
3. How to use Feedburner
UPDATE: for the impatient, here are
12 quick steps to take to use Feedburner for your blog; you can refer to this post as a reference guide.
This part 3 is an introductory guide, part review part practical tutorial, to the fab service
Feedburner, focusing mainly on
Blogger users but with info of interest to users of other blogging platforms too - with a basic intro to Feedburner, an overview of its services and howtos and tips on using Feedburner and getting the most out of it. (In
part 1 of this introductory feeds basics 101 series I covered the basics about feeds, and in
part 2 how to activate and publicise (in a basic way) your blog feed. I know this part 3 is rather behind!)
This part 3 blog post is mainly aimed at those who already know what feeds are, e.g. through reading
parts 1 and
2 (although I do include a summary below).
What's Feedburner?
Feedburner is a superb service for doing all sorts of clever things with feeds, particularly tracking
statistics - notably, the
number of people who "subscribe" to your blog. That all sounds a bit vague but bear with me, you'll see what I mean later.
Most of Feedburner's services are currently free, and they've been
owned since mid-2007 by
Google, who have made even more Feedburner features free. (Full disclosure: they
asked me to become a Feedburner Community Expert (unpaid volunteer in their
Feedburner help group) a couple of months ago, but I drafted most of this post well before then, as I've been a Feedburner fan ever since I learned about their service.)
My personal view is, if you have a feed, you really should use Feedburner - it just keeps on getting better and better, rolling out more and more features and enhancements, and they were doing that even before the Google acquisition. I've not heard of any similar service that competes with it, but frankly even if there was one I'd still stick with Feedburner, myself.
Recap / summary on feeds generally
Just to recap on web feeds generally (particularly for readers who haven't read parts
1 and
2).
You decide you want to
"syndicate" your blog or news site - i.e. to publish your blog posts or stories / articles in such a way that people won't have to keep visiting your blog or site to check for updates, but can just
"subscribe" to your site's
news feed or
web feed.
That way, your content is "fed" to them (along with updates from any other blogs and news sites they subscribe to), so that they can view all the new content from all the sources they've subscribed to, pretty much as it comes out, but from one single place that's convenient for the user - whether that's their
newsfeed reader or
"feed aggregator" software on their computer, or alternatively a Website which specialises in collecting feeds from different blogs and news sites and pulling them together into one Webpage that they can read online. People can even offer feeds by email. (Feeds can be opened in browsers too, and in most modern browsers will display fine, but trying to go to a feed URL in earlier browsers produces a bunch of code which might cause a bit of a shock to the system.)
All this is possible by using a standard format known as RSS (hence the term
"RSS feeds"). Another commonly used standard for newsfeeds is
Atom, but it doesn't seem as well known to the general populace, and in fact "RSS feed" is often used to mean "newsfeed" generally.
To produce a feed, you need to set things up with your
blogging software (such as
WordPress or
Blogger) so that whenever you publish a new post, your blogging software will update your feed
according to how you've set it up on your blogging platform - i.e. it automatically creates a
separate version of your changed main blog page as a
separate feed file, but reformatted into the appropriate form for feeds such as
Atom or
RSS (or both, in the case of Blogger and other blogging platforms which produce more than one feed file behind the scenes).
That feed could contain your latest 5 posts, your latest 10 posts etc; and it could contain the
full text of your posts, or just a
summary - it depends on how you've set the syndication feed up behind the scenes with your blogging software (with
Blogger, it's the Settings, Site Feed bit of the Dashboard; with
WordPress, go to Settings on the right, then the Reading sub-tab).
Now if you're happy to stick with the basic feed that's produced natively by your blogging platform, all you need to do is to switch on or enable your feed, tweak its basic settings, and publicise its Web address or URL (which I covered in more detail in
part 2 ).
But if you want your feed to be more useful and user-friendly both for you and your subscribers, you really should consider using Feedburner. Those who've signed up for the free
Google Webmaster Central service for
webmasters can get through it figures for who's subscribed to their feed via Google services like
Google Reader and the
personalised Google homepage iGoogle; but if you want stats for subscribers who use
other feedreader services like
Bloglines or
Newsgator, Feedburner is the best way to get the subscriber numbers all in one place. And it has other uses too, as I'll come to.
Why use Feedburner?
In terms of pros and cons, there are tons of benefits and advantages you can get from using Feedburner, and no disadvantages that I can see, given that it's free. In my experience their staff have always been amazingly smart, knowledgeable, friendly, funny and helpful, unlike some other Web 2.0 services I could name, but politely won't - I sure hope getting together with Google won't change them (I love their sense of humour, you can see it on their various website pages and even on your account pages when you log in). [Note: I drafted that paragraph before I was asked to become a Feedburner Community Expert, and no I hadn't shown it to anyone!]
As I said before, to me it's a total no brainer. Feedburner give their own
overview plus specific reasons why
bloggers,
podcasters and
commercial publishers should use their service. For instance Feedburner offers a feature called "SmartFeed" which provides your feed in whatever format, RSS or Atom, a user's feed reader can handle.
In my view, the key advantages of Feedburner are these:
- traffic analysis / analytics for your feed - feed subscriber and usage statistics / metrics; you can even use Feedburner to track visitors to your blog or site, not just your feed, and get some useful info on most popular / top pages. etc
- user-friendliness through browser-friendliness and reader-friendliness
- providing email subscriptions to your blog - which are also included in your statistics
- publicising your blog - loads of tools to help here
- Feedflare to enhance your feed and blog both (I'll explain later)
- future possibility of making money through ads in your Feedburner feeds.
Browser-friendliness
As mentioned in
part 1, given the way that feed icons / links are commonly shown on Webpages, if a visitor is not familiar with feeds (which will be most non-techies), then they're liable to leftclick on the link, which opens up the feed in their browser - and in many browsers feed files will just look like gobbledygook, which some may find confusing, scary or just annoying.
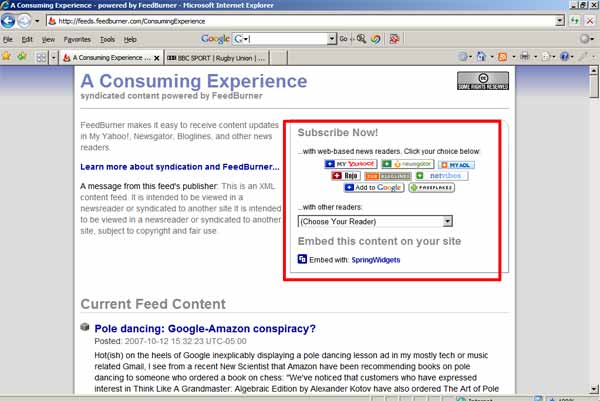
Feedburner feeds have a feature called "Browser-friendly", which means that if a user opens the feed link in their browser (even old browsers), it provides a much nicer view, almost like a normal webpage, and it furthermore offers the user the chance to easily subscribe to the feed via the main popular feed readers or aggregators like
Newsgator,
My Yahoo,
iGoogle homepage or
Google Reader etc (see the section outlined in red in the pic below, which Feedburner adds to the view of your feed in a browser).
Stats - how to track users who download your feed
Most bloggers like looking at their statistics. Many have hit counters to see how many visitors they've had and where they came from, etc (I use
Statcounter, and also
Google Analytics). So, for fans of web analytics, Feedburner is essential as most blogging platforms don't provide a built-in way to track hits to their native feeds.
A
hit counter, which you can add to your blog, will tot up visits to your blog web
pages (including individual post or item pages if it's been set up that way). But it won't track how many people have downloaded your
feed, or how many have clicked on items in your feed to go to the original post's web page. Feedburner will keep count of hits to your feed,
as long as the user has accessed your feed via a Feedburner feed URL (instead of the native feed URL).
So, when you login to Feedburner you can see how many people have subscribed to your Feedburner feed (the figure can vary a lot as it goes by the
number of times feed readers have fetched your feed, not the absolute number of people who've
added your feed to their reader), and even what particular items they've clicked on, etc.
If people subscribe
direct to your blog's
native feed (e.g. in Blogger the http://yoururl/atom.xml or http://yoururl.com/feeds/posts/default feed URL), you didn't use to be able to track that, so you had no way of knowing how many
direct subscribers you had. However, if you use Blogger, by
redirecting your native Blogger feed to Feedburner
as mentioned in part 2, you can now track
all your subscribers - even those who try to subscribe to the direct atom.xml etc address will be redirected to your Feedburner feed. (With other blogging platforms, I'm not sure how you can track users who subscribe to your blog's native feed direct rather than your Feedburner feed.)
Also, if you wish you can use Feedburner to track visitors to your underlying blog or website, not just number of feed subscribers.
Offer your readers e-mail subscriptions
With Feedburner, you can even allow people to get email subscriptions to your feed, i.e. to receive your new posts by ordinary email, if you wish - with a choice of email subs via
Feedblitz (see
my posts on Feedblitz), or
via Feedburner themselves, or
Rmail - and Feedburner will track those subs too. Feedblitz is currently more powerful e.g. sending subscribers emails only weekly instead of daily, if you prefer.
More flexibility to allow users to consume their media in whatever way
they choose is always a good thing, in my book. And in fact this very blog has a few subscribers who subscribe to its feed via email (about 8% subscribe via Feedblitz).
Gimme Feedburner - how do you get a Feedburner feed, i.e. burn your feed, anyway?
To use Feedburner you "burn" your feed. This involves giving Feedburner your feed URL, and they will then take your original feed and produce a new special Feedburner feed out of it, with its own unique web address or URL.
Your original source feed still exists and is left untouched. In other words:
- Your "burn" your feed by giving Feedburner your feed URL (if you don't know your feed URL it may be able to figure it out from your blog URL).
- It then takes your feed and transforms it into a different, more useful kind of feed, a special Feedburner feed with a different unique URL of its own (http://feeds.feedburner.com/somethingorother-uniquetoyou), which is served out of Feedburner's own servers.
- You then note down your Feedburner feed URL and make use of the URL in various ways e.g. publicise it on your blog.
To repeat, you should thereafter, if you want to get the benefits of Feedburner, just give out as your feed URL the URL of your
burned Feedburner feed (which will be something like http://feeds.feedburner.com/YOURBLOGNAME),
instead of the URL of your basic Blogger or other blog feed. If you have a Blogger blog you can get it to automatically redirect to your Feedburner feed as mentioned above.
I repeat,
your original blog feed still exists, and is still necessary, as it's what the Feedburner feed is based on - they just convert it to a new whizzy (separate) feed which you can then deploy. So you
mustn't turn off the outputting of your blog's native feed, unless of course you deliberately want to for privacy etc reasons. In which case you probably won't be wanting to burn a Feedburner feed anyway.
How to burn your feed - step by step
If you prefer videos
watch the official Feedburner video (a little out of date now as they've added to their features, but basically still good) for a howto on burning your feed, but it's really very straightforward.
Here's a step by step:
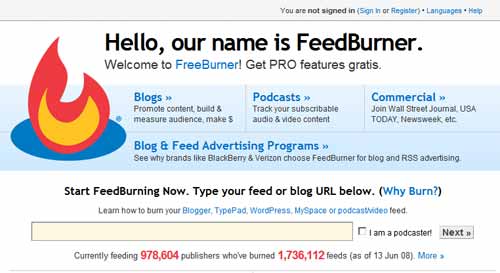
- On the Feedburner front page, enter your feed URL or, if you don't know it, blog or site URL in the box (how to find out your feed URL for MySpace, note: for self-hosted WordPress blogs it's best to just use the FeedSmith plugin) - you can leave out the "http://":
- Then, making sure "I am a podcaster" is not ticked (unless of course you are a podcaster), hit Next. (If you want to podcast your feed, see this introduction to podcasting).
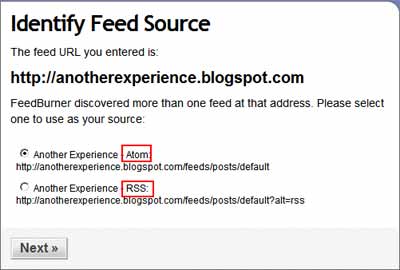
- Feedburner will "auto-discover" your feed, and give you a choice of feeds based on your blog's auto-discovery settings - some blogging software like Blogger and WordPress will produce both Atom and RSS versions (outlined in red below).
If it's available pick Atom, then hit Next (but don't worry if RSS is the only option):
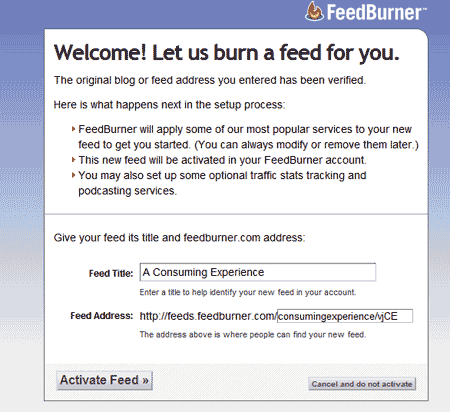
- You'll see something like this:
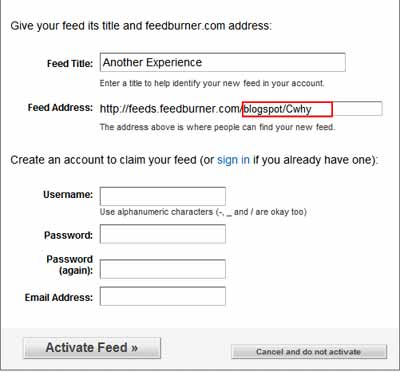
Feed address: if you don't like their suggested feed address, you can change the ending of the Feedburner feed address, the bit that's in the text box outlined in red above (blogspot/CWhy in the pic above) to a name of your own choice - if it's not already taken. For instance, my main Feedburner feed is at http://feeds.feedburner.com/ConsumingExperience. (I also have other feeds, at http://feeds.feedburner.com/ConsumingExperienceFull for my full feed, for instance). You can even change the ending via Edit Feed Details after you're logged in in future, though I wouldn't recommend it once you've had subscribers who are using the original feed URL.
Create an account: self-explanatory, if you're new to Feedburner you have to create an account with them to access your stats etc later.
Then click "Activate Feed", and that's it.
The feed URL they've given or you've chosen, http://feeds.feedburner.com/WHATEVER, is now the address or URL of your crisply burned new Feedburner feed, and as mentioned above you can redirect Blogger to that feed address (and should, if you're using Blogger), add the Feedburner URL link to your sidebar, etc etc, as you wish. So make a note of that feed URL.
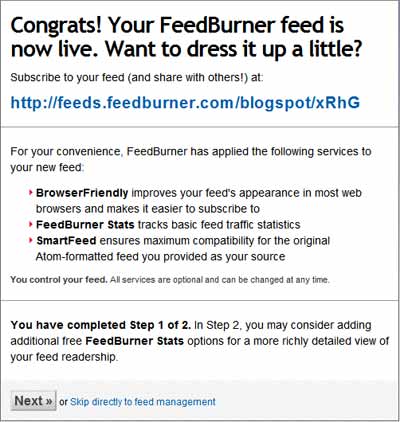
- Now you'll see something like this, just read it and click Next:
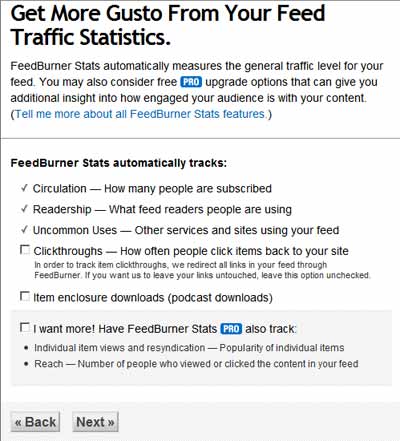
- You may as well click Next and then tick all the boxes shown below (clickthroughs for stats, item enclosure downloads for podcast downloads, and Feedburner Stats Pro, currently - Feedburner Pro is now mostly free thanks to Google, so you've nothing to lose):
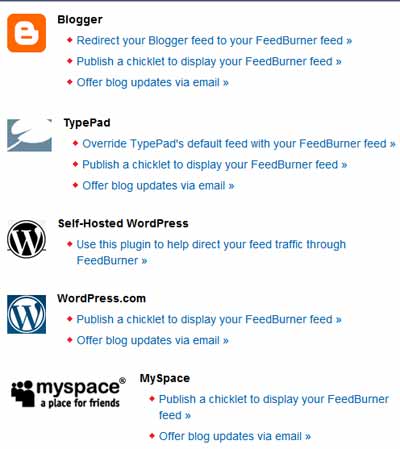
- Then click Next, and you'll see lots of helpful options from Feedburner to help you redirect your blog feed to your new Feedburner feed, add a chicklet to your blog sidebar and offer blog updates via email - not just for Blogger but also for users of TypePad, WordPress, and MySpace; click the suggestions for your own blogging software and try 'em out (particularly redirection and offering email updates):
- If you've already got a Feedburner account, you can login and burn a new feed via your My Feeds page using the box at the bottom of your list of feeds. Whatever you prefer, really. Obviously, in that case it won't ask you to create a Feedburner account:
What next? How to set up Feedburner options
There are many settings relating to what useful things Feedburner can do for you, grouped under the Analyze, Optimize, Publicize etc tabs.
One could write a whole book just on the many and varied possible uses of Feedburner feeds (and I would if someone were to want to commission one, ahem!), but I'll just touch on a few key features here and make some initial suggestions to get you started, if you have no particular preferences (you can always change them later, and should, to whatever suits your own situation best).
So, login to Feedburner, and in My Feeds click the name of the feed you want to tinker with.
Check out the various options and tabs. They include ways to publicise and optimise your feed, and maybe even make money from it too.

I'll walk you through the tabs now.
Analyze tab - statistics
This is the section where you can see how many (though not which) people subscribe to your Feedburner feed, and what readers they use, etc. The stats are pretty self-explanatory and comprehensive. You can find more detailed
help on the Analyze tab. Some tips:
Feedburner Stats Pro - first thing, under Services, bottom left, you should go to Feedburner Stats Pro and
tick all the empty boxes (if you tick "Exclude visits from this computer" too, then your own visits to your own site won't be counted as hits, which will provide you with more accurate statistics should you choose to use that Feedburner tracking service). That'll get Feedburner to track more things, which again are self-explanatory.
Now back to the top of the Analyze tab page.
Feed stats show subscribers, views and click throughs from your feed, both total and for individual posts. You can see info on your subscribers - numbers and what feed readers or aggregators they use, including email subs, or browsers, and even which search engines' bots have fetched your feed. Note that the
"Subscribers" stats are for the
number of times that particular Feedburner feed has been checked or fetched by readers/aggregators within the last day, 7 days or other period you select from the dropdown - it's
not the same as exactly how many humans have subscribed to your blog, though it should give you a good idea of that number as it's based on the number of times your feed's been requested in a 24-hour period
"Live hits" show what time and where your last 25
"live hits" i.e. hits to your feed were, feed readers used (user agent), and countries of origin - i.e. when someone loads your feed into their reader or browser or a bot requests your feed.
"Item use" is info on which were the most popular items viewed by your subscribers and the number of click throughs on them.
Site stats are available free, as well as feed stats (see the
Feedburner site stats overview and FAQ). If you activate site stats (as explained below), Feedburner will give you helpful statistics on the visits to the most popular individual post or item
webpages on your blog or site, not just your
feed (with trends e.g. up 10% or down 3% etc) as well as overall figures on visits and page views. It also shows you the top 20 incoming traffic sources i.e. where visitors to your blog came from (plus top search engine sources, top search terms as well as top
referring domains linking to your site), and even top 10 outgoing links clicked and how many clicks each had. There's also info on visitors like numbers, browsers used, top cities they came from, even top languages, operating systems and screen resolutions, all presented in a very user-friendly way.
And you can of course have site stats from Feedburner
in addition to your normal blog traffic hit counters or trackers if you wish. So it's up to you whether you want to use Feedburner site stats, or alternative
web analytics services provided by e.g.
Google Analytics (which is to be
integrated properly with Blogger soon - Google
had acquired Measure Map in 2006), or
Statcounter, etc.
To activate site stats, scroll to the bottom of the Analyze tab - it's in the Feedburner Stats PRO section (which you'll have activated if you followed my suggestions earlier after burning your feed), tick the boxes if you haven't already and get the code to paste in your blog template following the instructions for your blogging software. If you already have FeedFlare (covered below), just make sure that the "For my site, track" box for Visitors etc is ticked and Save, as the
FeedFlare code will do double duty so you don't need to add any extra code to your blog.
I'll come to
Headline Animator later.
Optimize tab
You can get detailed
help on the Optimize tab. Here are the key points.
- Make sure BrowserFriendly is ticked (it should be anyway), otherwise people who try to open your feed URL in some browsers will get a horrid scary offputting screen. Click it and check the options, make sure all Appearance Options are ticked. Click "More subscription options" and tick the boxes there if you want to allow your visitors to subscribe via more services than the standard ones already ticked. I won't go into Content options here, you can just leave it as the default. Don't forget to Save!
- SmartCast is just for podcasters, ignore it if you're not podcasting (intro to podcasting); similarly Tickerize is for financial feeds/podcasts.
- SmartFeed - make sure this is ticked and active. As mentioned above that makes your feed work with all kinds of readers. It doesn't matter whether your blogging platform produces your feed in RSS or Atom format - with SmartFeed turned on, Feedburner cleverly generates a feed in whatever format the reader prefers, so you don't need to worry about any standards wars, just have a single Feedburner feed and that's it. But don't touch Convert Format Burner unless you know what it's for and it's deliberate!
- FeedFlare - I'll cover this later.
- Link Splicer, Photo Splicer and Geotag are self-explanatory, and optional - you can automatically add your latest del.icio.us or other social bookmarking links or your photos from Flickr, Buzznet or Webshots to your feeds, even if they're not added to your blog's Webpages. Just remember to click Activate when done.
- Feed Image Burner - self-explanatory, you can add your own pic or logo to your feed (see mine, top right when you click this ACE feed link). By default that pic will be the Feedburner logo, unless you choose your own custom image URL (upload your own pic to a free file hosting service like Fileden, then enter the resulting link to the uploaded file in Feed Image Burner). One gotcha - if you choose Creative Commons (see later), and an image like the Feedburner logo or your own image, the latter will override and you won't see a CC image in your feed. There can be only one. (Image in your feed, that is. Sorry, Highlander reference!)
- Title/Description Burner - again self-explanatory, to make your feed title etc more descriptive if your native source feed isn't good enough - check it out to see the options.
- Convert Format Burner - usually leave this to the default.
- Summary Burner - remember, your blogging platform puts out a feed, and you then give that feed URL to Feedburner to process it further. If you use the summary burner, Feedburner takes your original blog feed and then cuts it down according to your settings, so that those subscribing to your Feedburner feed URL will only get the cut down version. I've previously discussed in more detail how to use summary burner. You could also set your feed to output only a summary at the source feed end (with WordPress it's in the Settings, Reading tab), but of course that means that Feedburner will never get the full feed to work with. If you want to have only one feed, my personal view is that a full feed (not summary) is best, but it's your choice.
- Event Feed - leave this alone! When this feature was first introduced, I thought that if you activated it and then added events from upcoming.org etc to your blog, this option would add those events to your feed too. Not so - if you try that even as a test, you may get an empty feed. This option is for use only when you burn a feed that's from a special, calendar or events-type site, not for a "normal" site like a blog. However, as Feedburner suggest, you can use this to burn an event feed, then use BuzzBoost (see later) to get code to paste in your site in order to display the events in date order on your blog.
- Amazon ID Burner is also self-explanatory, useful if you're an Amazon Associate and want to make money from your feed.
Publicize tab - promoting your feed
I strongly recommend that you check out the options here carefully. You can get more
help on the Publicize tab. Just a few pointers:
- BuzzBoost - this lets people display snippets from your Feedburner feed on a Web page, and is mostly self-explanatory (see the Buzzboost overview). Set your options, then Activate to get some Javascript code you can paste in your blog template or any website in order to display your feed on your blog or that website. It's a bit recursive if you paste it into the same blog whose feed you've just burned, of course, but the main point is that you can use the code in other blogs or sites to help publicise your blog, e.g. if you have more than one blog you could show the feeds from blog A in the sidebar of blog B.
You can customise BuzzBoost too, in terms of number of posts to display etc, and also customise how the Webpage snippet looks through CSS styling.
- SpringWidgets - very cool, but a bit fiddly as you have to make a logo for your widget of exactly the right size etc, and I'm hopeless at image twiddling myself, cropping is my limit! I had a play with SpringWidgets when they first came out a year or so ago. I even had one in my sidebar for a while but removed it for some reason.
I never got round to blogging about SpringWidgets at the time, but basically you can make a free widget to display your blog content via your feed, a bit like BuzzBoost. What's unique about SpringWidgets is that people can very easily grab that widget to display your content on their computer desktop or on MySpace, message boards, their own website or blog, just by clicking the  icon.
icon.
If you want a SpringWidget for your own blog I suggest you use SpringWidgets' own widget maker - it's a lot easier to configure, e.g. if you only have a narrow sidebar you can change the size there and then, etc (that's what they mean by "widget embed size") - it's not often I say something's easier than Feedburner, but this is! Anyway here's one I just whipped up for this blog so you can see what it looks like:
- Email subscriptions - activate this to offer your readers the ability to subscribe to your posts by email, i.e. they'll receive email updates with the text of your posts in them (whether full posts or excerpts only etc will depend on your Summary Burner settings, mentioned above). You'll get some code to paste into your blog or site's template, e.g. in the sidebar (see mine), where someone can fill in their email address to subscribe - it's even easier to add the subscription form to TypePad or Blogger. Here's how to add the email subscription form for MySpace and WordPress (note: if you don't see Presentation - Widgets, try Design, Widgets, add a Text widget, Edit it, put the code in the bigger box and you can add a title like "Subscribe to feed" in the upper box) - see WordPress.com's own write-up.
At present you can provide email subscriptions via 3 services: Feedblitz, Feedburner's own email subscription system or, though I've not tried that, Rmail. Feedblitz probably offers the most power and flexibility currently (see my early Feedblitz write-up) - e.g. with Feedburner's own system you can only get emails sent to your subscribers once a day within a delivery window you select; with Feedblitz you can have weekly delivery, etc, but you'd need to sign up for a separate account with Feedblitz. I won't go into the details here, they're mostly intuitive, but obviously if you use Feedburner the options will be in Feedburner, whereas if you use Feedblitz you'll have to login to Feedblitz to tweak your settings (see the Feedblitz FAQs). I use Feedblitz for ACE.
- Pingshot - tells various feed/web services when your feed is updated so they can index your updated content. I'd tick everything (notably Ping-O-Matic, which itself pings lots of other services including Newsgator, and Google Blog Search - much better than manually pinging BlogSearch!). You're allowed to add 5 more services to ping, so make full use of that and Add them before saving/activating - no point adding those which PingOMatic already pings, in my view, so probably not Icerocket, BlogDigger, Syndic8, Moreover, but if you want to why not ping Weblogs.com direct for luck (though Blogger does that already), and I'd add Alexa, Snap and Tailrank too, but it's up to you.
- Feedcount - get a graphic to show off your Feedburner feed's current subscriber circulation (regularly updated) by pasting the code provided into your blog template (or directly installing the widget if you use Movable Type or New Blogger - just select from the dropdown). I don't have one because I offer several feeds (full, excerpts and headlines only, see below) and it's not possible to merge their stats into one number yet, so the figures may be confusing.
- Chicklet Chooser - this is absolutely vital, in my view. Here, you can get code for an icon (chicklet) to add to your blog (usually the sidebar) which visitors to your blog can click in order to subscribe to your blog's Feedburner feed. I suggest you click one of the top two orange squares (I prefer the second, personally - more subtle). You could pick one of the custom icons but that narrows subscribers down to only the service picked (e.g. Google or Yahoo); or you can choose plain text if you prefer that to an icon (bottom option).
Once you've picked the look, copy and paste the code given into your template or, if you use Movable Type or New Blogger, you can install the widget direct to your blog. Here's how to add chicklet for TypePad, add a chicklet to WordPress (note: if you don't see Presentation - Widgets, try Design, Widgets, add a Text widget, Edit it, put the code in the bigger box and you can add a title like "Subscribe to feed" in the upper box), or add a chicklet to MySpace.
Tip: no reason why you can't have both the orange square icon and a My Yahoo button or whatever. Just click the one you want, get the code for it, and paste it in your template. Then click the other one, get the code for it, and add it elsewhere in your template.
- Awareness API - ignore this unless you're a developer in which case you don't need to read this post!
- Creative Commons - I won't go into CC here. Even if you want to use a Creative Commons licence for your feed (I do on mine), note that if you use the Feedburner icon (or your own Feed image burner icon) it will overwrite the CC icon, so it may be pointless ticking "Use the "Some Rights Reserved" image as my feed's logo".
- Password Protector - if you want to be exclusive and only let select people subscribe to your Feedburner feed, activate this and enter a username/password combo (again there's only one combo). Give the combo to select few, so they can use it to view your feed. No one should be able to see your Feedburner feed without that info.
But remember, Feedburner processes the original feed from your blog or site. If a nosy parker can work out the URL of your blog's native feed, they can read that source feed anyway (unless you've password protected the original source feed, or protected specific posts, or you've redirected the source feed to the Feedburner URL) - it's only the Feedburner feed they won't be able to read. So a Feedburner password will only work if you're not using a well known blogging platform like Blogger or WordPress.com where the base feed URL can easily be guessed from the blog URL (e.g. for a Blogspot blog it'll just be http://blogurl.blogspot.com/feeds/posts/default) - or, if you're using Blogger etc, unless you keep even the blog URL secret except from the select few. (If you turned off the native source feed altogether that won't help as Feedburner wouldn't then be able to produce anything - nothing in nothing out.)
- NoIndex - if you want your feed to be private, activate this so that it won't get indexed by the search engines (the Feedburner feed won't then, anyway - you still have to make sure your source feed isn't indexed). You probably also want to tick the box that stops the Feedburner feed from being used with Yahoo Pipes. (If you don't know what Yahoo Pipes are and want to keep your feed private, best tick it and activate.)
Monetize tab - make money with ads
Just to clarify, Feedburner lets you add ads in two ways:
- to your feed, and
- on your blog's website.
Ads in your feed have been via the
Feedburner Ad Network (
the FAN) - see Google
help on FAN and
FAQs. They've only let a limited number of publishers join FAN. But feed ads will
soon be available via
Google's Adsense (which any blogger can
sign up for, with your
Google Account if you already have one).
Ads on your blog via Feedburner are AdSense ads displayed using Feedflare (covered below). If you're already using AdSense direct on Blogger (or even if you aren't), I suggest that's the easiest way, rather than using Feedflare. For non-Blogger bloggers, you might want to consider using Feedflare Adsense ads. Remember, this displays ads on your blog webpages using Feedflare, it does
not show any ads in your feed.
See the
official help on the Monetize tab.
Troubleshootize tab
Again I'm not going into this, let's hope you won't need to use it!
FeedFlare (in Optimise tab)
FeedFlare deserves a section of its own. This is a very clever tool, and it has multiple uses.
Bloggers often enhance their blog with social media links e.g. via
AddThis, to encourage readers to tag posts or share posts on social bookmarking sites and the like (such as Facebook, Del.icio.us, Digg) and thus increase visitors, or links to enable users to forward a post by email to a friend. But those links show only on the blog webpages, to people who visit your blog site on the Web.
Feed subscribers don't get them because they only get your feed, they don't need to visit your blog pages via the Web.
With FeedFlare, you can enhance your
feed similarly by adding clickable links of that kind to your feed (they'll appear at the end of each post in your feed). As Feedburner put it in the
FeedFlare overview & FAQ, "FeedFlare changes the dynamic of how users interact with an RSS feed. Rather than just read content from your
[Feedburner] feed, subscribers can now take direct actions, such as being able to forward or save an item
[or even post a comment or read the comments, for Blogger and self-hosted WordPress blogs]. With a few clicks, publishers can include a whole slew of services. And FeedBurner's open API allows any Web service to create links that publishers can attach to their feeds, making this a fully extensible and customizable solution."
Activating FeedFlare. To use FeedFlare, just go to the FeedFlare section of Optimize, tick the items you want for your feed under the "Feed" column and Activate at the bottom. Each item if you click it has a brief explanation of what it's for. I'd recommend as a minimum ticking Email This, Comments Count, Save to del.icio.us, Digg This! Share on Facebook and Stumble It! but it's up to you. (
Tip for Blogger users: do
not add the
"Email The Author" Feedflare, as Blogger haven't got that working properly and the email will only go into a black hole at Blogger.com rather than going to you. There's a
workaround (scroll to the end) but it's really not very satisfactory as it'll display your email address in places you may not want it shown, in place of your name. I hope the Feedburner team will liaise with Team Blogger to sort this out - add a field to the Blogger profile where you can insert your email address for this purpose, ideally.)
Adding other FeedFlares. See the "Personal FeedFlare" section? This lets you add extra FeedFlares created by users outside of Feedburner. Just paste the URL of the FeedFlare in the box and click Add New Flare. I've added ones for Slashdot, Reddit and Twitter for instance (not that ACE has ever been Slashdotted, but that link can't hurt!).
How do you get the URLs of the extra FeedFlares you want to add? You can
write your own, if you're a coder, or check out the FeedFlares in the
Feedburner FeedFlare catalog or
“101 FeedFlare Ideas”.
Changing the order. You can change the order of the FeedFlare items you add, whether provided by Feedburner or others - scroll towards the end of the FeedFlare page, and just move the items around with your mouse to the desired locations.
FeedFlare for your blog. You can also use FeedFlare to enhance your
site, i.e. the webpages of your blog, not just your feed.
That's what the "Site" column on the FeedFlare page is for. If you want a social bookmarking link or "Save to delicious" link to show up on your blog
webpages (not just your feed), tick the appropriate item here before saving and activating. So for many of these links, FeedFlare is a viable alternative to adding the code for the links manually (e.g. the
Delicious Tagometer) or using something like
AddThis. I don't have the Save to del.icio.us FeedFlare ticked in the Site myself column, because I already have the Tagometer - but I do tick it under Feed. Similarly I don't need to tick the Email This or Comments Count under Site as I've already got those in my Blogger blog, but if you don't you might want to.
One more step to get the FeedFlare items to show up on your blog webpages - get the FeedFlare HTML code and add it to your template. Scroll to the end of the FeedFlare page and pick your blogging software (Blogger, TypePad, Movable Type, WordPress or other) to get step by step instructions on how to add the code to your blog template.
In addition, if you add the Feed Flare code to your site, then as mentioned under Site stats above it does double duty by also tracking visitors to your blog's webpages (not just the feed).
The only disadvantage I can see for FeedFlare (compared with say AddThis) is that the social bookmarking etc links shown on your webpages are text-only links, not eye-catching icons. It would be nice if they made them clickable graphics but I suspect that'll be further down the line.
Promoting and publicizing your feed - autodiscovery etc
You'll see some of the options above involve tweaking your blog template or installing widgets in order to provide your new Feedburner feed URL to your subscribers via a chicklet, grabbing Headline Animator for use in your email signature, forum signature etc. All good stuff for publicity, so make use of them.
You should also
redirect your blog's native feed to your Feedburner feed's URL, if you can
(more info on redirection). Here's
how to redirect Blogger feeds. There are specific instructions for various other platforms on how to
redirect your feed to your Feedburner feed's URL in the
Feedburner help:
TypePad redirection, and
self-hosted WordPress feed redirection - sorry, feed redirection doesn't seem currently possible with WordPress.com or MySpace.
Another important thing to do with your blog is to tweak the
auto-discovery settings (more on how to
tweak auto-discovery).
What about submitting your feed to search engines and feed aggregators? Well, I think activating and making full use of PingShot is enough, myself. See my previous post on
how to publicise your feed generally. There are also other things you can try like
turning your feed into a Google Gadget and submitting
your feed to iGoogle (the Feedburner Browserfriendly service has the option to add to Google, but you could also add the Add to Google button to your blog sidebar if you want to, see Chicklets above).
Monitoring your Feed burner feed
If you want to keep an eye on your Feedburner feed and have Feedburner notify you of any problems, you can sign up for
FeedBulletin via the My Account page once you've logged in to Feedburner.
You can get that info by email, or by private feed (which you can even password protect if you wish) - if you choose the feed and want to keep it private, see these
suggestions for keeping Feed Bulletin private.
Want more than one Feedburner feed? and feed risks
Now here's a tip. As you'll have figured from what I said above,
you can in fact have more than one Feedburner feed for the same blog or site, as many as you like really (I assume there's a limit but I've not hit it yet!).
Just go through the whole process of burning your feed again, entering the URL of your native blog feed (e.g. http://www.consumingexperience.com/atom.xml or http://www.consumingexperience.com/feeds/posts/default?alt=atom in the case of ACE) - and note down the new Feedburner feed URL that's produced, or change its ending to any one you want that's not already taken.
Then you can use the different feed URLs for different purposes, tweaking Feedburner settings separately for
each feed as you wish. That's how I'm able to provide subscribers to ACE's feed with a choice of feeds (here's
how to offer subscribers their choice of full feed or partial feed (titles/excerpts only) - or even headlines only, as they prefer).
It's even been known for people to burn feeds from blogs or sites other than their own, in order to tweak the resulting feed in a way that better suits them. I'm not commenting on the legalities or moralities of that, just be aware than once you put out a feed, others can make use of it. Others can
scrape your blog too, but it's certainly easier for them to copy your content wholesale if you put out a feed. (This is nothing to do with Feedburner - if you activate your feed, then you bear that risk whether or not you choose to burn your feed through Feedburner.) Personally I think it's worth offering a feed despite the risks, but it's up to you.
More info, help and support
Feedburner have useful
help pages for almost everything, plus
support forums (Google Group). I'm usually there for a while on Sundays, though it seems to be every 2 or 3 weeks at the moment.
The help on the Feedburner forums, from both Feedburner staff and ordinary users, was certainly invaluable when I were a mere baby blogger trying to to find my way in the weird world of Web 2.0 (thanks to all the
Feedburner team!).
See also Google's
tips for feed publishers.
And for more basic info on feeds generally, see
part 1 of my introductory feeds basics 101 series where I covered the basics about feeds, and
part 2 how to activate and publicise (in a basic way) your blog feed, and my
intro to podcasting.
Tags:
Feedburner, BuzzBoost, FeedFlare, Headline Animator, SpringWidgets, feed, feeds, newsfeed, newsfeeds, RSS feeds, RSS, Atom, feed analytics, web analytics, statistics, metrics, full feeds, partial feeds, email, chicklets, feed chicklets, feed icons, auto-discovery, auto discovery, autodiscovery, feed autodiscovery, Blogger.com, Blogspot, blog, blogs, browsers, blogging, blogging tools, tips, tricks, guide, basics, practical, howto, howtos, publicity, promotion, Improbulus, A Consuming Experience


