Pages

Sunday 31 December 2006

Google blogs: read together, search all Google blogs


UPDATED 28 Oct 2007 to add in recently-started Google blogs, and feeds and searches specific to Google developers' blogs only.

The Google blog mention of the nearly 40 corporate blogs (update: 60 now I think!) they now publish prompted this post. Here's how to check them all out easily.

Google blogs - combined Webpage or combined newsfeed

If you want to keep up with all the many Google blogs, and read them together in a one place, you can use these links:

Searching Google blogs together

To search all the official Google blogs together, but only those blogs (plus official Google press releases), I used Google Custom Search Engine to whip up this search engine (do bookmark that page if you wish):

You can try that search engine live here (for all Google blogs):


or here (for English language Google blogs only):


UPDATE: or here (for English language Google developers' blogs only):


And add that search engine to your Google homepage by clicking this button if you wish:
  • For all Google blogs: Add Google Blogs search to your Google homepage(UPDATE: deleted as too time-consuming to maintain)
  • For English language Google blogs only: Add English language Google Blogs search to your Google homepage
  • UPDATE: For all Google developers' blogs only (English): Add English language Google developers' blogs search to your Google homepage
To add the Google blogs search box to your own blog or webpage, you can copy and paste this code in your template -

For all Google blogs and press releases:
<!-- Google CSE Search Box Begins -->
<form id="searchbox_005290489992497281250:cpu9dwfpkos" action="http://google.com/cse">
<input type="hidden" name="cx" value="005290489992497281250:cpu9dwfpkos" />
<input name="q" type="text" size="25" />
<input type="submit" name="sa" value="Search" />
<input type="hidden" name="cof" value="FORID:1" />
</form>
<script type="text/javascript" src="http://google.com/coop/cse/brand?form=searchbox_005290489992497281250%3Acpu9dwfpkos"></script>
<!-- Google CSE Search Box Ends -->


For English language Google blogs and press releases only:
<!-- Google CSE Search Box Begins -->
<form id="searchbox_005290489992497281250:vnjespye2jg" action="http://google.com/cse">
<input type="hidden" name="cx" value="005290489992497281250:vnjespye2jg" />
<input name="q" type="text" size="25" />
<input type="submit" name="sa" value="Search" />
<input type="hidden" name="cof" value="FORID:1" />
</form>
<script type="text/javascript" src="http://google.com/coop/cse/brand?form=searchbox_005290489992497281250%3Avnjespye2jg"></script>
<!-- Google CSE Search Box Ends -->

UPDATE For all Google developers' blogs only (English):

<!-- Google CSE Search Box Begins  -->
<form action="http://www.google.com/cse" id="searchbox_005290489992497281250:goo2kq1t-ie">
<input type="hidden" name="cx" value="005290489992497281250:goo2kq1t-ie" />
<input type="text" name="q" size="25" />
<input type="submit" name="sa" value="Search" />
</form>
<script type="text/javascript" src="http://www.google.com/coop/cse/brand?form=searchbox_005290489992497281250%3Agoo2kq1t-ie"></script>
<!-- Google CSE Search Box Ends -->


(I'd seen something similar before on searching for it, as it's a bit of a business reading all those separate blogs - but it seems to be no more, hence this post.)

UPDATED 28 Oct 2007 to add in recently-started Google blogs, and feeds and searches specific to Google developers' blogs only.

New Blogger: page elements widgets code reference and tutorial


UPDATE: this post is a general intro to New Blogger's standard built-in page elements. To get some other free page elements widgets for your blog, see this post and this webpage. Also updated to add code for standard (non-optional) page elements, for ease of reference.

This is a reference guide about the standard Blogger page elements widgets available as at 31 Dec 2006 via the Page Elements sub-tab of the Template tab (headed Add and Arrange Page Elements)- mainly for myself, but I'm posting it in case it's of use to others, whether coders or non-techies, as a howto or tutorial introduction for the now feature complete fancy new Blogger, formerly known as Blogger Beta (overview and thoughts on new Blogger).

UPDATE: note - if you're interested in New Blogger template code and want more on converting your old classic Blogger blog to the new style templates, you may want to read this post on the mysterious new "expr:href" and new Blogger data tags.


Page elements can be added to a section of the blog (e.g. sidebar or footer) only if the showaddelement setting for that section in the expanded template is set to 'yes'. A 'yes' for a b:section's showaddelement makes an "Add a Page Element" link appear in that section in the Template Page Elements tab view. E.g. for the main blog section the default is <b:section class='main' id='main' showaddelement='no'>, so you can't add extra elements to that section via the Page Elements tab unless you change that to 'yes' in the expanded HTML template. (To get to the expanded template click Template, Edit HTML and tick Expand Widget Templates. The full HTML for the template is of course then shown in the Edit Template box.)

(Updated 1 Jan 2007) Note on the Header: even if showaddelement='yes' in the page header b:section (the b:section with id='header'), the "Add a Page Element" link won't display there unless you also either delete maxwidgets="1" in the header b:section, in which case there's no limit to the number of widgets you can add to that section, or else change that maxwidgets number to increase the maximum number of widgets you can have in that section to e.g. 2 or 3. (Thanks to Shelly!)

Where the "Add a Page Element" link displays, the available widgets list seems to be the same, i.e. it's not context-specific. (See further on the new Layouts system Blogger's Layout Guide to template page elements, Page Elements Tags for Layouts and Widget Tags for Layouts.)

On clicking the "Add a Page Element" link in a section (e.g. sidebar), a popup window offers different types of page element widgets that can be added to that section:

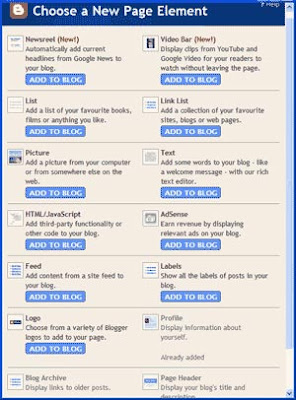
Currently the available types of standard new Blogger page elements or widgets are:
(Updated 29 April 2007 for completeness though they're included as standard):
  • Archive
  • Profile
  • Page header
  • Footer
(Profile, Blog Archive and Page Header are already added as standard in the Layouts view so they're greyed out from adding, but you can edit them - there's only one each allowed per blogof the page header widget, profile widget and (though this seems tweakable manually) archive widget; but more than one of the other widget types is possible, and Blogger will give them different ids automatically e.g. Text2, Text3, HTML2, Feed1, Feed2 etc).

How to add a Page Element

Click "Add to Blog" against a particular page element e.g. Picture to set its options and then add it to the section. New elements are added to the top e.g. of the sidebar, but can then be moved around by dragging with the mouse, including to another section e.g. from sidebar to footer.

Bug? Deliberate? (not in the known issues list as far as I can see): after clicking the Edit link for a Page Element, then clicking "Save changes" (whether or not you've edited anything), the Edit link against that page element disappears from the Page Elements tab view. You have to refresh or reload the page for the Edit link to come back for that particular page element.

Navbar oddity: to edit the navbar (colour selection only), there's an edit link against the navbar in the Page Elements tab, and currently Blogger's Page Elements Tags for Layouts help page includes, at the end of its list of the types of widgets you can specify, "Navbar" - which suggests that there is a navbar widget. But there's no widget code in the HTML of the template for the navbar (though there is navbar code in the final webpage HTML). Why? If Blogger were trying to stop people from hiding the navbar, it hasn't worked! Though it seems quite clear that you're not supposed to mess with the navbar if you publish to Blogspot as your blog host, as opposed to your own server.
(Aside on TOS: most of us are law abiding folk who will do what we're supposed to, as long as we're clear what it is. Blogger have strangely been notorious about not officially spelling out what it is they require of those of us who use Blogger in relation to the Blogger navbar/buttons, despite their users often being confused about this. If they said in their terms of service, clear and simple, "You must display the navbar and not hide it or else we reserve the right to delete your blog and stop you using our service", we would know where we were. As an A type who always wants, nay needs, to know where she stands, good or bad, I really wish Google would take the New Blogger opportunity to update the extremely out of date Blogger terms of service or TOS to make things like this crystal clear. Or that Blogger would spell it out in some other official way that it is OK to hide the navbar, if it is.)

Standard Blogger Page Elements widget code

Below is all the widget code for the current standard Blogger page elements, for ease of reference, with preliminary notes on options you can set when adding each page element widget. I always find that examples help in understanding stuff, and (now that people can share their own widgets so others can add third party widgets to their blog layouts with a few clicks without knowing any coding) in writing widgets - e.g. Kirk's Picasa pics display widget, to show pics you might have posted from Picasa. Non-techies may wish to ignore the code bits, but the descriptions of what the widgets do and what options are available may be of use.

As mentioned, the widget code seems to be standard for each type of widget - only the title you entered (I've called it yourtitle below) gets added to the opening widget tag.

Some notes on Page Element widgets

In the opening b:widget tag:
  • id - a combo of letters/numbers unique to that widget (no other id can be the same in the entire template) which Blogger creates and adds automatically.
  • locked - if 'false' means the widget/page element can be moved and deleted from the Page Elements tab view. If 'true', it can't.
  • title - the text you enter when adding the page element, which becomes the display label for the widget in the Page Elements tab and on the blog webpage itself, see further below. I refer to this as "YOURTITLE" in the widget code below.
  • type - self-explanatory and determines the type of widget e.g. LinkList for a list of links.
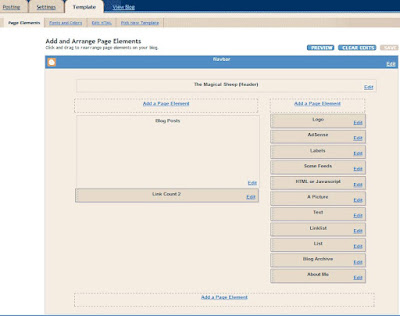
Title. For almost all the standard page elements a Title can be entered, and whatever title text is entered will be used as the label or display title of the added page element/widget in the Page Elements tab view (in the pic above I've entitled most of the added page elements in the sidebar with its type, but I've called the picture "A Picture" and the feed widget "Some Feeds" just to illustrate that you can use different text). The user-entered title text is shown in the widget code below as "yourtitle".

The title text is also displayed as the heading for the page element item on the final blog webpage.

But the title is the only bit of the info you can enter (or of the options you can choose when adding a Page Element) which will appear in the widget code for that page element, or which will even affect the widget code. All other options you pick for the page element or widget, e.g. max no. of list items to show, or how to sort list items, are saved by Blogger to their database behind the scenes, so you won't see them in your template widget code.

Notice that all these page element widgets have
<b:include name='quickedit'/>
as part of their code (within the includable bit). That's good stuff to put in widget code. It makes the widget easily editable from the Page Elements tab by inserting an "Edit" link that shows up in the bottom right hand corner of the page element, [added later:] and also makes it editable from your blog webpage (if you're logged in), via a quickedit icon at the bottom right of the widget. If you add that quickedit code to your own hand-crafted widgets, that'll make them more easily editable too (e.g. the Technorati Link Count widget I whipped up) - with thanks to Kirk for the tip, as usual.

Newsreel (UPDATED 1 April 2007)

Adds a "news bar" which constantly updates to show (usually in your sidebar) the results of Google News searches of your chosen search expressions (headlines and excerpts) - e.g. the default search term examples they provide are Apple, Google, Microsoft. Basically it's what you'd get if you searched direct for the same term (e.g. Apple) on Google News, but displayed on your blog, with the results continually updated. See this post for a pic of what the results might look like on your blog.


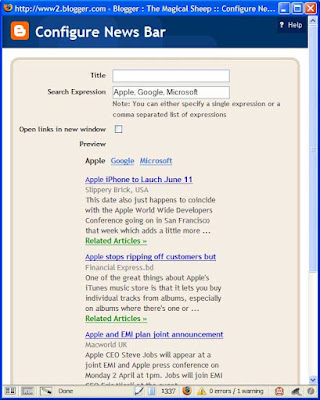
The user can click on a search term which is an underlined link (by default Apple, Google or Microsoft) to see the results of that particular search. At the moment it shows just 4 results, there seems no way to configure how many results you want it to display.

Options you can set: Title (e.g. My News Searches); your own search expressions (comma separated for multiple word searches); whether to open links in a new window.

You're supposed to be able to preview the search results for your new search terms but when I tried it, it kept trying to show me the examples (Apple, Google, Microsoft) instead. It just flashed up my new search terms for half a second, then reverted to the default examples. When I saved changes and clicked to Edit, same thing. I think it's because the search terms I tried weren't being used. However on the blog itself, if there are no search results it'll display search results for the term "Google" (nice publicity for them!).

<b:widget id='NewsBar1' locked='false' title='YOURTITLE' type='NewsBar'>
<b:includable id='main'>
<!-- only display title if it's non-empty -->
<b:if cond='data:title != ""'>
<h2 class='title'><data:title/></h2>
</b:if>
<div class='widget-content'>
<div expr:id='data:widget.instanceId + "_bar"'>
<span class='newsBar-status'>Loading...</span>
</div>
</div>
<b:include name='quickedit'/>
</b:includable>
</b:widget>

Video Bar (UPDATED 1 April 2007)

Adds a "video bar" which lets you "Display clips from YouTube and Google Video for your readers to watch without leaving the page." It shows video clips which match the search terms you enter, again just as if you'd searched direct for that term on YouTube or Google Video, and it's kept constantly updated. See this post for a pic of what the results might look like on your blog.


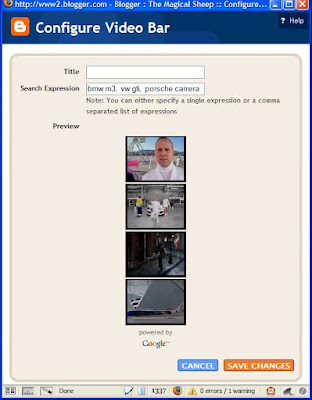
Options you can set: Title; your own search expressions (comma separated for multiple word searches).

As with the newsreel widget, if you can't get anything with the Preview it's probably because there's nothing yet on YouTube etc using your search term. On the blog itself, if there are no results with your search term, it just shows the title you entered for the widget, with no video underneath it (unlike the News Bar, above, which does show results for "Google" if there's nothing for your search term).

Again at the moment it shows just 4 results, there seems no way to configure how many results you want it to display.

<b:widget id='VideoBar1' locked='false' title='YOURTITLE' type='VideoBar'>
<b:includable id='main'>
<!-- only display title if it's non-empty -->
<b:if cond='data:title != ""'>
<h2 class='title'><data:title/></h2>
</b:if>
<div class='widget-content'>
<div expr:id='data:widget.instanceId + "_bar"'>
<span class='videoBar-status'>Loading...</span>
</div>
</div>
<b:include name='quickedit'/>
</b:includable>
</b:widget>

List

Displays a list of stuff.

Options you can set: Title, max no. of items to show in the list, sorting (don't, alphabetical, reverse alph) and individual items for the list (including with links, if desired - so you could have an item in the list with links, and one without).

<b:widget id='TextList1' locked='false' title='YOURTITLE' type='TextList'>
<b:includable id='main'>
<h2><data:title/></h2>
<div class='widget-content'>
<ul>
<b:loop values='data:items' var='item'>
<li><data:item/></li>
</b:loop>
</ul>
<b:include name='quickedit'/>
</div>
</b:includable>
</b:widget>

Link list

Displays list of links. Use for manual blogrolls or link rolls i.e. list of favourite links etc.

Options: title, max no. of links to show in list, sorting (don't, alph, reverse alph) and for each link the site URL and site name i.e. clickable link text.

<b:widget id='LinkList1' locked='false' title='YOURTITLE' type='LinkList'>
<b:includable id='main'>
<b:if cond='data:title'><h2><data:title/></h2></b:if>
<div class='widget-content'>
<ul>
<b:loop values='data:links' var='link'>
<li><a expr:href='data:link.target'><data:link.name/></a></li>
</b:loop>
</ul>
<b:include name='quickedit'/>
</div>
</b:includable>
</b:widget>

Picture

Displays an image, wouldja believe it.

Options: title (heading over the pic), caption (under the pic), and upload an image from your computer or use one on the Web (it then shows a nice preview); Shrink to fit is ticked, which seems best in most cases. So Blogger automatically resizes the pic to fit in your sidebar, for instance, or your footer. Handy, e.g. for non-techies to display a favourite image in the sidebar.

<b:widget id='Image1' locked='false' title='YOURTITLE' type='Image'>
<b:includable id='main'>
<b:if cond='data:title != ""'>
<h2><data:title/></h2>
</b:if>
<div class='widget-content'>
<img expr:alt='data:title' expr:height='data:height' expr:id='data:widget.instanceId + "_img"' expr:src='data:sourceUrl' expr:width='data:width'/>
<br/>
<b:if cond='data:caption != ""'>
<span class='caption'><data:caption/></span>
</b:if>
</div>
<b:include name='quickedit'/>
</b:includable>
</b:widget>

Text

Displays a chunk of text, which can be formatted. Like a mini-post editor box, effectively, except that the stuff entered will appear in the chosen section e.g. sidebar, footer. Good for non-techies to use to add stuff in the footer for instance.

Options: title, and content of text (which can be formatted e.g. bold, colours, and can include HTML code and links). Usual Blogger hotkeys work in the Content box e.g. ctrl-shift-a to add a link to highlighted text.

<b:widget id='Text1' locked='false' title='YOURTITLE' type='Text'>
<b:includable id='main'>
<!-- only display title if it's non-empty -->
<b:if cond='data:title != ""'>
<h2 class='title'><data:title/></h2>
</b:if>
<div class='widget-content'>
<data:content/>
</div>
<b:include name='quickedit'/>
</b:includable>
</b:widget>

HTML/Javascript

Displays HTML or Javascript e.g. a badge or other code.

Options: title, content (with Edit HTML and rich text views). Usual Blogger hotkeys work e.g. ctrl-shift-a to add a link to highlighted text.

<b:widget id='HTML1' locked='false' title='YOURTITLE' type='HTML'>
<b:includable id='main'>
<!-- only display title if it's non-empty -->
<b:if cond='data:title != ""'>
<h2 class='title'><data:title/></h2>
</b:if>
<div class='widget-content'>
<data:content/>
</div>
<b:include name='quickedit'/>
</b:includable>
</b:widget>

AdSense

Displays your Adsense ads, of course.

If you've already signed up for Google's Adsense, it seems you only need to sign in once to Adsense on clicking to add this element, and thereafter as you're logged in to new Blogger with your Google Account, all your new Blogger blogs will automatically know your Adsense account details.

Options: format (ad units or link units, and their size), colors (incl. blend template or match template or standard schemes) or customise border, background, text, title and url colours, and it gives a preview. You can also switch Adsense publisher IDs. But you can't set a title for this.

<b:widget id='AdSense1' locked='false' title='' type='AdSense'>
<b:includable id='main'>
<div class='widget-content'>
<data:adCode/>
</div>
</b:includable>
</b:widget>

Feed (from other blogs or sites)

Displays items from feeds of your desired blogs or sites, kind of a feed roll but built into Blogger by the good folk of Team Blogger.

Nice one. Just enter the URL of the feed you want to display on your blog, and it retrieves the feed info, filling in the options: title (you can change it), no. of items to show (default 5, 1-5 poss), tick to show item dates, tick to show item source/author, with a nice preview when you change the options.

<b:widget id='Feed1' locked='false' title='YOURTITLE' type='Feed'>
<b:includable id='main'>
<h2><data:title/></h2>
<div class='widget-content'>
<ul expr:id='data:widget.instanceId + "_feedItemListDisplay"'>
<b:loop values='data:feedData.items' var='i'>
<li>
<span class='item-title'>
<a expr:href='data:i.alternate.href'>
<data:i.title/>
</a>
</span>
<b:if cond='data:showItemDate'>
<b:if cond='data:i.str_published != ""'>
<span class='item-date'>
&#160;- <data:i.str_published/>
</span>
</b:if>
</b:if>
<b:if cond='data:showItemAuthor'>
<b:if cond='data:i.author != ""'>
<span class='item-author'>
&#160;- <data:i.author/>
</span>
</b:if>
</b:if>
</li>
</b:loop>
</ul>
<b:include name='quickedit'/>
</div>
</b:includable>
</b:widget>

Labels

Shows all the labels used on your blog (which can now be bulk managed), a label cloud in effect.

Options: title, sorting (alph or by frequency), with a preview.

<b:widget id='Label2' locked='false' title='YOURTITLE' type='Label'>
<b:includable id='main'>
<b:if cond='data:title'>
<h2><data:title/></h2>
</b:if>
<div class='widget-content'>
<ul>
<b:loop values='data:labels' var='label'>
<li>
<b:if cond='data:blog.url == data:label.url'>
<data:label.name/>
<b:else/>
<a expr:href='data:label.url'><data:label.name/></a>
</b:if>
(<data:label.count/>)
</li>
</b:loop>
</ul>
<b:include name='quickedit'/>
</div>
</b:includable>
</b:widget>

Logo (Blogger button)

Just displays the standard Blogger button. Click against the pic you want (there's a choice of 6 button looks). No other options: you can't set a title for this.

It's interesting that the logo element is optional - this rather suggests that, despite what I previouly thought, you now don't have to display the Blogger button in return for Google letting you use Blogger as your blog publishing platform or Blogspot as your blog host.

<b:widget id='BloggerButton1' locked='false' title='' type='BloggerButton'>
<b:includable id='main'>
<div class='widget-content'>
<a href='http://www.blogger.com'><img alt='Powered By Blogger' expr:src='data:fullButton'/></a>
<b:include name='quickedit'/>
</div>
</b:includable>
</b:widget>

Archive

(Added 29 April 2007 for completeness though this is not optional but included as standard.)

Displays the blog's archive - included automatically in new blogs, but you can change the options by clicking its Edit link in the Page Elements tab.

Options you can set: Title, Style (hierarchy, flat list, drop-down menu), Show Post Titles (ticked by default; if unticked then individual post titles aren't shown, people have to go to the archive page for the month), Show Oldest First (unticked by default so posts are shown in reverse chronological order), Archive Frequency (monthly, weekly or daily - so there'll be one archive per week's worth of posts if you tick weekly, etc) and Date Format (for year and month display).
<b:widget id='BlogArchive1' locked='false' title='YOURTITLE' type='BlogArchive'>
<b:includable id='main'>
<b:if cond='data:title'>
<h2><data:title/></h2>
</b:if>
<div class='widget-content'>
<div id='ArchiveList'>
<div expr:id='data:widget.instanceId + "_ArchiveList"'>
<b:if cond='data:style == "HIERARCHY"'>
<b:include data='data' name='interval'/>
</b:if>
<b:if cond='data:style == "FLAT"'>
<b:include data='data' name='flat'/>
</b:if>
<b:if cond='data:style == "MENU"'>
<b:include data='data' name='menu'/>
</b:if>
</div>
</div>
<b:include name='quickedit'/>
</div>
</b:includable>
<b:includable id='flat' var='data'>
<ul>
<b:loop values='data:data' var='i'>
<li class='archivedate'>
<a expr:href='data:i.url'><data:i.name/></a> (<data:i.post-count/>)
</li>
</b:loop>
</ul>
</b:includable>
<b:includable id='menu' var='data'>
<select expr:id='data:widget.instanceId + "_ArchiveMenu"'>
<option value=''><data:title/></option>
<b:loop values='data:data' var='i'>
<option expr:value='data:i.url'><data:i.name/> (<data:i.post-count/>)</option>
</b:loop>
</select>
</b:includable>
<b:includable id='interval' var='intervalData'>
<b:loop values='data:intervalData' var='i'>
<ul>
<li expr:class='"archivedate " + data:i.expclass'>
<b:include data='i' name='toggle'/>
<a class='post-count-link' expr:href='data:i.url'><data:i.name/></a>
(<span class='post-count'><data:i.post-count/></span>)
<b:if cond='data:i.data'>
<b:include data='i.data' name='interval'/>
</b:if>
<b:if cond='data:i.posts'>
<b:include data='i.posts' name='posts'/>
</b:if>
</li>
</ul>
</b:loop>
</b:includable>
<b:includable id='toggle' var='interval'>
<b:if cond='data:interval.toggleId'>
<b:if cond='data:interval.expclass == "expanded"'>
<a class='toggle' expr:href='data:widget.actionUrl + "&amp;action=toggle" + "&dir=close&amp;amp;amp;amp;amp;amp;amp;amp;amp;amp;amp;toggle=" + data:interval.toggleId + "&toggleopen=" + data:toggleopen'>
<span class='zippy toggle-open'>&#9660; </span>
</a>
<b:else/>
<a class='toggle' expr:href='data:widget.actionUrl + "&amp;action=toggle" + "&dir=open&toggle=" + data:interval.toggleId + "&toggleopen=" + data:toggleopen'>
<span class='zippy'>&#9658; </span>
</a>
</b:if>
</b:if>
</b:includable>
<b:includable id='posts' var='posts'>
<ul class='posts'>
<b:loop values='data:posts' var='i'>
<li><a expr:href='data:i.url'><data:i.title/></a></li>
</b:loop>
</ul>
</b:includable>
</b:widget>

Profile

(Added 29 April 2007 for completeness though this is not optional but included as standard.)

Displays your Blogger profile - included automatically in new blogs, but you can change the options by clicking its Edit link in the Page Elements tab.

Options you can set: Title, Share my profile (untick if you want it private), Show on this blog (ticked by default), Name, Description, Location (tick to show on this blog), City/Town, Region/State, Country/Territory (leave any of those blank if you prefer).

Default title is "About Me" but you can change that of course e.g. to "The Lowdown" or whatever you prefer.
<b:widget id='Profile1' locked='false' title='About Me' type='Profile'>
<b:includable id='main'>
<b:if cond='data:title != ""'>
<h2><data:title/></h2>
</b:if>
<div class='widget-content'>
<b:if cond='data:team == "true"'> <!-- team blog profile -->
<ul>
<b:loop values='data:authors' var='i'>
<li><a expr:href='data:i.userUrl'><data:i.display-name/></a></li>
</b:loop>
</ul>
<b:else/> <!-- normal blog profile -->
<b:if cond='data:photo.url != ""'>
<a expr:href='data:userUrl'><img class='profile-img' expr:alt='data:photo.alt' expr:height='data:photo.height' expr:src='data:photo.url' expr:width='data:photo.width'/></a>
</b:if>
<dl class='profile-datablock'>
<dt class='profile-data'><data:displayname/></dt>
<b:if cond='data:showlocation == "true"'>
<dd class='profile-data'><data:location/></dd>
</b:if>
<b:if cond='data:aboutme != ""'><dd class='profile-textblock'><data:aboutme/></dd></b:if>
</dl>
<a class='profile-link' expr:href='data:userUrl'><data:viewProfileMsg/></a>
</b:if>
<b:include name='quickedit'/>
</div>
</b:includable>
</b:widget>

Page header

(Added 29 April 2007 for completeness though this is not optional but included as standard.)

Displays the page header (which you can't reposition) - included automatically at the top of new blogs, but you can change the options by clicking its Edit link in the Page Elements tab.

Options: Blog Title, Blog Description, Image (from your computer or the web).
Default title is Your Blog Name (Header) but you can change that of course.
<b:widget id='Header1' locked='true' title='YOUR BLOG NAME (Header)' type='Header'>
<b:includable id='main'>
<b:if cond='data:useImage'>
<b:if cond='data:imagePlacement == "REPLACE"'>
<!--Show just the image, no text-->
<div id='header-inner'>
<a expr:href='data:blog.homepageUrl' style='display: block'>
<img expr:alt='data:title' expr:height='data:height' expr:id='data:widget.instanceId + "_headerimg"' expr:src='data:sourceUrl' expr:width='data:width' style='display: block'/>
</a>
</div>
<b:else/>
<!--Show image as background to text-->
<div expr:style='"background-image: url(\"" + data:sourceUrl + "\"); " + "background-repeat: no-repeat; " + "width: " + data:width + "px; " + "height: " + data:height + "px;"' id='header-inner'>
<div class='titlewrapper' style='background: transparent'>
<h1 class='title' style='background: transparent; border-width: 0px'>
<b:if cond='data:blog.url == data:blog.homepageUrl'>
<data:title/>
<b:else/>
<a expr:href='data:blog.homepageUrl'><data:title/></a>
</b:if>
</h1>
</div>
<div class='descriptionwrapper'>
<p class='description'><span><data:description/></span></p>
</div>
</div>
</b:if>
<b:else/>
<!--No header image -->
<div id='header-inner'>
<div class='titlewrapper'>
<h1 class='title'>
<b:if cond='data:blog.url == data:blog.homepageUrl'>
<data:title/>
<b:else/>
<a expr:href='data:blog.homepageUrl'><data:title/></a>
</b:if>
</h1>
</div>
<div class='descriptionwrapper'>
<p class='description'><span><data:description/></span></p>
</div>
</div>
</b:if>
</b:includable>
</b:widget>

Page footer

(Added 29 April 2007 for completeness though this is not optional but included as standard.)

Page footer has nothing in it by default, just a placeholder to mark the footer section. For complete completeness, the footer b:section just goes
<b:section class='footer' id='footer'/>

UPDATE: this post is a general intro to New Blogger's standard built-in page elements. To get some other free page elements widgets for your blog, see this post and this webpage.

New Blogger: large blogs still finish last...


In other contexts the last may become the first but sadly, with Blogger Beta, now more aptly called New Blogger, it seems that large blogs still can't switch yet. I noticed from the Blogger help (I don't know when exactly they updated it with that info) that:
"for now, if you have a very large blog (more than a couple thousand posts + comments), you'll need to hold off for a bit. Note that, even if your blog is eligible to switch, you may not have the link to do so on your dashboard. "

Which includes this blog of course. I don't think I have more than a couple thousand posts but they sure are big ones, as the actress said to the bishop.

So, those of us with big blogs have to keep hanging on in there. Still, I've continued to beaver away trying to understand New Blogger and its fancy template code, so I'll be sharing on this blog what I've learned, probably over the next few weeks.

Nominative determinism 8


Recent funny or appropriate examples of nominative determinism (jobs reflecting names) spotted by me or others who've pointed them out to me:

The Kent Wildlife Trust, in its leaflet on 2007 study days (sadly, not yet on its website), lists for Sunday 29th April 2007 an event called "Walk and Talk Spring Flowers" - led by a Lynne Flower.

A Times article in November 2006 on circumcision reducing the risk of AIDs ends with a quote by a very aptly-named expert:
“It’s not a magic bullet, but a potentially important intervention,” agreed Dr Kevin De Cock, of the World Health Organisation.

Sunday 24 December 2006

Happy holidays to everyone!


I'm going to be offline for a few days (eeek no Internet access, how on earth will I survive?!) - but I shall be back next week.

Have a good break everyone!

Saturday 23 December 2006

Delicious Tagometer howto: manual mode customisation, code


Delicious bookmarks before domain name change:

This is an introduction and tutorial, with code and customisation howto, for the new "Tagometer"button or badge launched yesterday by social bookmarking service Del.icio.us. (While I give the full code for Blogger, I also explain how users of other blogging platforms can also customise Tagometer.)

Not only will the badge let visitors click to bookmark the webpage on Delicious - but it shows, live on the webpage displaying the badge, the number of people who've already bookmarked that webpage on Delicious, and what tags they used for the page.

For example this is what their one-line badge, designed for blog or page footers, might look like if it was displayed on the Del.icio.us homepage (which in fact it isn't!):


There's a tall narrow version designed for a sidebar too, which looks like this:


If you want to see a live example in action, check out my intro to Technorati tags.

Delicious have given the code for the badge on their Delicious Tagometer badge page, which you can copy/paste into your blog template or webpage where you want the badge to appear.

The issues

The Tagometer is an excellent and helpful idea (even though it will slow down the loading of whatever page you put it on - you have been warned!). I've included it in my own blog.

But there are just two problems with it that I can see.

First, the one-line version doesn't display properly on some blogs. The line is cut off at the right, so that the tags in particular aren't visible or even the "tags" label isn't visible - see the screenshots below (if you want to see the live posts for those, see this or this):


Second, the code given by Delicious only displays bookmark information for the current webpage.

That's fine if you're looking at a blog item page or post page. But if you're looking at the main page of a blog which has several posts on it, the one liner for post footers still shows only bookmarks info relating to the main blog home page, not the individual post, and it only lets people bookmark the main page - not the individual post page. A fact that several commenters on the Delicious blog post had already noted, and requested a solution for e.g. Jon Williams.

Fortunately, there are ways round both issues, though a bit of hacking is involved.

I'll outline the "what and how to" first, and then provide code that you can just copy/paste if you're using Blogger (including old as well as new) - plus, if you're using another platform like Wordpress or Movable Type or indeed some other blogging tool, I don't give the code but you should be able to adapt my instructions very easily for your own blogging system.

Getting the Delicious display not to be cut off

You can get the display to just take the whole width of your page but not get cut off, like this:

But to do that, you have to change the CSS.

I see that Fred has already done a howto on the Delicious blogbadge CSS. So I won't repeat it here.

This is what you do:

1. Embed the stylesheet in your own template as Fred says (for beginners, you copy/paste the code he's given in Step One in the head section of your template, just before the </head> bit will do fine).

2. Now you need to edit that code you just pasted in your template, so that in:

.delicious-blogbadge-custom {
font: 12px arial; border: 2px solid #B1B1B1; width: 190px; text-align: center; position: relative;
}


you delete the "width: 190 px;" bit, that I put in bold above, but just that bit - leave the rest alone. (I'm no CSS expert. I've picked up a tiny bit here & there, mainly I just look at stuff and guess. I suspect that instead of embedding the long blogbadge CSS wholesale into your template, if you are happy with the original look and don't want to style it further but you only want to fix the "cut-off at the right" problem, you could just override that width thing by adding a single ! important declaration in your own template. But I shall leave it to Kirk or others to explain how to do that! Hint hint?)

UPDATE (after a comment on this post): as mentioned I'm no CSS expert. I'd tried a few things before I did the above, which worked fine for me. But if the suggestion above doesn't work for you, I'd suggest trying two things:
  • insert "word-wrap:break-word;" (without the quote marks) into the CSS in various places, and/or
  • change "display:inline;" to "display:span" in various places - though this made the display more of a tall narrow tower block, whereas I wanted it to stretch across the page horizontally as much as possible.

3. Then you can use the code he's given in Step Two of his post, pasting it where you want the badge to appear e.g. post footer. The main thing to note is that in the original Delicious code, you need to change 'delicious-blogbadge-line' to 'delicious-blogbadge-custom'.

So, that should sort the "cut-off" problem. But it still doesn't deal with the multiple-post webpage issue. That's a different thing to look at.

How to customise Tagometer - manual mode

Les of Del.icio.us, in a comment on the original Delicious post, mentioned a hidden feature of Tagometer - "manual mode" - which he's used on his own Wordpress blog to point to individual posts instead of the main webpage. He said they'll be releasing more tips & tricks about this "in the coming weeks". I guess they wanted us to do some detective work of our own!

So I've done some detecting, and figured out the basics of manual mode. Manual mode is what you need if you want to be able to point to an individual post's Delicious info (rather than the blog home page's info) from a main page that displays several posts. Delicious haven't documented it yet, so I'll document what I've been able to find out.

This is what to do to use manual mode:

1. In the head section of your blog template (e.g. the just before the </head> bit ), paste this code:
<link id="delicious-blogbadge-css" href="http://images.del.icio.us/static/css/blogbadge.css" rel="stylesheet" type="text/css" />
<script type="text/javascript">
if (typeof window.Delicious == "undefined") window.Delicious = {};
Delicious.BLOGBADGE_MANUAL_MODE = true;
</script>
<script src="http://images.del.icio.us/static/js/blogbadge.js"></script>
2. Now in your template, in the section where you want the badge to appear, you need to insert some other code - different from what's on the Tagometer badge page.

The following is not the exact code you paste in, but is to help me explain the structure, so you know how to adapt it for your own blog/blogging platform:
<div class="delicious-blogbadge-line" id="badge-POSTID"><script type="text/javascript">Delicious.BlogBadge.register('badge-POSTID', 'PERMALINK', 'POSTTITLE');</script></div>

Now take a look at the bits I've put in capitals/uppercase: POSTID, PERMALINK and POSTTITLE.

What you need to do is change POSTID to whatever special code or template tag it is for your blogging platform that represents the unique ID number of the individual post that you want to point to. With "old" Blogger for instance, it's <$BlogItemNumberWhat you need to do is change POSTID to whatever special code or template tag it is for your blogging platform that represents the unique ID number of the individual post that you want to point to. With "old" Blogger for instance, it's <$BlogItemNumber$>- and I think it's "<$MTEntryID$>" for Movable Type and "<?php the_ID(); ?>" for Wordpress but don't take my word for it on those as I don't use 'em, it's just what I've heard before.

Similarly you should change PERMALINK to whatever will produce the individual post's permalink, and POSTTITLE the post's title.

(And don't forget that if you customise the CSS to improve the display e.g. as mentioned above, you should change "delicious-blogbadge-line" to "delicious-blogbadge-custom" too.)

I've found from experimenting that if you try to include the code more than once for the same post, the full Delicious info (no. of people, tags etc) only shows the last time the code is included. Earlier instances just provide the ability to bookmark the post on Delicious. Maybe someone can tweak it so each time the code shows the full works, but that won't be me!

Individual post tagometer code for Blogger

Here's code for Blogger that Blogger users can copy/paste. In the template, you delete the <p class='post-footer-line post-footer-line-3'/> line and paste the following in its place, or if you already have other code in the post-footer-line-3 section, just add the following code after the <p class='post-footer-line post-footer-line-3'> line but don't include the first and last lines as they're already there:
<p class='post-footer-line post-footer-line-3'>
<div class='delicious-blogbadge-line' expr:id='"badge-" + data:post.id'>
<script type='text/javascript'>
Delicious.BlogBadge.register(&#39;badge-<data:post.id/>&#39;, '<data:post.url/>&#39;, '<data:post.title/>&#39;);
</script>
<noscript><a expr:href='"http://del.icio.us/url/url/check?url="+data:post.url'>Del.icio.us history</a></noscript>
</div>
</p>
I know Blogger Beta is now out of beta, but some people still haven't got the option to switch (like me!). So here's the code for "old" Blogger, I put it at the end of the post:
<div class="delicious-blogbadge-line" id="badge-<$BlogItemNumber$>"><script type="text/javascript">Delicious.BlogBadge.register('badge-<$BlogItemNumber$>', '<$BlogItemPermalinkURL$>', '<$BlogItemTitle$>');</script><noscript><a href="http://del.icio.us/url/url/check?url=<$BlogItemPermalinkURL$>">Del.icio.us history</a></noscript></div>

Noscript

As I saw a comment on the Delicious blog quite rightly pointing out that there should be a noscript option, you'll have noticed that in the Blogger code above I've included that. It'll automatically work for the individual post URL. For non-Blogger users, it should be straightforward to tweak the noscript part of the final bit of code above, just change <$BlogItemPermalinkURL$> to whatever represents the post's URL on your blogging system.

Tagometer manual mode - other uses

You don't have to just display info related to the blog the badge is on. You could, if you wanted to, display info on other blogs. Just use the same code:
<div class="delicious-blogbadge-line" id="badge-POSTID"><script type="text/javascript">Delicious.BlogBadge.register('badge-POSTID', 'PERMALINK', 'POSTTITLE');</script></div>
As long as POSTID is the same in both places, you can put any URL you like instead of PERMALINK, and any title (e.g. the name of a blog or website) instead of POSTTITLE. (Again remember to change "-line" to "-custom" if you've customised/fixed the CSS.)

For example this:
<div class="delicious-blogbadge-custom" id="badge-delicious-home"><script type="text/javascript">Delicious.BlogBadge.register('badge-delicious-home',  'http://del.icio.us/', 'del.icio.us');</script></div>


displays info on Delicious's home page -


And this displays info on Kirk's blog (home page):


and this, on his post on Blogger label clouds:


UPDATE: also to add that if you use the fab Feedburner service for your feeds, they've produced a Feedflare for Tagometer, with instructions in that post on how to turn it on (remember to Activate Feedflare too). So you might want to do that for each of your feeds if like me you offer several versions, full, excerpts and headlines. Then all subscribers to your feed will be able to see the Tagometer info and bookmark posts too.

Lots to play with... so happy tagometering!

Wednesday 20 December 2006

Does out of beta Blogger beat out older Blogger or is older Blogger better?


So, Blogger's Blogger Beta is finally out of beta, as of yesterday, 19 December 2006. (You'll have to forgive the tongue twister in the title, a take off of Peter Piper and his pickled pepper of course, sorry but I just couldn't resist.)

Well done to Team Blogger, they must be relieved to get this out of the way before Christmas. Though it's good to see that "We’re done with “beta,” but we’re far from done with the new Blogger" - they mean to keep enhancing Blogger further, the good chaps that they are!

Switching from old Blogger to new Blogger

The Blogger Buzz post by Pete describes the switching process - but in an update of today also points out that not everyone will have the "Switch Now" button on their Blogger homepage yet as they're only letting a limited number of switches happen simultaneously.

I certainly haven't seen the "Switch Now" button for this blog yet, myself, but in a way I'm relieved that it's not popped up for me, as I still haven't had the chance to get to grips with the new Blogger template code properly, and I dread having to tinker with my (non-standard) template to get it to work properly under the new Blogger (as I should now call it, rather than "Blogger Beta").

Does out of beta Blogger beat out older Blogger or is older Blogger better?

On the whole yes, it's definitely better, I think the vast majority of people who've used both would agree.

I think getting to grips with the new template code will be harder than the old template tags though - I've already started trying, and I need to increase my supply of cold towels for sure, as I'm no coder and just rely on good ol' logic to try to figure things out.

Overview

The whizzy new features have been mentioned in many blogs, including this one (overview of features, labels etc, which I won't repeat here). UPDATE: summary now also in the official Google blog.

So I'll just add a few random further observations.

www2 it is

I see that http://beta.blogger.com/ still works for me, but, unless it was in use before but I missed it previously, we're now being pointed towards http://www2.blogger.com now instead (a fancy new server I presume).

No CAPTCHA for comments on own blog, hooray

Again maybe it was there before and I just missed it, but I see that you no longer have to solve a word verification CAPTCHA (type out those pesky weird shaped letters, which sadly spammers can do better than I can) in order to post to your own blog while you're logged in to Blogger (so I've updated my comments wishlist post, thank you thank you Team Blogger! Ahem there's a few more on that list if you feel like it... I know, I know, give 'em an inch and they'll ask for several inches more, no rest for the wicked & all that...).

Picture management?

I'd been hoping for better picture management with new Blogger and maybe with Blogger's increasing integration with Picasa, now officially confirmed, perhaps that's on its way?

Automatically updating the date/time on draft posts

One small niggle. The Buzz post highlights "better input fields for post dates". I'm not sure I get it, unless they mean that in the new Blogger's post editor you now have a section where you can manually type in the post date/time that you want (instead of the dropdowns that you had to use on the old Blogger where you had to set each hour, second, PM/AM, month, day and year separately, which was indeed a hassle) - see the bit on the right:


The only issue there is that the date/time doesn't update itself automatically. If you start to create a post, then save the draft, and go back to it say 3 days later, when you eventually publish it the post still bears the date/time that you first clicked "Create", not the date/time that you finally hit "Publish Post". It took me some headscratching when I first started blogging to figure out why a post I'd just published wasn't visible on my blog - that was because it was being posted to an earlier date, sometimes not even appearing on the main page.

I got round that problem by using Jasper's superb free "Keep current time on posts" Greasemonkey userscript for Firefox users which he'd helpfully updated previously. That script set the date/time of your post to whatever it was when you actually published it.

Unfortunately it doesn't work with the new Blogger, which Aditya had already spotted. So I'm just about to add my own plea for a "new Blogger" version of the script to Jasper's post.

But rather than pestering the poor man, it might be better if Blogger users were to suggest to Blogger that they introduce a "keep current time on post" feature. I can't imagine anyone wanting a draft to bear the date/time the draft was first created, rather than the time of publishing, so I feel it should be a standard feature. You can certainly type in the current date/time manually, but I'm pretty sure I'll forget (plus it's an extra hassle which could be eliminated if keep current time was standard), which is why Jasper's script was such a lifesaver in the first place. Fingers crossed here for either Jasper or Team Blogger to come through on this one...

UPDATE: Aditya's now produced a script that works on New Blogger, thanks Aditya!

Well, I shall now wait and see just when I get the button from Blogger to switch me on!

Comment moderation now ON


I get way more spam comments than genuine ones. I often have spells when I'm too busy to tend to this blog, so I used to think that it would be better to let anyone comment, and take the chance of spam, rather than keep people waiting till I managed to find time to approve comments.

But I've really had it now. I don't get many real comments anyway, these days, yet increasingly I get so much spam (the spammers seem to be better able to solve the CAPTCHA than me!) that I seem to be spending more time deleting spam comments than answering real ones or writing new posts.

So I've turned on comment moderation. And I'm leaving it on until there's an easy way to bulk delete unmoderated comments (or Blogger introduce better anti-comment spam tools).

So if your comment doesn't appear on a post immediately, you'll know why. Sorry about that, but that's how it goes.

Thursday 14 December 2006

Supermarkets, technology, marketing: searching, finding, IKEA rage and the like


In November 2006 Google's advertising team started a Google CPG blog (consumer packaged goods) in order to "share ideas and touch on an array on topics related to the CPG industry, advertising, and Google". A smart move, as CPG are clearly big business.

A recent "Make markets super" post on that blog, about improving marketing by supermarkets, mentioned an interesting top 10 rules of supermarket marketing from an interview with the head of ad agency Meyer & Wallis, and added some extra suggestions plugging use of supermarkets' websites and the Web - including Web ads and searching, but of course.

That prompted this post. Now I'm no marketing expert (well I'm no expert an anything, I'm always learning), but as a consumer and supermarket customer there is one simple use of technology that supermarkets and big grocery stores could make, but don't, which I've wanted for ages, and which would make such a difference to me.

It's just this: a search terminal at the end of every couple of aisles where you can type in what you're looking for, and it tells you on which aisle number the product can be located.

The big supermarkets like Tesco's, Sainsbury's, Waitrose and ASDA (just using UK examples) surely must have automated stock control systems that can keep track of their goods and stock levels. Why can't they adapt those to provide in-store information for customers? And frankly, why can't the big department stores do something similar?

Haven't you had the frustrating experience of wandering round a supermarket or grocery store trying to find what you need to buy, even trying to find a staff member who's able and willing to tell you where it is? Businesses are trying to use machines/software in so many ways to do what people did - this is a prime area where it might actually work well.

For busy people with limited time, like me, wandering aimlessly for ages round a supermarket is the last thing you want to do at the weekend. You just want to get what you need and go. So why not cater for people like that, and make it easier for them to buy what they want? (Yes I could buy online and sometimes do, but for fresh fruit and vegetables, and some meat, I prefer to check it and choose it for myself, thank you.)

Probably they want to make you walk round the whole store hunting, in the hope that you'll impulse buy goods you hadn't planned to, which you wouldn't otherwise notice if you could make a beeline just for your shopping list items.

An interesting recent New Scientist article "Locating locating locating" was about how people look for things (Lévy flight patterns rather than Brownian motion, apparently - very short steps interpersed with very long steps rather than medium length steps, which is it seems how our ancestors hunted). But it also mentioned "IKEA rage" and why shops that force you along a prescribed route can be so maddening, time-consuming and exhausting... yet also tend to result in splurge impulse buying, a reward or treat to yourself for getting there! It must be that shops like IKEA get enough benefit from the impulse buys that they are happy to deliberately frustrate their customers. But personally, while I think many of their products look good and are great value for money, I've bought nothing from them for a long time, because I really don't want to go through their long and winding showroom routes again (and trying to find parking in their car park is even worse). So in the case of this consumer anyway, their strategy has put me off rather than made them more money.
IKEA tip - it's behiiiiind you!!: The New Scientist article also mentioned research on IKEA routes and how people navigate through IKEA stores, carried out by Farah Kazim a master research student of Alan Penn, an architect at University College London. "If you want to find your way out of Ikea, look behind you." "Kazim found that our forward-facing vision is the key to why we all follow the windy route through the showroom. There are plenty of short cuts to allow you out, but they are always cleverly located behind you - in the direction opposite from the arrows that lead you through the showroom floor. As a result, you just don't notice them." Very clever. (There's a nice plan of an IKEA store in the article too, showing the extremely "sinuous route")

So I can't imagine that supermarkets are going to introduce search terminals for customers any time soon (though surely they could also then extend that to allow customers to do stock checks at their local supermarkets over the Web like other consumer goods websites do? Why not let you pick your local store, enter a shopping list online and give you a list of aisle numbers for each item which you can print out? Why not have something like that in the in-store cafes, so you can sit down and have a nice cup of tea or coffee and check your shopping list?). But I do think groceries are quite different from furniture and that annoying customers pays off less in that sector. Well, I can but hope...

Yahoo & IBM: free enterprise search


Yahoo and IBM are giving away an enterprise search engine, IBM OmniFind Yahoo! Edition, to search your organisation's file system, intranet and public website, integrating Yahoo! Search into the results so you can search both internal documents and the Web via a single search. (Extra support however has to be paid for.)

According to the Yahoo Search blog the features of this free software, which they say is easy to use, include:
  • Indexes up to 500,000 documents and over 200 file types in 30 different languages.
  • Customizable search results interface, and you can also hide certain features.
  • Add new synonyms.
  • Create your own featured links to applications and content that you may want to provide one-click access for. For example, a search on “expense reports” may include a featured link directly to your Expense Report system.
You can download it after filling in a form (which somewhat contradictorily says "Thanks for downloading..." and "Before you download, please answer a few quick questions..."). You have to give your business email address, the rest is optional.

As it's free, there seems to be no downside in trying it out. I haven't had a chance to check out the further info much yet let alone install it myself (supposedly a 3-click installation), but it looks good given that it's free!

It's meant to work on certain versions of Linux and Windows, with both Internet Explorer and Firefox too, and it seems you can customise results relevancy.

They say that it incorporates open source Apache Lucene technology (a Java search engine) and that key integration features are:
  • Open URL-based APIs for simplicity, development language flexibility, and extensive portability (REST architecture)
  • Interfaces that support:
    • Issuing search requests and receiving search results
    • Retrieving cached and source documents
    • Pushing new documents to be indexed and updates
    • Deleting documents from index
  • Easily embeddable and customizable UI output (XML/XSTL/HTML/HTML snippets)

Documentation/resources

There seems to be a decent amount of supporting documentation and info e.g.:

Thoughts - Google, security and document management systems etc

I wonder how OmniFind will compare with Google's own (not free) enterprise search product and Google Search Appliance? I notice that Google have been at pains to point out recently that they agree enterprise search systems must support document level security (and see their security page). I haven't been able to see what sort of security features OmniFind supports beyond a statement in their forum that "This release of OmniFind Yahoo! Edition does not support for Active Directory or LDAP for authenticated search. OmniFind Enterprise Edition supports this via global security w/in WebSphere Application Server".

Google must also be thinking hard about how to ensure OneBox can be competitive against a free offering.

Another important issue is integration with the major document management systems.

In my view, for enterprise search systems to gain widespread acceptance, they have to take into account not only that organisations will want document level security, but also that most large organisations already have in place their own, expensively bought/developed and maintained, document management systems.

Searching file systems and intranet Webpages just isn't good enough. Most people want to search documents. Searching accounts systems may be useful, yes, but for many of us it's really information in textual documents that we're after. Enterprise search engines have to be able to integrate with the existing leading document managements systems, as many organisations already have too much invested in those systems. If I were Google or Yahoo/IBM I'd focus quite hard on that, and I'd certainly provide an easily accessible and comprehensive list of DMS with which the search product is compatible.

I've never had the chance to test out or even research Google Enterprise products properly, but I've also often wondered how their relevance ranking works with an internal search. Google's PageRank system, which works extremely well to give you the most relevant results highest in the list, surely depends on hyperlinks from one HTML document to another. How do you "follow" links, which at best might just be short text references, from one internal (say Word) document to another? Especially if the documents are held via a document management system? That to me is another major issue for enterprise search. Will OmniFind do better?

Very interesting stuff, clearly there's going to be a big fight in the enterprise search arena. You never know, maybe Google will release their product for free too! Which can only be good for us users and consumers.