Pages

Wednesday 7 September 2011

Internet Explorer cookie contents - the new format analysed


Microsoft changed the way that Internet Explorer cookie files work and randomised cookie filenames, for security reasons; the cookie text files now have random names which don't indicate the name of the website that saved the cookie, and you have to open up each cookie file individually to check what that is.

However, you can still view the contents of all your IE cookies, unmangled, by exporting your cookies to a single cookies.txt file. Then if you open up that cookies.txt file, you can see the cookie info, in a much more comprehensible, intelligible user-friendly format, eg:

Webtrends seems to be used by Microsoft for recording web visitor analytics & statistics info.

I compared the contents of a couple of the new cookies against the cookies.txt versions to try to figure out how they work. I found that if you copy and paste the text from the cookie file into something else (eg a new text document), the info is broken up into separate lines (ie there's hidden new lines to separate the different components of the info).

For example, the contents of a Twitter cookie file named J0R4GWEF.txt, which like the other contents of cookies appeared to run continuously on in the txt file, was split up like this:

guest_id
v1%3A131542058071389408
twitter.com/
214748475215010693123032155316242192030174605*

The cookies.txt equivalent of that was:

twitter.com TRUE / FALSE 1378897943 guest_id v1%3A131542058071389408

So that helps to figure out the new format of the cookie file. The elements seem to be in this order:

  1. variable name (eg "guest_id")
  2. variable value (eg "v1%3A131542058071389408") - the equivalent of the old "guest_id=v1%3A131542058071389408"
  3. domain name (ie the website which set the cookie, eg "twitter.com/")
  4. something I haven't figured out yet (in the example above, it's "214748475215010693123032155316242192030174605") - but it must convert to the expiration date for the variable (ie 1378897943 in the example above), which traditionally is the number of seconds since 1 Jan 1970, and shows up as the "proper" figure in the cookies.txt version. Maybe this long figure also contains other info about the cookie file
  5. * symbol - which marks the end of this variable, and the start of the next variable set by the website, whose name etc follow in the same order.

I worked out the purpose of the * from looking at a single Google cookie file, for example these contents, of a single txt file:

PREF
ID=15025770280c4f56:U=8cbfd7d77ff8ecf4:FF=0:TM=1315398473:LM=1315408615:S=zAzaJeJ5lq1Y-EEk
google.com/
1536
521981312
30321428
744646208
30174577
*
NID
50=IVMzsW2RssDmmdt21XYqM-m6GMBe731GqCispetEG495dEdHdl_tlLqIv8h8tINpCg1kI2lgsAgLheW-TVQzbGoBoiHfBjSJuhOPJSEfWVNTw-H-_Nt16tyNCyIL2zCf
google.com/
9728
2103298560
30211390
722926208
30174577
*

- showed up in the cookies.txt file as this:

google.com TRUE / FALSE 1378844158 PREF ID=15025770280c4f56:U=8cbfd7d77ff8ecf4:FF=0:TM=1315398473:LM=1315408615:S=zAzaJeJ5lq1Y-EEk

google.com TRUE / FALSE 1331583355 NID 50=IVMzsW2RssDmmdt21XYqM-m6GMBe731GqCispetEG495dEdHdl_tlLqIv8h8tINpCg1kI2lgsAgLheW-TVQzbGoBoiHfBjSJuhOPJSEfWVNTw-H-_Nt16tyNCyIL2zCf

Final example, from a Facebook cookie:

eLlnTol8k9yayreWIGxF-h6m
facebook.com/
2147492864
3767864320
30321455
3978419216
30174604
*
translates to:

facebook.com TRUE / FALSE 1378856079 datr eLlnTol8k9yayreWIGxF-h6m
datr

I've not yet worked out how the name of the cookie text file relates to anything in its contents (which no doubt is part of the purpose of the security fix!), so you still can't tell which file was set by which site without opening up each file. The order of info in the cookies.txt document doesn't match the order of the dates that the cookies were created or modified, and they're not in alphabetical order of domain name either. But at least it's possible to check out all the contents of all cookie files at once.

Internet Explorer cookie names change


Worried that your cookie filenames have changed to incomprehensible random strings of letters and numbers? No need. Microsoft has, for security reasons, changed the way IE cookies are named. This is to improve security and reduce "cookiejacking", addressing one way in which attackers might be able to access your cookies (which could include your login information etc).

Side effects: some apps depending on the old cookies names system broke, eg CCleaner and WinPatrol. Also, it's now harder for users to figure out which cookies were set by which websites, as you can't tell the website name from the cookie name anymore. You have to open up the cookie file to check.

However, other browsers like Firefox aren't affected by the change - it's Internet Explorer only.

Old cookie names structure

Internet Explorer cookies used to have filenames with the structure: yourcomputerloginname@partialdomainname.txt eg johnsmith@microsoft.txt (or johnsmith@msdn.microsoft[2].txt etc).

IE cookies are typically located in your AppData\Roaming\Microsoft\Windows\Cookies folder (to find the AppData folder, click Start, in the search box type "appdata" without the quotes and hit Enter. If that doesn't work try "%AppData%" again without the quotes which may go straight to the "Roaming" subfolder).

The security hole, and update

However, in August Microsoft released a Cumulative Security Update for Internet Explorer (2559049) which (according to Microsoft Security Bulletin MS11-057) addresses a "Drag and Drop Information Disclosure Vulnerability CVE-2011-2383" which existed because IE (all versions) didn't properly restrict access to store cookie files.

In more detail for the techies, before the update Internet Explorer did not "properly restrict cross-zone drag-and-drop actions, which allows user-assisted remote attackers to read cookie files via vectors involving an IFRAME element with a SRC attribute containing an http: URL that redirects to a file: URL, as demonstrated by a Facebook game, related to a "cookiejacking" issue".

This vulnerability meant that "An attacker who exploited the vulnerability when a user views a Web page and performs a drag-and-drop operation could gain access to cookie files stored in the local machine."

What the security fix changes

To fix the vulnerability, this update modified how Internet Explorer accesses locally stored cookies, and how it manages cookie files. These changes included changing how Internet Explorer sets file names for cookies, to help make cookie file names less predictable.

Reportedly this change has been seen in several Windows operating systems, ie XP, Vista and Windows 7, and several versions of Internet Explorer including IE8 and IE9 (which would make sense as Microsoft's info says the vulnerability affects Internet Explorer 9 and previous versions).

A Microsoft blog explained the change - see the "Cookie Filenames are Randomized" heading. It's now harder for attackers to guess the location of a particular cookie as IE cookie files are now named "using a randomly-generated alphanumeric string. Cookies are not instantly renamed on [the security] upgrade, but are instead renamed as soon as any update to the cookie’s data occurs."

Consequences of the cookie name change

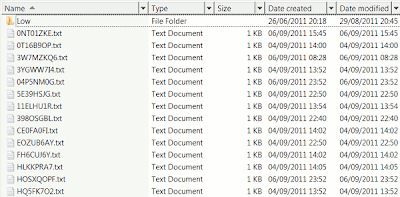
Now, cookie names look like this:

As mentioned earlier, certain software depending on the old system doesn't work anymore, and will have to be tweaked.

From the viewpoint of those protective of their privacy, while you can't see the website's name from looking at the cookie filename, you can still see it if you open up the cookie in Notepad or other text editor.

For example, here's the contents of cookies saved by Microsoft when I visited and then re-visited their webpage about the cookie change. You can see "microsoft" in there:

And here's the contents of a cookie saved by Google when I searched for info on the cookie change using the search box in Internet Explorer. Again, you can see "google.com" in there, although the filename is now "25Z1H29G.txt", and no longer mylogin@google.txt:

Link

For more details of how it seems to work behind the scenes, I've done a separate blog post on how to view the contents of your Internet Explorer cookies in a more user-friendly way.

Sunday 4 September 2011

How to batch crop JPEG photos, scans, images


Here's how to crop a bunch of JPEGs with the free JPEGCrops (Windows), which I used where I needed to chop half an inch (of printer-ink-wasting-black) off the top edge of one set of scanned music score pages, and half an inch off the bottom edge of another set (where I'd turned the book upside down to scan those pages). I couldn't find a proper howto, so here's my step by step.

Cropping multiple files in a batch saves having to open, crop and save each JPEG individually. You just set the edges of the first image (where you want it to be cropped to), and the rest of the photos or pics can automatically be set to the same dimensions.

If all the unwanted bits are on the same part of every image, eg always the left margin or always the bottom margin, you can use the excellent free PDFill PDFTools. My problem was that for some images I needed to crop one edge, and for others another edge, so I couldn't do that - hence JPEGCrops.

I couldn't get JPEGCrops to work fully at first, so here's my step by step tutorial, including all the basic stuff most people skate over:

  1. Download, install and open JPEGCrops. It's a bit blank looking, but that'll change.


  2. See the folder name in the bottom right? That's the folder into which the software will automatically save the cropped images, in my case "C:\Users\myloginname\Cropped". You can change the location of that folder via the menu File > Select Output Dir to choose another folder, but obviously you need to do that before you crop the images in question.

  3. Go to menu File > Preferences and choose your Default Aspect and OK. In my case, as I'm in the UK, it's A4 - your mileage may vary. Feel free to experiment and change it for each set of images and see how it looks.


    (The Preferences box is weird on my system, many buttons aren't visible, probably something to do with my system.)

  4. Now in JPEGCrops open up the pics that you need to crop. There are 2 possible ways -
    1. use the menu File > Open Images (or click the "Open Images" button at the bottom left), then navigate to the folder containing your JPEGs, then select the files you want; you can select several files by holding down the Ctrl key as you click on the ones you want, and click Open, or
    2. in Windows Explorer or Computer, navigate to the right folder, select the images you want (again Ctrl and clicking, or the Spacebar key for hotkey fans, does the trick), and drag the selected images into the JPEGCrops window.

  5. Your selected images should now all be in JPEGCrops. Look at the first pic. You'll see parts of it are greyed out, and parts of it are more clearly visible with a white background. The cropping will get rid of the greyed out bits.


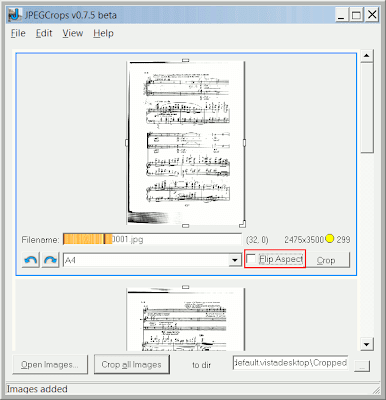
  6. Depending on your situation, you may want to UNtick the "Flip aspect" button, as I did, to get a proper Portrait view:


  7. There are white horizontal and vertical bars around the clearly visible bit. You'd drag these with your mouse to outline the area of the JPEG that you want to keep. But don't do that just yet!

  8. This is the step I missed: first, go to the Edit menu, make sure "Synchronize Crops" is ticked (it isn't in the pic below), by selecting it if necessary.


    This is to make sure that the crops etc you make to one image will automatically be done to all the others you opened in JPEGCrops. Otherwise you have to tediously do them one by one, which kinda defeats the purpose of using "batch" image editing software!

  9. Now that sync is on, you can drag the white bars to outline the part of the image that you want to keep. There are right and left curly arrows at the bottom left which you can use if you also want to rotate all images at once.


  10. Once you've done the edits, it's a good idea to scroll down through all the images in JPEGCrops to check that the correct parts are outlined in all the images. This is to avoid cutting important bits off the occasional image, especially if you haven't scanned them all in exactly the same way and sometimes had the book (or whatever) a few millimetres off.

    You may find you have to tweak some of the edges one way or the other, so that you have the sections you need outlined in all the pages. Worse comes to worse, you could untick the synchronisation, then tweak it just for a particular problem image or two.

  11. When all set, click the "Crop all images" button (NOT the "Crop" button):


  12. It automatically crops them and saves the cropped images in a new folder, the folder mentioned in step 2. (You can open that folder quickly by clicking in the box, selecting the folder path info and copying it into clipboard, then pasting it into your Windows Explorer address bar.)

  13. In my case, I then repeated this with a different set of JPGs where I needed to crop a different edge off. Then I stitched the cropped images together into a single PDF file for ease of printing, rather than having to print each cropped image one by one - PDFill Tools works great for that too (it's the "Convert Images to PDF" button, then drag and drop the image files, and reorder images in the list if necessary).