Pages

Friday 27 July 2007

BBC iPlayer download TV: beta trial sign up, screenshots, video


How to sign up for iPlayer?

To take part in the BBC iPlayer public beta trial, which as previously mentioned launches today (in fact last night), sign up here (but check the system requirements first).

It's an open public trial now but I gather places are still limited, so sign up quick if you're interested.

To check out a YouTube video of the iPlayer software in action, see below.

What's the iPlayer trial about anyway?

The trial of iPlayer that starts today involves free downloading of BBC TV programmes for 7 days after broadcast (7-day catchup TV), to your Windows XP PC - actually it could be as long as 44 days, see my previous post. It's only open to UK residents.

It's not Mac or Vista compatible yet. Other components of the full "iPlayer" won't be available until later in 2007 (see my previous post), e.g. "series stacking" where you can download all back episodes of a series from the start until 7 days after the last episode, even if it's been more than 7 days after the first episode; downloading of radio programmes in MP3 by anyone anywhere without restrictions (non-DRM podcasts - we face a longer wait for those); and simulcast or streaming of TV programmes live over the Net while they're being broadcast (again we'll have to wait).

I was involved in the 2005-2006 trials of iPlayer's predecessor BBC iMP (aka myBBCPlayer), and in the limited system trials for iPlayer earlier in 2007. The links:

How to download the BBC iPlayer software?

I could provide the download link for the iPlayer program but it won't do you any good. You can't just download the BBC iPlayer software (which they call the BBC iPlayer Library) - you have to register to be considered for the trial, and only if you're accepted will the BBC send you login / password details to allow you to download the program and access the restricted pages on the iPlayer website (obviously if you tick "Remember my password" that'll save you time in future, and of course I've blanked out my username and password):


Also, a slight pain this, you have to register yourself separately on the BBC website for a bbc.co.uk membership and sign in for that again after the first login. Yes, that's two separate logins. I assume that when iPlayer is fully launched publicly, they'll get rid of the first login.

Video of iPlayer in action

Here's a YouTube video of a screencast demo I did which walks through the current version of iPlayer (version 1.2.2038 now, it prompted me to upgrade last night). The picture in the mini-player doesn't show up on the recording or screenshot for some reason, but it's fine live. The quality's not fabulous so there are screenshots further below (and yes the BBC have given me permission to put these up), just click to play as usual:


(Credits: CamStudio 2.00 for the screen recording, thanks Nick the Geek!, and for compressing the AVI video file Windows Movie Maker. All open source or free.)

Other iPlayer-related videos

The videos for iPlayer I've seen so far on the BBC site are as follows (thumbnails for convenience only for the purposes of this review) -
  • BBC iPlayer promo:


  • Demo of downloading by iPlayer managing director Ian Hunter:


  • Ashley Highfield Director of New Media at the BBC, on iPlayer:


Screenshots

Here are a few screenshots to get yer juices going, all tasty pink & black. There's a better walkthrough demo in my video above, but these screenshots are much easier to see.

Main iPlayer Library window


Mini-player

When you click to play, this mini window comes up first. For some reason the video doesn't show up in the screenshot but it's there:


You can click to view in Full Screen, or launch it in Windows Media Player, but I'm not including any pics as again the image on the screen isn't visible in the screenshot.

Preferences tabs


Downloading

Via the iPlayer website (see the pic at the start of this post), find the programme you want then click to download:

In the iPlayer Library software on your PC, it'll show the download progress:


This shows up on your computer when the download is done, you can see watched programmes are marked with a green bar labelled NEW (for a demo of playing downloaded TV programmes, see the video above):


Tips and troubleshooting

As you can see the software download is one thing, but the website is another - you have to go to the iPlayer website and look for programmes to download, then choose to download from there; unfortunately you can't do that from your BBC iPlayer Library software (but you could with iMP). Once downloaded, you can play it using the iPlayer Library.

Time and bandwidth. It takes me about 1 hour to download a half hour programme, more for a longer one. It's a pity that no booking of downloads was allowed by the BBC Trust, but that's for another post. Be warned, even though iPlayer uses peer to peer filesharing via Kon Tiki it'll really eat up bandwidth.

Registry. If you have Spybot or the like, you need to allow the changes to your registry made by the Kon Tiki software which provides the download manager component (yes, confusing I know, it's not called iPlayer!):


Also you should let it start up automatically with Windows.

Firewall. If you have a firewall (and no one in their right minds doesn't these days), you need to let kHost.exe and kService.exe through - the former is called, confusingly, Delivery Manager:

Problems? Uninstall. Be prepared for having to uninstall and reinstall the Library several times if you get problems, as that seems the only way to fix it (for me anyway). Luckily in Add or Remove programs (via Control Panel) it is called "BBC iPlayer Library".

There is a help page but you can only access it if you're accepted for the trial and have logged in. However, now see the resources below.

Other resources

I have a number of thoughts and comments on iPlayer generally and the controversy that has surrounded it, but I shall leave those to another post!

(Minor updates on 28 July to add further info and credits for the screencast.)

Tuesday 24 July 2007

Podcasts: an introduction & podcasting howto


This post is a guide / tutorial which explains podcasting generally - with some introductory basics for non-techies about what podcasting is and what it involves (from a user as well as podcaster's viewpoint), then how to podcast your blog via a Blogger in Draft feature (for Blogger users) recently introduced to facilitate podcasting (including vidcasting), touching also on Feedburner's Smartcast feature for podcasts. But much of this post applies whatever blogging platform you use.

I'm starting with a basic explanation of podcasts for beginners. More experienced bloggers may want to skip straight to the section at the end of this post.

The long and slow (for novices)

What's podcasting?

This is my own definition of podcasting: think of it as a way to get audio or video etc "transmitted" over the Net to a user's computer, and thence (if they wish) their iPod or other MP3 player, in a relatively easy, seamless, semi-automated manner, so that they can then play back the audio etc later at whatever time and place suits them.

The audio could be music, it could be a speech, a play, news, birdsong, any kind of audio really.

The pre-Internet analogy: it's like having a super-portable AM/FM radio cassette player which automatically turns itself on regularly, tunes itself in turn to each of your pre-chosen radio channels, and then records them all for you to play back whenever you like. Except that instead of broadcasting whatever the station happens to be playing live in real time at the moment, the station continually broadcasts its latest 25 (or whatever number) programmes, so if you've missed anything recently you can still catch up with it.

And it's not limited to audio, you can have vidcasts and other media files, even documents, downloaded by your podcatcher automatically - if the podcatcher can handle those file types.

How to get podcasts

To catch a podcast you need a suitable "podcast receiver" - which can in fact involve two elements:
  • podcatching software - a special computer program appropriately known as a "podcatcher" or "podcast receiver", and
  • an iPod or other MP3 player (only if you want to listen to your podcasts on the move - you don't have to, you could just play stuff back on your computer).

Podcatching programs are often available for free. The most well known is Apple's iTunes (download, FAQ, tutorials), which is rather more than just a podcatcher. A popular open source (i.e. free) cross-platform podcatcher / aggregator you can download is Juice, formerly known as iPodder, which works on Macs, Windows and Linux computers. Unfortunately iPods and other MP3 players aren't free, although you can always pout at someone suitable or drop heavy hints.

Now, just as you'd tune a radio to the stations you want, so you have to tell your podcatcher which podcasts you want "subscribe" to (i.e. monitor and record). That's straightforward - just give the podcatcher the URLs or Web addresses of the podcast "feeds" (radio station channels) which you want it to monitor.

Then it'll regularly check your subscribed feeds (tune itself to your chosen stations), and if there's anything new, download the new "episodes" to your computer (record it to your radiocassette). If you've connected your iPod or other MP3 player to your computer, typically via USB, many podcatchers will then automatically transfer the audio to your iPod.

You can unsubscribe at any time to any feeds you've subscribed to.

How to podcast audio, video etc

So, how do you podcast content if you're a publisher / producer of audio or video?

Continuing with the radio analogy, you have to transmit in AM or FM if you want your signal to be received by AM/FM radios - it's no good transmitting in shortwave.

Podcasts have to be transmitted in a format known as "newsfeeds" or "feeds", of which there are 2 main flavours - RSS and Atom (AM and FM). Many people will know that newsfeeds can "carry" text as well as audio, and indeed feeds are probably used for text as much if not more than audio.

The common unique factor is the ability to set the feed reader / aggregator or podcatcher software to automatically tune itself to the channels of your choice in turn, and then capture the transmitted text or audio, video etc to your computer.

A podcast is basically just a particular type of feed, or rather a feed carrying a particular type of information.

What are news feeds or RSS feeds?

I'm going to focus mainly on blogs. Now most blogging software will automatically, as standard, create "matching" feed files from blog webpages. This newsfeed file is a separate file from the HTML file for the blog home page or post, with a separate Web address or URL (feed files usually have the ending .XML).

If you're new to feeds, the concept is explained very well in this video from Common Craft which I came across a few months ago:


Nice and easy for text feeds: to "subscribe" to a feed a reader only needs to know its URL. The basic feed for a Blogger blog will be something like http://yourblogname.blogspot.com/atom.xml or for a Wordpress blog http://yourwordpressblogname.com/feed/. (In fact, Blogger creates two or more feeds from your blog - at least one in each of the 2 main feed formats, Atom and RSS.)

But what about producing feeds that broadcast audio files, i.e. podcasts? That's not so simple. It depends on what your blogging platform can do.

To understand this, it's necessary to look at what is actually transmitted in a podcast. Here's where the radio analogy breaks down a little.

First, actually it's not like there's a computer server sitting out there on the internet constantly beaming out feeds like a radio transmitter beams out radio waves. In fact it's much lazier than that.

New analogy. It's more like a shop window with constantly changing wares on display - when you update your blog with a new post, your blogging platform (the window dresser) automatically changes your shop window to reflect that. A feed reader is the feed subscriber's faithful personal assistant, regularly going out to bring them back all the stuff from the windows in each of the shops they've told it to visit.

With a basic text feed, the feed reader gets the text - whether full text or excerpts from posts only is a different issue, discussed elsewhere, but basically the reader gets everything that the publisher or author decides to send out (put in the window) for the feed at the subscribed URL. So the shop window might display all new products (full feeds), or just limited free samples of them (excerpts, or partial feeds) where you have to then go into the shop to get the full product if you like the sample.

Normally the shop window only displays the latest 25 (or whatever number) products that have been added to the shop. There's only so much room, so when a new product is added the oldest gets removed from the window. A subscriber's personal assistant will check if something new's been added since their last visit, and if so fetch back the latest stuff.

Now with a podcast it doesn't work in quite the same way. The podcaster doesn't actually transmit MP3 files embedded within the podcast. What it does is to give the addresses of those files, and the podcatcher then goes out and gets them from wherever they happen to live. Back to the shopping analogy, it's more that the shop window here displays not the products themselves but catalogues of goodies, which could be from that shop or some other shop; and the personal assistant looks at the catalogues, then trudges over to those shops and brings the goodies back to the subscriber.

If you're a non-techie who's read this far, hopefully the next section for more experienced users will now make some sense.

The quickie (for more experienced Blogger users)

Practical step by step

To turn your Blogger blog into a podcast:
  • login to draft.blogger.com with your usual Blogger login, then -
  • to create a vidcast (aka video podcast, video cast, or vodcast):
    • go to your blog and create a new post
  • to cast other types of media e.g. music, or even documents:
    • note the URL of the MP3 etc file you want to podcast (see below for some suggestions on where to upload your own files)
    • turn on "Show Link fields" first, if not already on (go to Settings, Formatting, scroll down, set Show Link fields to Yes and Save Settings - see the Team Blogger video below)
    • create a new post in the usual way. Now you'll see the the Link box with "Add enclosure links" to the right of it (highlighted by a red rectangle below)


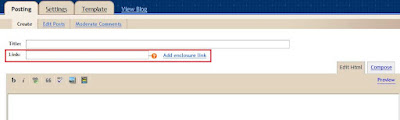
    • click Add enclosure links and you'll see this:


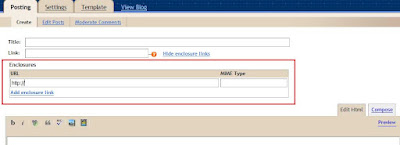
    • in the URL box (not the Link box), enter the URL of the MP3 or other file (no need to put anything in the Mime Type box, normally - and no need to put anything in the Link box either)
    • click "Add enclosure link" again if you want to add more MP3 file links in the same post, otherwise just carry on with the text of your post
    • if you want the MP3 link to be visible in your blog, and possibly allow visitors to play the file on your blog by clicking a Play button, via Delicious Playtagger (here's how), note that the link won't automatically appear in your post. You need to also add the a href link to the MP3 in the usual way in the main Blogger post editor box. Otherwise, the links you added in the URL box won't show up in your blog's webpage, only in its podcast feed.
  • publicise your podcast feed URL e.g. in your blog sidebar, email sig, submit it to Apple iTunes etc (see the iTunes podcasting FAQ).

Note: the MP3 files you link to must obviously already be hosted on a server somewhere on the Web, in order to have a URL you can link to. Make sure you've got all the necessary permissions, whether you're linking to someone else's file or uploading the file yourself. If you need somewhere to store your MP3 or other media files or documents for free, you could try Ourmedia (use SpinXpress), or file hosting services like Fileden (which I mainly use just for my favicon but it's been fine so far, and they accept MP3 uploads and allow hotlinking) - or use this workaround to convert the MP3 to a video file which can then be hosted on Google Video via Blogger video uploads, but watch the apparent 5MB limit issue mentioned.

Here's some more background and detail for those interested.

Background - what's a podcast

A podcast is a particular type of newsfeed which enables the recipient to download media files, typically audio files like MP3s, to their computers (and thence to their iPods or other MP3 players, if they wish) - using special software known as podcatchers or podcast receivers.

Video files and indeed other types of media files like image files can also be podcast (videocast or vidcast etc). I refer mostly to MP3 audio files in this post, but what I say will generally apply to videos and other media files too.

The podcaster, the author or publisher of the podcast, doesn't actually send out MP3 files with their podcast. Instead, the podcast includes links to the URLs i.e. Web addresses of MP3 files stored somewhere on the Net - maybe on the same server, maybe on someone else's server (assuming they've got the necessary permissions of course).

The podcatcher receives the subscribed podcast, gets the URL address info of the audio files from the podcast feed, and then retrieves those files to your computer behind the scenes.

A podcast has got to be in the right format for podcatchers to understand it. Standard blogging software automatically creates a special separate feed file (usually ending .xml) from the blog posts, so that the blog owner can then offer the feed's URL to their subscribers.
What are feed enclosures?
Unfortunately, just including a link to an MP3 file in your blog post isn't enough to get podcatchers to recognise your feed as a podcast (and then go fetch those MP3 files).

They will only do that if, in your feed file, the MP3 links are within special code called "enclosures". I think the term comes from the notion of the MP3 being "enclosed" with or attached to your feed, even though it really isn't "enclosed" at all.

(A twist. The two main feed formats, RSS and Atom, deal with enclosures slightly differently - the enclosure code is not the same for each. But they're still enclosures.)

One thing to watch - generally it's best to have only one enclosure (MP3 etc link) per post, particularly for RSS feeds, because strictly the RSS format only allows one enclosure per item or post (Atom's much better with enclosures), and also some podcatchers can't cope with more than one enclosure per post.

On Blogger and some other blogging platforms, unfortunately if you just add a simple MP3 file link (a href etc) to your post, it does not get converted to an enclosure when Blogger creates the newsfeed file from the post. So a podcatcher receiving your feed just wouldn't know it was supposed to download the linked MP3 file. It only sees it as a simple link, not a proper enclosure - and it only downloads files linked to in enclosures.

So what can we bloggers do? Well, there are workarounds; the simplest is to use Feedburner.
Using Feedburner for podcasting
Via the fabulous Feedburner, now owned by Google, who were very smart to buy them (I've been a huge Feedburner fan since I started learning about blogging technology, and it's not just because they linked to my blog!) - you can "burn" your blog's feed (see movie), i.e. give your feed's URL to Feedburner to do clever things with it. One of those clever things is turning your feed into a proper podcast.

If you make sure to tick the "I am a podcaster!" box when burning your feed, Feedburner tries to insert the appropriate enclosures when it burns your feed. Just use the URL of the burned feed that Feedburner gives you for your podcast feed. (Yes, you can offer more than one type of feed for the exact same blog, e.g. full feeds and partial feeds or excerpts, or even headlines only - see this post for how.)

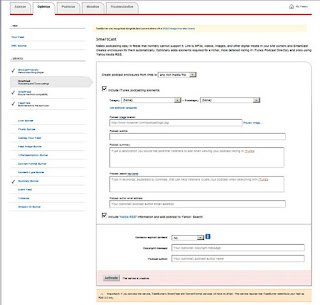
Alternatively you can activate podcasting in the Optimize, SmartCast tab for that feed. You can even include iTunes podcasting elements ("metadata") e.g. categories or keywords for users to find when searching in iTunes, and include Media RSS (which supports multiple files per item), and add the podcast to Yahoo! Search:


The way Feedburner adds enclosures for media file links isn't entirely foolproof, but if you know how it does its thing (see this Feedburner help, and there's lots of info in the Feedburner podcasting forums) then you can produce posts which convert into decent working podcasts. I won't go further into that now, basically the best way is to add rel="enclosure" to your link e.g.
<a href="http://whateveryourlinkis.com/whatever.mp3" rel="enclosure">

Blogger in Draft enclosures

Now, riding to the rescue of Blogger users, we also have Blogger in Draft, a playground for experimental features which aren't quite ready for prime time yet.

Blogger in Draft has a newish feature which will convert MP3 and other media links to proper enclosures in the resulting Blogger feed.

How to include enclosure links in Blogger in Draft

To access BiD features, just login to your Blogger blog via draft.blogger.com instead of www.blogger.com (see these posts).

You have to turn on Show Link fields then click Add enclosure link. This video from Team Blogger shows how:


Now, to podcast an MP3 audio file, you just insert its link in the URL box. If you want to include more than one MP3 file in your podcast, click Add enclosure link again and an extra line will appear: enter the other link in the URL box there, and so on.

Important note: do not enter the MP3 link in the Link box. That won't turn it into an enclosure and in fact it'll change your post's title to a link to the MP3 file, not the post or item page. You can leave the Link box blank altogether if you want to; the podcast will still work. It took me ages to work out what that field was for when I started blogging, and I still don't use it, personally. (See the official Old Blogger or Blogger Classic help on the link field.)

Now, when you publish your post, the MP3 links you've entered in the URL boxes will automatically be available in your feed, which will be all shiny and podcast-friendly.

For completists: you'll have noticed there's another box next to the box where you insert the MP3 file's URL, headed MIME Type. That has to be filled in too, for the enclosure code to be produced properly. The good news is, normally Blogger in Draft automatically fills in that box for you.

In fact, as mentioned it's not just MP3s you can podcast. You can "broadcast" other types of files too, e.g. video files (which makes it a vodcast, vidcast or video cast), even image files, PDFs etc, for podcatchers to download in the background - though note that not all podcatchers recognise all file types. Blogger in Draft will cleverly recognise the format of most file types after you enter the URL, and when you click outside the box it automatically completes the MIME Type box as appropriate.

Supported file types

Hopefully Team Blogger will give us their definitive list of file formats at some point (and they're seeking requests or suggestions), but from trial and error I've found that Blogger in Draft will automatically fill in the mime types for these file formats. That's a lot of file types!:
  • avi
  • doc (Microsoft Word)
  • flv (Flash)
  • gif
  • htm
  • html
  • jpg or jpeg
  • m4a
  • m4v
  • mov (Quicktime)
  • mp3
  • mp4
  • mpeg
  • mpg
  • ogg
  • pdf (Adobe)
  • rtf
  • txt
  • wav

For other types of files you'll have to enter the correct mime type in the MIME types box yourself; for example the following file types I tried, just out of interest, don't get their mime types auto-completed at the time of writing:
  • 3gp
  • aac
  • csv
  • mid
  • Open Office odt or ods
  • ppt
  • rtf
  • swf
  • tiff
  • tsb
  • tsv
  • wma
  • wmv
  • xls
  • xml

The post vs the feed

You'll notice that, when you view your published post, no MP3 link is visible. That's the downside of the Blogger in Draft method. The MP3 link is only available behind the scenes, to feed readers / podcatchers - not to someone who just visits the blog webpage and views your post via a web browser.

If you want to include a visible clickable link to the MP3 file within your blog post, which visitors to your blog can see (and play from within your blog), you'll have to insert the link manually in your post in the usual way, as well as inserting the URL in the URL box. Which is a bit tedious.

Feedburner is more helpful here. If you insert a "normal" hyperlink to an MP3 file (or other media file) in your blog post, when Feedburner processes your original feed it'll automatically add enclosures for that link (as long as you ticked "I am a podcaster" when you burned the feed, or after you burned it activated SmartCast, see further above).

Wishlist and issues

You can guess what I'm working up to. Now that the Feedburner team are part of the Google family, why not have even more of that juicy Feedburner / Blogger integration?

My main wishlist item, to provide bloggers with more control and ease of use, is this: in the Blogger post editor, can we have a toolbar icon please (and a keyboard shortcut is a must of course, e.g. Ctrl-Shift-m for mp3 or media), similar to the hyperlink or video icon, which you can use for media files you want to 'cast?

It would be great if a user could highlight the text which they want to make into a clickable link, click the Media file icon, get a nice popup box, enter the URL of the file in that box, and have Blogger automatically put in special behind the scenes code magically so that, on the published post webpage, the link can be seen as a standard hyperlink to the MP3 file (playable via Delicious Playtagger etc if you've enabled that (here's how)) - but, in the feed file, it's turned into a proper enclosure.

Alternatively (or as well?), if a user manually enters the enclosure code in the post editor (say a standard a href link, but with rel="enclosure" manually added), it would be cool if Blogger could do the honours with the media file in the same way, again. (I tried adding rel="enclosure" to a link just to see, but it didn't work - no proper enclosures were created in the feed).

In other words, auto-adding enclosure links for audio files as well as video uploads would be very nice indeed.

And not surprisingly I'd like to be able to have it all (eventually!) - i.e. to have, in Blogger, all the handy features you get with SmartCast - iTunes podcasting elements etc.

Another observation - editing. There's an Add link but I'd like a Remove link against each line. At present you can't delete a link you've added.

Also, if you save a draft post and go back into it later, you have to click Show enclosure links to see the links you've added. I'd like those boxes to be automatically expanded and visible when you go back in to edit the post, if they've got anything in them when you saved the post. (Something Aditya or Jasper could probably do with Greasemonkey, if not Kirk, but it would be nice to have this built in.)

I'm sure that, given the top notch quality of the people in the Blogger and Feedburner teams, they should be able to get all this to work without too much difficulty. So, pretty please?

Sunday 22 July 2007

Microsoft Word keyboard shortcuts: generate list automatically


If like me you're a keyboard shortcut fan, did you know that you can automatically generate a document listing all your keyboard shortcuts in Microsoft Word, which you can then print or save etc?

Microsoft has provided a howto, but it's slightly different in Word 2003 which I have, so here's a step by step on how to automatically produce a comprehensive list of keyboard shortcuts for that version (for other versions it will be similar).

1. Go to menu Tools, Macro, Macros:


2. For the "Macros in" dropdown, choose Word commands (you can ignore the Macro name bit):

3. In Macro name, choose ListCommands (quicker if you just type or copy/paste that in rather than scrolling through the long list in the box):


4. Then choose Run and you'll get this List Commands box. I'd pick All Word commands as it's a bit more comprehensive:


5. Then hit OK, and the document listing the Word keyboard shortcuts is generated, which you can save or print etc as you wish:


I've updated my original keyboard shortcuts paean to link to this post.

Friday 20 July 2007

Vocal health, voice care, food & drink dos & don'ts, singing techniques, free voice analysis software


Some teachers, singers and actors in particular may suffer vocal problems, but they're not the only ones - many of us have difficulties with our voices from time to time. It's not surprising: apparently in a typical day a teacher's vocal folds (a more accurate name for them than vocal cords) open and close about a million times, yes that's a million times in one single day. And an opera singer's vocal folds can do the same in just a few minutes. I heard all that plus more at some recent events "Voice Makeover" and "Blagger's Guide to Singing" at the Dana Centre.

This isn't so much a review as a selective summary of some things I learned there - see this Telegraph article for a good preview of the Blagger's event, including a video (not for the squeamish) that was shown there of Jeremy Fisher's vocal folds moving while singing My Way, and what happens in terms of muscles etc when you speak or sing.

The speakers at these events, in alphabetical order, were:
  • Steve Durevitz, sound engineer from recording studio 2002 Studios
  • Jeremy Fisher and Gillyanne Kayes vocal coaches from the Vocal Process
  • Carrie and David Grant vocal coaches of TV's Fame Academy fame
  • Mary Hammond, vocal coach and Head of Musical Theatre at the well known Royal Academy of Music, London
  • Tom Harris, consultant laryngologist and ENT surgeon at Queen Mary's Hospital, Sidcup, Kent (which has a specialist voice clinic), and Sara Harris, speech & language therapist at Queen Mary's (and yes, they're husband and wife).
    • From contacts in the UK professional (classical) singing world I know that Tom Harris is considered the "go to" consultant for voice problems, and that Sara Harris is a lovely person who has helped singers as well as others with speech difficulties.
  • Dr David Howard, engineer and senior media fellow holding the personal chair in music technology at the University of York, and a singer himself.
At the Blagger's event the video I've mentioned was shown, Tom and Sara Harris spoke as did Gillyanne Kayes (who is doing a part-time PhD on how female singers in commercial music deal with the break or gear change in their voices), and Carrie and David Grant gave some useful tips on singing including interpretation and performance. At the Makeover event attendees were split up into smaller groups and rotated round to hear Steve Durevitz, Mary Hammond and Dr Howard in turn. Both events ended with a (don't shudder) participative singsong. Ironically, given tips heard later about mike technique, Tom Harris didn't have the mike close enough to his mouth and was barely audible!

In no particular order, here are the points I found the most interesting. (David and Carrie Grant were excellent and inspirational as well as entertaining, but I won't deal with what they said in this post.)

Food and drink, and vocal care

Some tips from the session with Dr Howard, a very enthusiastic speaker who was able to impart information about voice production, what nodules are etc very clearly, with the helpful use of demos, models and a hands on trial:
  • It's important that your vocal apparatus, including the mucus on your vocal folds, stays sufficiently hydrated. (If you're delicate, look away now - but the colour of your urine is a good clue, if it's too yellow it's too late to re-hydrate, you shoulda had that water a few hours ago.)
  • Water, water, water! Any water you drink goes first to your stomach, liver, kidneys etc - it's only excess water after that which goes to your saliva and vocal folds, so if you're not drinking enough water your vocal folds etc won't be properly hydrated.
  • Do (good for voice). Water is best. Do drink lots of it. Professional singers and actors can drink 4 litres a day in addition to the water they get from their meals. Teachers should sip water often, a lot more than many do.
  • Don'ts (bad for voice!). Within at least the hour, preferably longer, before you are due to sing (or act). don't take dehydrating drinks like coffee, tea, Coca Cola or Pepsi (anything with caffeine in it), alcohol.
  • Don'ts (bad for singing!). Avoid eating foods and drinking drinks which contain fat or anything else which coats your mouth or vocal folds and prevents water getting to your larynx, like dairy products (milk, ice cream, yoghurt etc), chocolate, bananas. (Which to me proves one thing: don't try to troubleshoot Firefox shortly before you have to sing, act or lecture! Sorry, in joke, you had to have read these comments too.)
  • Do (good for singing). As well as water, do take what clears the fat etc, like steam (obviously not direct from the kettle!) and (this was new to me) citric fruit juices especially lime juice, lemon juice, and orange juice (in that order of preference, it seems). Possibly even have a squirt of Jif Lemon, aiming carefully down the back of your mouth to avoid the teeth! Interesting hands on demo - Dr Howard gave chocolate to the attendees to munch, then water to drink, pointing out how drinking water didn't clear it but adding some lemon juice to the water would. And it certainly did.
  • Don't. Coughing is very bad for your voice. The best way to cough is not to do it!

Different vocal styles / techniques - and how to belt?

Mary Hammond took us through trying to sing the same few excerpts in different ways - what she called "speech quality", twang or belt, pop (breathy, whispery, lots of air), and spitting-out-the-words Gilbert & Sullivan / classical. (Sirens are by the way apparently good because they get blood going to the operative parts. What's a siren - views seem to differ on what the right vowel/consonant is to use it on, and you need to go to the original page to see the video clip.) She was very good but unfortunately she just wasn't given enough time to do more than touch on how those different sound qualities were produced.

Big red warning. Many English classical singers brought up in the choral tradition, especially women, have trouble getting away from that posh vibratoey classical or operatic sound to achieve a contemporary music theatre "belt" or rock / pop quality (pop in the general Madonna / Aguilera etc sense rather than the soft, breathy sense which Mary Hammond meant during her session).

In vocal pedagogy or voice pedagogy (i.e. the art or science of teaching singing) there is a well known school of thought, to which it seems Mary Hammond, and certainly Jeremy Fisher, Gillyanne Kayes and others, subscribe, chiefly popularised by Jo Estill and her trademarked techniques. This holds that a high larynx is the key to producing that sound. I just want to add a warning note that many other vocal technique experts think maintaining a high larynx etc is positively unhealthy and bad for you, and that you can still produce that quality of sound with a low larynx - as exemplified by Aretha Franklin and Mariah Carey (taught from childhood by her mother who was an opera singer at the New York Met, father part African American part Venezuelan, grew up listening to gospel, R&B and soul - a killer combo really). There's an excellent Wikipedia article which summarises the belt controversy very well.

I have no idea either way personally, as I'm no vocal production or singing pedagogy expert, but I certainly don't want to risk damaging my voice, and someone whose knowledge of vocal anatomy, physiology and singing I trust absolutely believes strongly that the Estill view is wrong. So don't take as gospel everything you hear about voice production and the best way to belt. Bear in mind that there is more than one view, so it would be sensible for you to find out all you can about the different approaches and then make up your own mind - it's your voice and health we're talking about here.

Voice processing using sound editing software

Steve Durevitz gave a great explanation of some basics, with a demo on a Mac and a brave volunteer/conscript singing Frère Jacques.

Dynamic microphones are much more robust, cheaper, you can generally swing 'em round and drop 'em on a stage; condenser mics are more expensive and more sensitive. You can get a variety of microphones with different directionality in terms of where they pick up sound from, e.g. even 180 degrees. But with most mics you do have to speak or sing very close to them.

Pop shields between your mouth and the mic stop the p-p-p pop sound on p's and similar noises; a cheap way is to bend a coathanger into a circle and stretch tights over it. A windshield stops the sound of the wind, which can be a big interference in outdoor recording (thuds, booms and other nosies, I know, I've had that with outside recordings!). A de-esser reduces sibilance - different people are sibilant at different frequencies, and you can get rid of that (reduce the volume at those frequencies) during recording or afterwards.

His demo used GarageBand which those lucky Apple Mac people get for free with their Macs. Audacity (see Wikipedia) is another audio recording and editing tool he recommends, I use it myself and there are versions for PC and Linux / Unix too.

Autotune (there's a basic version in GarageBand) moves a note to the nearest note in the key you're in; the most famous use of auto-tune, for effect, was in Cher's Believe. For very bad singers unfortunately the nearest note may well be the next note down or up from the one they were aiming for, so something like Melodyne works better there. Some singers even use auto-tune in real time in live performances (so even if they're off when they sing into the mike, the audience hears the right notes coming out of the speakers), - some of them even feed the pitch-corrected sound back to their own headphones to help them keep in tune better. I've certainly heard some chart toppers who ought to use autotune live!

He also described the main effects used in processing vocals - compression, reverb, equalisation - which again can be done using basic software tools including Audacity.

More tidbits. After editing together the main vocal from many takes, Steve often gets another take for the right side, and another for the left, to fatten the sound - the equivalent live would be using a chorus effect. And I never knew this but apparently Madonna is well know for using shadow singers who sing along with her when she performs live, mainly for the effect, but if she goes off occasionally you'd also never notice!

Other resources including free software

I've researched the speakers since the event, and found some further interesting resources.

The British Voice Association, which it seems all speakers for the event except Steve Durevitz have connections with, has some articles and tips for singers etc on things like:
Dr Howard has links like:
I've noticed that the Harrises and Dr Howard have collaborated on a book, which seems to be for medical experts or hospitals mainly, but if anyone is interested it's The Voice Clinic Handbook (Exc Business and Economy (Whurr)) - I've not read it myself but the synopsis says "The first half of this book provides an outline of the structure and function of a voice clinic, a review of the structure and function of the vocal tract and an outline of the most common forms of voice disorder likely to be encountered in a clinic. It also provides brief descriptions of the various forms of therapy available for the treatment of non-cancerous voice disorder and suggests appropriate treatment modalities. The second half of the book is based in science and contains an overview of the instrumentation available for the investigation and documentation of voicing."

Rumbles about Dana Centre events

A rumble rather than a rant, and bearing in mind I am an A type who likes to know exactly where I am: but when I go to a talk I want to know who's speaking and what their expertise is. Not everyone reads or remembers the website descriptions.

Maybe it was my own woolly ears, but as far as I could tell the compere for the Makeover event, Tracy Collins, didn't even announce her own name or job properly (c'mon, if you have an opportunity for self-promotion like this, use it - no one will mind!). More to the point, when she announced the speakers, she spoke their names far too quickly and mumblily - and I know it's meant to be informal an' all yeah, but it would be nice to hear surnames, not just their first names. I had to peer at their namebadges while trying not to be too obvious about it (really peer - the lettering was tiny). But then I guess I'd only be happy if there was a large slide with speakers' names and job titles on display throughout the event. As for announcing their areas of expertise, it was only afterwards on looking at the webpage again that I realised David Howard was a media lecturer at the University of York. Furthermore, from other sources I see he's "Dr" Howard, but that wasn't mentioned. I feel speakers' names and roles should always be given slowly clearly at the start, and then again for each individual just before they speak.

Another rumble: as I mentioned above, there simply wasn't enough time e.g. for Mary Hammond's mini-session, which merited a full event of its own on the exact means of achieving the different sound qualities, and which in fact I had thought was the main point of this event. I hope the Dana Centre takes note and programmes accordingly, on another occasion.

Friday 13 July 2007

One for All URC 7555 review, & how to choose a universal remote control


This post is:

The quickie

If you're after a single multifunctional remote control to control all your audiovisual gear - TV, DVD, Freeview, satellite etc - One for All's range is a good bet, given that URCs are one of their core product lines and they clearly try to provide decent customer support. The 7555 (One For All Universal 5 in 1 Stealth TV/DVD/SAT/AMP/VCR Remote Control) at under £30 (including postage) is superb value for money if you're happy with a (relatively) basic infrared URC which still has learning and macro capabilities.

I didn't bother with Philips URCs because I didn't think much of their website (in terms of helping potential customers find the info they want to know) or their pre-sales customer email support. Logitech also have a good reputation for their URCs but their price point was a bit more than I was prepared to pay for what I felt I needed.

The long and slow

What's a universal remote control?

For those not familiar with URCs, a universal remote control is a single remote to replace all the several remote controls for your audio-visual (AV) devices like television, satellite or cable receiver, Freeview box, DVD, VCR, home cinema amplifier and other set top boxes (STBs). (For anyone interested: basics of how to connect up audiovisual gear). They're also known as multifunction remote controls, multi-function remote controls, multi-functional remote controls, you get the drift...

Their purpose is obvious - for not very much money (depending on which one you buy), you can save space and stop fumbling around swapping remote controls when watching television or home theatre. Plus, if members of your household tend to fight for the remote, well they can have one of their own!

The downside is, if you lose your single URC down the back of the sofa you'd better have your original remotes somewhere where you can still find them. Or buy another URC.

Criteria - what to consider when picking a universal remote control

Before buying new gear, generally you should of course first figure out what's important to you (though good decision making rules say you shouldn't spend too long pondering, if you want to make the best choice). To me, it doesn't matter how cheap or expensive the gadget is - I still try to work out what would be best for my situation.

Below is the list of criteria I used to choose my URC, which I hope will be of help to others considering how to buy a universal remote control. Your own mileage may vary, of course - I finally decided on the One for All 7555 (One For All Universal 5 in 1 Stealth TV/DVD/SAT/AMP/VCR Remote Control), which I got via Amazon UK, based on my own personal setup and requirements.
What range of equipment does it support?
My main requirement was that the URC had to work properly with my beloved Topfield 5800 PVR. You probably have other key equipment which you need to make sure any universal remote control you buy will work with, too.

Most URCs claim compatibility with all "common" or "standard" audio visual kit. If you've got any non-household name gear you consider essential, you might want to doublecheck, if possible, for the specific brand and model - e.g. with less common make or models like the Toppy.
How many devices can it control?
Also, I needed a remote that could control several AV devices - TV, Toppy, old Panasonic hard disk cum DVD-RAM recorder (largely superseded by the Topfield, but I use it to play DVDs), old VCR in case I need it - with a little room for expansion should I get more gear (I've been eyeing BT Vision for a while).

So I thought a URC which could handle 5 devices would be about right. Some may want one that controls just 2 or 3; others, with full-blown home theater systems, maybe a dozen!
How many buttons does it have and what are they?
If a remote you want to replace bristles with enough buttons for the twenty-fingered, a URC with just 10 keys won't do much except frustrate you - unless it's one of those fancy cost-the-earth ones with touch-sensitive screen where the same key or location can serve multiple functions, all nicely labelled with programmable LCDs which name the buttons differently depending on the selected device / mode.

Most URCs come with a basic set of standard buttons which do what you'd expect e.g. volume up and down, channel / programme up and down, numbered buttons, mute, play, stop, pause, fast forward / rewind, red, yellow, blue keys etc etc.

Some have extra buttons or keys on top of that, which can be programmed or assigned other functions (see learning, below) - the question is, how many of those extra keys do you need?

If you don't have many devices or many buttons on your existing remotes (or indeed even if you do, but you don't use most of those keys), a basic URC may be good enough. But if there are many buttons you regularly use, you'll probably need a URC with lots more extra buttons (maybe on a shifted basis, see below) or programmable keys to which you can assign the special functions that you use the most.

The Toppy remote has quite a few buttons so I had to be sure to get a URC with enough keys for my needs. But forking out for a top of the line touchscreen remote just wasn't worth doing, for me.
Is it programmable, how easily, can you get a key or button to "learn" a function from your existing remote?
I chose the 7555 not just because it supports the Toppy, but because of its "learning" feature (IR code learning).

You can basically get any key on the 7555 (except a few reserved ones) to work the same as any key on the original remote control - it "learns" to do the same thing - just by pointing them at each other, doing a few keypresses on the 7555 and then pressing the original key whose function you want to copy, in order to beam the correct infrared signal over from the original remote for the URC to "memorise". Very clever.

Plus, the same key can be made to learn different functions in different modes (such as TV, or DVD). E.g. in TV mode you might assign screen aspect change to button X, but in VCR mode you could use button X to get slow motion playback.

The 7555 also has "shifted" learning. This simply means that the same button can be made to learn two different commands, one triggered when you just press the button, the other triggered when you press a special key first (called the Magic button by One for All) and then press the button. So, you can have twice the number of separate commands as you have available keys.

The manual says the 7555 can learn 25-40 commands; I've not needed that many so far!
How easy is it to keep track of what button does what? Can you be bothered to keep track yourself?
This is related to the number and complexity of your devices, and how many extra functions you assign to the "spare" buttons on the URC.

If you get keys on the URC to "learn" functions operated by one or other button of your original remote's keypad, you need of course to remember which key on the URC equates to which key on the original. As the same key can perform different functions in different modes too, you may have to remember (or note down) different key assignments for different modes, too.

If you don't want to have to do that, you might prefer to invest in an expensive URC where you can program labels on the URC that change to describe what each key does for each mode you're in (TV, satellite etc).
Do you want programmable macros?
This wasn't a major factor for me but has turned out to be helpful. You can easily set up the 7555 so that e.g. pressing just one particular key switches on your TV, satellite receiver and DVR all in a row (or in my case, just TV and Toppy). Similarly you can use one key press to power everything off (or rather put them on standby) in one go. Heck, if I wanted I could get one button to turn everything on, put the volume on high, tune it to channel X in widescreen mode and record it, then make the tea. Well maybe not the tea, but who knows what's on One for All's roadmap.

In short, any series of button presses on the URC 7555 (up to 15 keystrokes max) can be programmed as a "macro" to be triggered by a single key stroke. Useful. And again, as with codes learning, you can have shifted macros too.

One point to watch for though is that if you assign a learned function to a key in one mode, and then you try to assign a macro (sequence of key presses) to the same key, the macro just won't work. The key will only operate the learned function.
Do you need to control stuff that's out of sight?
Is your gear tucked away neatly in rows of closed cabinets, controlled by radio frequency (RF) remotes? If so, a humble cheaper infrared URC won't do, you'll need a URC that transmits radiofrequency signals. To work, infra red remotes need a clear uninterrupted line of sight to the infrared receptor on the appropriate box. I barely have room for my existing stuff never mind cabinets, so infrared was all I needed.
Do you want easy PC setup and control?
The higher end URCs can be connected to your computer and configured and controlled etc on screen via the PC. This hopefully makes life easier and simpler for the user, of course, especially novices. But the extra user-friendliness certainly comes at a price. I didn't feel I needed something like that myself, I'm quite happy to putter around inputting codes into the URC direct myself rather than have a computer automate that.
What's your budget?
Last, but not least, I only have a few AV gizmos. Home cinema afficionados with 10 pieces of kit might want an all singing all dancing URC that costs £200 or more, and if they can afford so many bits of AV gear they can probably afford (and might find most convenient) a top of the rangeURC too.

But me, I just want it to do what I need - I ain't gonna spend £300 when less than £30 will do. I go for value for money and fitness for purpose rather than buying the most expensive unit I can afford.

Why not Philips?

Philips supposedly has a good line in URCs, and I have an excellent widescreen Philips TV - but their pre-sales support was hopeless. Many of their online "manuals" (brochures, more like, usually) weren't detailed enough; and their site search function was equally useless (sorry but I don't have time to individually download each of their many URC PDF manuals just to see if (a) it lists the supported gear in the first place - many don't - and (b) the Topfield is in the list).

That's just me and my "boycott the consumer-unfriendly" principles talking, though. I'm sure others are happy with Philips, and as mentioned I do like my Philips TV. But then I don't need any support from them for that, I can even turn it on and off all by myself, wheee, fancy that (or if I can't, well my 7555 can now do that for me!).

Logitech are also known for their URCs e.g. the Harmony range, but their starting price was higher than I was prepared to pay for what I wanted, and after the nightmare of trying to find out which Philips URCs worked with the Topfield, I wasn't prepared to risk going through the same palaver again with Logitech.

So, I turned to the Toppy forums. (One reason I bought a Toppy rather than some other brand of hard disk recorder, apart from twin Freeview tuners, 250 GB hard disk and the availability of user-programmable mini-apps called TAPs to enhance it, was the supportive and helpful online community of knowledgeable enthusiasts e.g. at Toppy.org.uk).

I saw from their URC thread that someone had got an One for All 7555 and was happy with it, so I took a look at prices and checked out the One for All website - which was much more user-friendly, consumer-friendly and informative than Philips'. I went for the 7555 and it does exactly the job I need.

The One for All URC 7555 universal remote control

The One for All 7555 URC One For All Universal 5 in 1 Stealth TV/DVD/SAT/AMP/VCR Remote Control controls up to 5 devices, i.e. has 5 modes. The device buttons are labelled TV, Satellite (for satellite, cable or Freeview), VCR (for video recorder wouldja believe), DVD and Amp (for amp, tuner etc) - but you can change e.g. the VCR button to control a second TV or whatever, if you prefer.

So if you press the TV key, the channel changing buttons etc will work on the TV. Press the Sat key to make the same buttons change the channels on your satellite receiver. And so on.

Setup / installation

As is standard with URCs, the 7555 comes preprogrammed to work with many common units, but you need to do some initial setting up to tell it what equipment you've got, by entering the right codes.

There's a list of brands at the back of the manual, with corresponding codes (sometimes more than one set). To get the URC to control your equipment properly, you enter the code given for your make and model of gear, and then rinse and repeat in a different mode for each of your bits of kit (TV, Freeview etc).

You can also get the codes for your manufacturer and model from the One for All website, and if all else fails there's a search function to try to get to a working code. But the choice on offer is massive so hopefully not many people will have to do that.

If several code options are given, just try and see which one works best (Topfield is listed in the Satellite section).

Manual

The One for All URC 7555 manual that came in my box, in 7 European languages (downloadable manual in 13 languages), is concise and clear, taking you from setup to more advanced functions. And it's a proper booklet too, not like the CD many companies fob you off with when flogging you computer hardware or software, or a flimsy 1-sheet leaflet stitched together by someone writing in their four & a halfth language. There's a detailed page with support contacts (email, web, phone, fax) in different countries, and what info to give them when contacting support.

Yes, I feel a rant coming on about manuals, one of my consumer bugbears. If One for All can provide users with a properly written hard copy user guide for a gizmo that costs less than £30, why can't manufacturers of much more expensive gadgets e.g. mobile phones or camcorders do the same? They simply have no excuse not to, in my book.

Preliminary tip. It pays to spend a few minutes working out and noting down in advance which extra functions on which remote you want to assign to the extra keys on your URC via the learning feature. And similarly for the macros you want to program. Then you can do it all smoothly in one go.

TV

To control my TV, there are two functions I use a lot which on my Philips remote are tucked away, I even have to open a flap to access one of them.

Mapping them on to two obvious keys on the 7555 has made life a lot easier. (I've even sneakily got one key of the URC, in Sat mode, to emulate another key on my TV remote! Worked for me, anyway.)

TV tip: the power button turns the TV off but won't turn most TVs on, use a number button instead to do that.

Topfield 5800 PVR

The 7555 doesn't have as many buttons as my Toppy's remote. But it has just about enough for what I need, even without resorting to shifted learning commands. I don't in fact use all the buttons on my Toppy anyway - others might, and if so they might want a URC with more buttons, or more customisable buttons.
Learning
I've set out my Toppy button assignments below for anyone interested. Non-Topfield owners can of course skip the next section.

Topfield 5800 PVR key mappings

Code 1545 seemed to work best for me. But I had to make it learn volume up and down and channel up and down, to get those buttons to work properly.

Tip: to record, you have to press the Record key twice in a row, this is just a "feature" of the URC 7555.

In case this may help other Toppy owners, here are my key assignments on the 7555 (reflecting my reliance on MyStuff EPG and QuickJump), copied via the learning function:
  • ? = Archive on the Toppy's remote
  • Radio = White, for deleting recordings from the archive
  • >>| = Text, for QuickJump's back 30 seconds
  • Subt = PIP Swap, for QuickJump's back 1 minute
  • |<< = |> (search), for setting a new ControlTimer
  • Back = Exit. Seemed to make sense to me.
  • -/-- = Opt (for powering off 10 mins after it finishes recording, if still recording when I want to go to bed).

(I found that keys in about the same position as on the original Toppy remote worked best for me, as I seem to use them more by memorised location / feel than label or look.)

Macros

I've mentioned what macros can do. The macros I use on the 7555 are:
  • Fav key (bottom right) - turn on everything
  • PPV (bottom left) - turn off everything
  • Magic key then Power (a shifted macro) - turn off TV now, and turn off the Toppy 10 mins after it finishes recording (using the Opt 10 minutes trick).

Macro troubleshooting tip: at first I couldn't get a macro on a button to work in Sat mode, even though the same key would output the right sequence of keypresses in other modes like TV. I realised it was because I had also programmed the key to learn a command from the Toppy remote. Once I cleared that "learning", the button worked fine to operate the macro in Sat mode.

There are other macro gotchas e.g. you can't program a macro onto the Record key, best read the small print notes for them! My one quibble with the manual: warning notes on stuff like that should be more up front, in my view.

Other features

There's other clever stuff the 7555 can do which I won't bore you with. Like "Key Magic", where even if you don't know how, the One for All customer service team will help get you the codes to program a function from your original remote control to the 7555.

And how was it for me?

I find the URC 7555 One For All Universal 5 in 1 Stealth TV/DVD/SAT/AMP/VCR Remote Control very handy indeed, and very good from a "design for usability" viewpoint. It took me half an hour or less to get to grips with it and make it all learn the keys I needed to control my Toppy the way I like it, but if your AV boxes are more standard and your URC has enough buttons, you may not even need to get it to learn anything at all after you've entered the setup codes for your equipment.

I really can't think of any disadvantages. To get learning and macro features at this price is just excellent value for money, in my view. It's worked for me every time so far, without a hitch. I've not had cause to use the customer support yet but the website appears very well set up and consumer-friendly. There's even a "Find my remote" section in the One for All site's sidebar to help you decide which model of remote to choose, depending on what equipment you want to control ("Find my remote" is a bit of a misnomer I feel, as it's meant for pre-sales help rather than post-purchase support for "my" One for All remote - I think they should rename it "Remote picker", or "Which remote?").

One for All are a market leader in URCs and they offer a huge variety to suit almost every need and pocket, from the relatively cheap one I bought to ultra sophisticated ones like the well known Kameleon range. If I need to upgrade in future I'll probably get another One for All (but certainly not a Philips).

(And it shouldn't need to be said but I have no connection with One for All except as a satisfied customer!)