Here's how to see all your unread emails in at once in Gmail. I cover 2 alternative ways.
The first builds on Gmail's Priority Inbox feature.
How to set up Gmail to show priority emails and unread emails
This assumes you've already turned on the Priority Inbox feature.- In Gmail, go to Settings.
- Click the Priority Inbox tab (1).

- In the Priority Inbox sections bit, item no. 3 probably reads "Empty" (2, above). Click on "Add section" (or the down arrow against that) for item no. 3, select Unread (3), then click Save Changes (bottom left) (4).
- Now it should look like this, with Unread ticked:

- From now on, when you go to your Priority Inbox in Gmail you'll see your email in sections or panels on the right, headed (going down) Important and Unread, Starred, Unread and Everything Else.
- The line with the Unread heading has a "View all" link on the right so you can click that to see all your (in my case very many) Unread emails, all at once:

You can play around with this and display all the contents (up to the fixed max number of items for that pane) of a particular "folder" ie label in one of your panels too, eg the most recent 10 emails for label X. It's the "More options" bit of the Options.
How to see all unread emails in Gmail using Multiple Inboxes
Don't want to use the Priority Inbox? You can still set up a section in your normal Gmail Inbox that shows all unread emails.- In Gmail, go to Settings, and click the Labs tab:

- Now find the bit that say Multiple Inboxes, and click "Enable" so there's a blue dot next to "Enable":

- Then scroll to the bottom of the page and click "Save changes".

- Now go back to Settings, and there'll be a tab for Multiple Inboxes. Click that.

- And you'll see something like this:

The default when you first set up Multiple Inboxes is to show your starred email then draft emails, above your normal Inbox, as in the pic above. But you can change that.
Unlike the Priority Inbox, in the "Maximum page size" section of the Multiple Inboxes settings you can choose exactly how many emails you want to show per pane (with Priority Inbox the choice is limited to one of 5, 25 or 50 only) - eg 12, if you wish. Multiple Inboxes doesn't let you set the number of emails individually so that it's different for each separate pane, but maybe that'll come one day.
"Extra panels positioning", as it says, lets you position your set of extra panels where you wish - above your normal Inbox is the standard, or you can have them below or to the right of the Inbox. The extra panes display in the order 0 to 4, as you'd expect.
What can you do with those panes? "Panel title" lets you give each a heading of your choice eg "Unread email", as you'd expect.
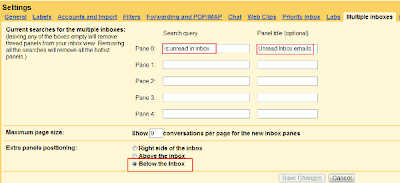
To display all unread email in your Inbox (and only unread incoming email), below your normal Inbox, do this (make the Panel title whatever you wish), then Save changes:

ie, in Pane 0 enter -
is:unread in:inbox
and select "Below the inbox".
(In your Inbox, the "View all" link at the right edge of each pane's title will show you all unread incoming email, as with the Priority Inbox method above.)
To emulate the Priority Inbox but, in my view, make it much more useful, first turn on the Priority Inbox feature, and then do this in the "Search query" boxes of your Multiple Inboxes settings:
In Pane 0 enter -
is:unread in:inbox is:important
In Pane 1 enter -
is:starred -in:inbox
In Pane 2 enter -
is:unread in:inbox
What this does is to put "important" email first (for what's treated "important" and how to influence that, see my post on the Priority Inbox).
Then starred email comes next, which is all starred email except for starred email that you've archived, hence the "-in:inbox". If however you want to see even archived starred email in that panel, just enter plain "is:starred" instead, without the in:inbox stuff.
Finally, the next pane shows all the unread email in your Inbox, without the clutter of all the read email in your Inbox. This is better than the usual Priority Inbox "Everything else" which shows in this pane, which isn't helpful at all, in my view.
Or, you can try this if you want all your starred (unarchived) emails on top, then your unread emails, then your "normal" inbox:
Pane 0 -
is:starred -in:inbox
Pane 1 -
is:unread in:inbox
Extra panels - Above the inbox.
Remember, you can make the panel titles anything you like. And you can experiment with other searches.
If in future you decide you don't want all this, to get rid of it again just go back to the Labs tab, click Disable against Multiple Inboxes and Save changes.


