Pages

Showing posts with label howto. Show all posts

Monday, 16 June 2014

Zotero & Pale Moon - solve Word communication error


If you get "Word could not communicate with Zotero. Please ensure Firefox or Zotero Standalone is running and try again", when trying to use the Pale Moon browser (see Pale Moon review) with Zotero and Word in Windows, here's how to solve the problem.

Don't waste your time trying the usual fixes for that communication error, something more specific is needed for Pale Moon. The following worked for me in Windows 7 Pro and Word 2010.

1. Use the 32-bit version of Pale Moon

The 64-bit version has compatibility issues with Zotero, so even if you have a 64-bit computer, it's best to download install the 32-bit version of Pale Moon.

If you've already installed the 64-bit version of Pale Moon, just uninstall it in the usual way (eg for Windows 7) and then install the 32-bit version.

2. Install the Zotero add-on

Install the Zotero for Firefox add-on in Pale Moon in the usual way.

3. Do NOT try to install the Zotero plugin for Word from within Pale Moon

Where you previously had Firefox and Zotero working with Word integration, you should not try to install the Zotero Word plugin again from within Pale Moon. That will just make even more stuff stop working. Tried that, just made things worse for me, Word integration stopped working altogether even with just Firefox open!

(But if you did that already, you can fix it this way: close Word, close Pale Moon for luck, open Firefox and then reinstall the Word plugin for Firefox direct from the Zotero webpage, open Word, and check that you can add citations normally in Word again.)

4. Edit the Zotero Word plugin

After some searching and tinkering (here's where I got the clue about the Startup folder!), I worked out how to implement the required edits.

Do not try to edit Word's normal.dotm file in the Word templates - you can't edit the Zotero macros from there. Instead:

  1. Open Word
  2. Menu File > Open
  3. In the File Open dialog box, click in the top address bar (or press Alt-d), then type or paste in the following:
    %appdata%\Microsoft\Word\STARTUP

    pmz1
  4. Then hit the Enter or Return key, or click the right arrow button outlined in red in the pic above. The correct sub-folder will open.
  5. Open the Zotero.dot file in that sub-folder. You'll just get a blank Word document.
  6. Now in that Word document, press Alt-F11 (ie hold down the left Alt key and tap the F11 key). A new window will open, with the title "Microsoft Visual Basic for Applications - Zotero". Click on "Project (Zotero) on the left to highlight it:
    pmz-project
  7. Next go to menu Tools, choose Macros, and you'll see this pop up:

    pmz2
  8. Click on "ZoteroInsertCitation" to highlight it, as shown above, then click the Edit button, and a sub-window should open up.
  9. Now find the section that reads:
    ' Try various names for Firefox
        Dim appNames(5)
        appNames(1) = "Zotero"
        appNames(2) = "Firefox"
        appNames(3) = "Browser"
        appNames(4) = "Minefield"
        For i = 1 To 4
    (you can search for 'various names' to get there - menu Edit Find or Ctrl-f)
  10. You need to make two changes
    1. insert the line:
          appNames(5) = "Pale Moon"
      after the appNames(4) line.
    2. change the 4 to read 5 in the "For" line
    so  it now looks like this:
    pmz3
  11. Now go to the menu, File Save Zotero, and close that window, then close Zotero.dot.

5. Further tips on using Zotero with Pale Moon

Don't have both Firefox and Pale Moon open! Just have Pale Moon open to insert citations etc from your Pale Moon Zotero library.

Syncing. You can transfer your Zotero library to Pale Moon by syncing it from Firefox to the Zotero Sync Server, then (using the same username and password) syncing it again in Pale Moon - it may take some time each way. If you don't already have a free Zotero account to enable syncing, it's worth creating an account, if only for the peace of mind with backups!

PDFs. Yes you can view PDFs in Pale Moon and add PDFs to Zotero using Pale Moon. You just need PDF plug-ins for Pale Moon. (Added 17 June)

Credits: this forum and patch. I just added some shortcuts and screenshots!

Pale Moon browser review - best Firefox alternative


palemoonThis post contains a review and tips on using the free, open source Pale Moon browser - the best Firefox alternative that I've found, because it's based on Firefox, so your fave Firefox add-ons / extensions should work in it. There are versions for Windows and Linux (no Mac). I'll mainly cover Windows here.

A real thumbs up to Pale Moon - I've found this excellent browser to be a complete lifesaver, because Mozilla have been increasingly scuppering Firefox to the point where it's now almost unusable for me and lots of other people. It's well worth donating to them.

Moving from Firefox to Pale Moon

You can download Pale Moon here and install it in the usual way by doubleclicking the installation file. There are versions for Windows and Linux, and even a portable version.

Tip: get the 32-bit version. Even if you have a 64-bit computer, I recommend strongly that you do not download the 64-bit version - it's much better to download the 32-bit version first, as it's more compatible, especially with Zotero (see more on getting Zotero to work with Pale Moon). If all works well and you want to experiment with the 64-bit version, go ahead (but you're on you own!). If you're not sure what kind of Windows operating system you have, it's safest to try the 32-bit version.

Installation tip. If you're only testing Pale Moon and don't want to make it your default browser yet, be sure to UNtick "Use Palemoon as my default web browser" when you get to that stage of the installation.

pm-install

You can always make it your default browser later once you're absolutely sure. Unfortunately there's only an option to import from Internet Explorer, not Firefox, inexplicably, so if you don't want it to import your IE settings, choose "Don't import anything".

If when starting up Pale Moon for the first time you get "Pale Moon is not currently set as your default browser. Would you like to make it your default browser", you should UNtick "Always perform this check when starting Pale Moon, then click No. Again you can always make it default later.

pm-default

Also, it allows you to import your settings etc from Internet Explorer (so if you're thinking of using Pale Moon as a Firefox substitute, don't import anything). Unfortunately it doesn't import settings from Firefox - see further below.

pm-import

Migration of your Firefox settings. Pale Moon provides a migration tool to move all your Firefox settings, bookmarks, add-ons etc to Pale Moon. This seems not without issues so I've written a separate post on Pale Moon migration - be warned, read that first before you try to use that tool!

Tips on using Pale Moon

Running Pale Moon and Firefox in parallel. As mentioned earlier, yes, you can use both Firefox and Pale Moon at the same time - I've had no problems with having both open at the same time (except that you shouldn't when using Zotero, see below). Once my period of testing Pale Moon is over, I'll be switching over completely to Pale Moon from Firefox. But I've already made Pale Moon my default browser (if you didn't do that when installing it, you can set it in menu Tools > Options > Advanced > General). Tip: keep Firefox for a while until you're 100% sure, as you can check your add-on settings in Firefox to make the same settings in Pale Moon, if the migration didn't work 100%.

Menu Bar, Navigation Bar. Personally, I like having the Menu toolbar. Rightclick in an empty space to the right of the Tabs and make sure Menu Bar is ticked to get it back. Same for the Navigation Bar if it's not there, etc.

Tabs on top. Just rightclick in the empty space in the tabs bar to tick Tabs on top if you prefer that (ie to move the address bar and other toolbars and bookmarks bar to below the tabs bar).

Add-ons. Every single Firefox add-on I've tried to install (ie all my usual extensions) all work in Pale Moon, yay! In Pale Moon, just go to the Mozilla Firefox add-ons site and search for your add-ons and install them from there. As you can run both Pale Moon and Firefox at the same time, you can switch between them to check your list of Firefox extensions.

Zotero in Pale Moon. If you use the Zotero add-on, please see my separate post on how to make Zotero work in Pale Moon, fix the problem of “Word could not communicate with Zotero. Please ensure Firefox or Zotero Standalone is running and try again”, and transfer your Zotero library across to Pale Moon. Works really well for me.

Bookmarks. To manually copy your bookmarks from Firefox, the easiest is to export your Firefox bookmarks to an HTML file that you save on your computer, then in Pale Moon you just import that file. In Palemoon, click the Pale Moon logo top left, then Bookmarks > Organise Bookmarks (or, if you have a menu bar, you can select the menu Bookmarks > Organise Bookmarks). Then select Import and Backup > Import Bookmarks from Html… Then navigate to and select the HTML file you saved from Firefox.

Tip: faster way to copy bookmarks across? I also found that in Firefox if I opened  Bookmarks > Organise Bookmarks view, on the left highlight All Bookmarks (or just Bookmarks Toolbar if you prefer), clicked in the right pane and copied it with Ctrl-c, then in Pale Moon opened the Organise Bookmarks view and highlight the equivalent on the left (ie All Bookmarks or Bookmarks Toolbar), clicked on the right pane and pasted with Ctrl-v, it also worked to copy the bookmarks or Bookmarks Toolbar across without having to export or import anything! The favicons in the Pale Moon Bookmarks toolbar may be blank, but once you visit a site by clicking its toolbar icon, the usual icon will reappear.

How to speed up Pale Moon. I've found Pale Moon to be pretty speedy (eg faster than Internet Explorer and it seems faster than Firefox), despite some views that it's not as fast as Firefox. For example, Pale Moon already includes most of the optimisations recommended for Firefox in this helpful post. However, I found that I could make Pale Moon run even faster (or feel faster at least!) by:

  1. doing the tweaks from the optimisation post on:
    1. network.http.pipelining.maxrequests
    2. network.http.proxy.pipelining
    3. reduce initial page delay (I used the value 50)
    4. use memory cache (even though I don't have an SSD drive), and
  2. disabling hardware acceleration in Pale Moon (menu Tools > Options > Advanced > General, then UNtick "Use hardware acceleration where available") then click OK.

PDF support. Despite views to the contrary, yes you can view PDFs inline in Pale Moon. There are two ways to do this:

  1. install the PDF Viewer add-on, or
  2. install a PDF reader which has a Firefox plug-in (like the lightning quick free Sumatra PDF reader), and then disable any built-in PDF viewer this way.

Voila! And, bonus: I've found that Zotero (on which more in a separate Pale Moon + Zotero post) will save PDFs in Pale Moon when displayed either way.

Moving Session Manager sessions from Firefox to Pale Moon manually - if you use the wonderful Session Manager, which has saved my bacon on more than one occasion after Firefox crashes in the past, you may have noticed it no longer auto-saves every X minutes automatically in Firefox 29 (see the May/June 2014 reviews for Session Manager).

However, I found that (with both Firefox and Pale Moon closed), even if without using the Pale Moon migration tool, I could copy over my Session Manager sessions from Firefox to Pale Moon, and they open! Here's how:

  1. In Firefox, go to the Tools menu >  Session Manager > Session Manager > Open Session Folder.
  2. Copy everything in the folder that opens up, except the "Deleted Sessions" folder.
  3. Now go to Pale Moon and open up its Session Folder in exactly the same way as above.
  4. Paste what you copied from the Firefox session manager folder. NB - if it says there's already a file with the same name, choose "Copy, but keep both files" if you don't want to overwrite your existing Pale Moon sessions! Make sure you first tick, at the bottom left, the box saying "Do this for the next X conflicts", to avoid having to repeat this for every file with the same name, before you click "Copy, but keep both files".
  5. Now, in Pale Moon, when you go to Tools > Session Manager, you'll see your old Firefox sessions listed, and you can open them - worked like a charm for me, and they open really quickly too!

Where's your Pale Moon profile folder? Easiest way to find it is to open Windows Explorer and type or paste:
%appdata%\Moonchild Productions\Pale Moon\Profiles
in your Windows Explorer address bar, then hit Enter to get to the folder. The profile folder is in there, a folder whose name is a mix of characters then a dot then probably your Windows username. Tip: or you could go to the Start menu and then type or paste the same thing (%appdata etc) in the Search box.

pm-profile

Backing up your Pale Moon settings etc. It's always wise to backup as soon as possible after you've set everything the way you want it, and backup regularly thereafter.

There's a backup tool, though it only backs up your default profile - not a problem for most people, as most people only have the one profile. Password protection seems to be greyed out. Be warned backing up takes some time, about 5 hours.

The indispensable free Mozbackup utility, which I use a lot, is meant to work to backup your Pale Moon profile - but you have to unhide your AppData folder first,  to unhide it see eg this post). However, when I tried it, I got an error message the first time, and the next time, it took about 7 hours to backup, which is odd as it doesn't take so long with Firefox. Be patient, even if it seems to be calculating diskspace for ages, just leave it to do its thing.

Other alternative browser options

Opera - I also use this free browser sometimes, because it's lightning quick, but - but…:

  1. I stick to version 12.16 and stop it from upgrading or updating (step 1 - changed it to "Do not check for updates" - + step 2), because after that version they've dumbed it down and tried to make it look and work like Chrome (just like Mozilla have done with Firefox, ruining it in the process). If I'd wanted a browser that was like Chrome, I'd just use Chrome!
  2. The kicker - I need certain Firefox extensions like NoSquint and Zotero. There's nothing like that for Opera. Which is why it's not my main browser.

Chrome - I try to avoid using Chrome because there's no easy tab switching based on most-recently used tab (MRU), plus there are security risks and privacy issues. The only reason I'd use it is to 'cast' a tab from Chrome via Chromecast to my TV, ie to get a webpage playing video on my computer to display on my TV.

Seamonkey - I tried it, but many of my essential or favourite Firefox extensions don't work in it, so I gave up.

Many thanks to those who recommended trying Pale Moon!

Background - and possible workarounds if you want to stick with Firefox

The nail in the coffin for me was Firefox 29's terrible un-userfriendly interface changes and its constant freezes and crashes, with the inability to recover properly from those because Session Manager stopped working properly in Firefox 29 too! Not to mention Firefox previously breaking add-ons / extensions constantly, forgetting that the main reason many people use Firefox is for the extensions, not Firefox itself.

For those reluctant to switch completely to Pale Moon, here are some other solutions or workarounds for Firefox 29's problems.

Problems with Firefox 29 (& 30)? - possible fixes


Fed up with Firefox 29 or 30? You're not the only one. Here are some solutions, fixes or workaround to try - I hope they help some other people.

1. Get the old user interface back

You can install the Classic Theme Restorer add-on, as covered previously. NB: after that you may need to rightclick in an empty area next to a tab, choose Customise, and then drag your status bar text (if you have Status-4-Evar) back down to the bottom left, and also draft your NoScript and other icons from the top right down to the status bar location, then Exit from the Customise view.

Mozilla have since given more guidance on how to restore the old look.

2. More drastic - restore an older version of Firefox

Eg you could download Firefox 28. If you want to make absolutely sure that you don't lose your existing settings, it's safest not to uninstall the existing Firefox 29 first (contrary to Mozilla's instructions) - instead, install the older version of Firefox over it, which has worked for some people.

There's a quick way to downgrade Firefox, instead of running the downloaded setup file for the older version to reinstall it (which worked for me when I tried it):

  1. open the setup file using the free 7-Zip, and open the folder named "core"
  2. copy its contents (ie all folders etc inside the "core" folder, called "browser", "defaults" etc)
  3. paste the copied folders/files to overwrite the existing folders/files that are inside your Mozilla Firefox program folder - ie open your Firefox program folder, then paste the copied folders/files and overwrite existing files, but NB:
    1. you may want to backup the contents of the Firefox program folder first, ie copy and paste them elsewhere, before you try this, so you can copy/paste them back if anything goes wrong
    2. my Firefox program folder is at C:\Program Files (x86)\Mozilla Firefox, yours may be in different location eg C:\Program Files\Mozilla Firefox - here's how to find your Firefox program installation folder

Important: ideally you should disable your network connection before downgrading Firefox, and turn off automatic updates (ie switch to "Never check for updates") on Firefox immediately after the downgrade when you re-open Firefox. Otherwise, it will just update itself back to a newer version of Firefox as soon as you launch your downgraded version!

Big red warning: downgrade and disable updates only at your own risk, because you'll lose the security updates rolled out in the later versions! Older versions are less secure. The next option, below, may therefore be a better bet.

Tip: if you don't manage to stop Firefox downloading an update at least partly, you can try this:

  1. close Firefox ASAP after you've turned off the automatic updates (disable that quickly!)
  2. delete the downloaded update files (here's where they are located). This worked for me and I was able to re-open Firefox without it trying to update itself.

I tried downgrading to 29 (from 29.0.1), but it still kept crashing or freezing and Session Manager wouldn't work properly again even after that, so I downgraded to 28. So far, that's still working, fingers crossed…

3. Download and use Firefox ESR (extended support release)

The ESR is intended for enterprises (there's even a portable version), but be warned that Mozilla try to discourage it for personal use!

The big advantage of ESR is that it gets all of Mozilla's security updates for Firefox: download ESR here. But it's effectively an older version of Firefox.

Now, I didn't test this to see if ESR keeps the existing Firefox settings, so you should take backup copy again just in case, but the trick above about copying over the contents of the "core" folder should work, if you don't want to do the full install procedure.

4. Give up on Firefox and switch to the Pale Moon browser!

I'm now exploring this option as I've had enough of Mozilla messing up the interface and functionality for people like me who have been loyal users of Firefox for years.

Pale Moon is an open source browser based on the same code as Firefox, which provides a tool for moving your settings etc over from Firefox, and so far all all my Firefox add-ons / extensions work! Please see my separate Pale Moon review and tips for more details. You can use both Pale Moon and Firefox at the same time, generally, so you don't lose anything if you try it.

Background

With version 29, Mozilla changed the user interface of Firefox so as to make it near unusable. Also, I found that version 29.0.1 kept crashing and freezing (and not just because of Flash or Realplayer plugins!). Crash recovery (and indeed automatic periodic session saves) stopped working with Session Manager - which is extra bad when it's always crashing! That's why I had to spend hours getting my main browser to work again. And am now testing Pale Moon, which so far has been excellent.

Friday, 2 May 2014

Firefox 29 for security - but fix 29's terrible interface


Update your Firefox to version 29 to address a lot of security issues. It also seems to be faster and using less memory, at least on my Windows 7 computer.

But, but - v29 has a horrible 'new look' interface which is hard on my ageing eyes, especially with multi-row tabs, and the rounded edges take up more space so I have more rows of tabs than I did, plus they took away the status bar that previous versions removed but which I got back as an add-on bar with Status4Evar.

So thank goodness for the Classic Theme Restorer add-on (via this article)! Install it, that's the best tip you'll get this month.

Steps to make Firefox 29 usable(ish) again:

  1. Update Firefox
  2. Install Classic Theme Restorer (how to install Firefox extensions) and change its settings as you need (see later)
  3. Restart Firefox
  4. Rightclick in the empty area beyond the last tab and choose Customise, then
    1. move icons back down to the status bar as necessary eg NoScript, Status Text (which is the status bar text displayed to show progress when visiting a webpage, the URL when you hover over a link etc)
    2. click on Title Bar at the bottom left if you want your title bar back
    3. click Exit Customise.

(Alternatively, use Firefox ESR so that you can get the security updates without the abysmal new interface.)

There seem to be more tweaking tips but I didn't need them. Installing Classic Theme Restorer gave me back clean sharp edges and my status bar! The Class Theme Restorer options I used (accessible from the Tools menu or the Add-ons page in the usual way - Ctrl shift a is how I usually get to it):

  1. Classic Toolbar Buttons, bottom left
  2. under Tabs I picked 'Squared tabs (classic)' - just tinker with the options… 

I didn't need to do anything else except check and change the width of tabs in TMP, and move icons or boxes back to the status bar at the bottom. Do donate to the developer, who very well deserves it.

Rant time. I still prefer Firefox to Chrome because of the lack of MRU tab switching in Chrome (TabMixPlus is THE best Firefox extension ever ever, I donate regularly). But in recent years Mozilla have been making the Firefox interface more and more unusable, it seems without thinking or caring about accessibility or usability or indeed bothering to listen to users. Prettifying it with rounded edges is not always best, particularly at the expense of accessibility. I like minimal but I like clean sharp edges more, and hiding too many things is a pain as users need information beyond the minimal (so a status bar is indispensable for a start). Someone on Slashdot put it well, it's just UX as 'an excuse for taking control from the user'.

There's also a cognitive and informational cost, beyond the learning curve associated with a changed interface - the new rounded tabs take up more rows as well as horizontal space tan the old interface (ugh smudgy kiddie look), and overlap so that I can't see what pages some tabs represent. (With version 28 I used TMP with short tab widths so I could cram more tabs onto one line but see what they are from the favicons.) It's ridiculous that, to get back workable interfaces, long-term Firefox users have to resort to third party add ons (which may break with new versions, like Status4Evar did before installing Restorer). What *&!@#£ came up with putting 'the icons/buttons you want to see all the time on the top toolbar'? Most of us have stuff we want all the time, AND separately stuff we need to see only occasionally. There's just no space on the top toolbar to put both, and I refuse to scroll horizontally, so I have to have a status bar! (That's why I still use a Quick Launch bar, in Windows 7 and Windows 8 - all my most used programs are there at glance, and the start menu, which takes one more step to access, is for the second-most used set.)

Changing aesthetics for the sake of it is fine, but not when it affects usability and productivity and takes away user choice. And why make users choose between security and usability? I resent having  an abominable unworkable accessibility-unfriendly interface forced upon me just in order to keep my browser secure. If Chrome had MRU switching and all the extensions I need (particularly Zotero and security ones like NoScript), I would seriously consider switching despite the privacy concerns and some security issues.

Mozilla, please get your act together and give users back their control. Though I doubt they'd listen to me when they don't listen to countless other users rather than 'UX designers' who may not use Firefox as much as us real users who need Firefox to do real work.

Sunday, 16 June 2013

Stop Word from reducing all windows!


Too many times, when I want to close the current window in Word, I accidentally hit Alt-F5 (instead of Alt-F4) which means it then 'restores', ie reduces the size of all my open Word documents. Every single one of them. I then have to maximise them one by one, individually going to each window first. This is a big annoyance as there is no single command to 'Maximize all windows' in Word, as far as I can find. What a pain.

My solution or workaround, short of finding a way to maximise all Word document windows together at once in one go, is this fix: simply disable the Alt F5 hotkey! Then it does nothing if you hit that combo inadvertently, instead of reducing all your Word windows to tiny unusable ones.

Here's how to disable that hotkey.

  1. In Word, rightclick an empty spot in the toolbar and choose "Customize the Ribbon".
  2. Towards the bottom against "Keyboard shortcuts", click the "Customize" button (outlined in red below):image
  3. Now on the left under Categories, scroll down to highlight "All commands":image
  4. Then click in "Commands" at the top right, and scroll down to find and highlight "App Restore".
  5. Under "Current keys" (outlined in red above) it should now show "Alt+F5".
  6. Click on the line that says "Alt+F5", then click the button (also outlined in red, above) saying "Remove".
  7. Then click the "Close" button.
  8. Then "OK".
  9. That should be it, you should be rid of this nuisance!

Monday, 30 July 2012

Nexus 7 - how to install Flash to view BBC iPlayer & other sites


Some websites, like BBC iPlayer, won't work on your Google / Asus Nexus 7. This post gives step by step instructions for beginners on how to get Flash on your Nexus 7 so you can watch or listen to BBC iPlayer TV or radio, and play videos or music on other websites that require Flash like Demand Five or 4od (the ITV Player app does work on the Nexus 7 but the iPlayer app isn't compatible yet).

The tips below represent the easiest solution I've found to add or enable Flash quickly on your Nexus 7, without having to "root" your device (as eg this post suggests) or take any other more complicated steps, thanks to this helpful post and others I found. (There's a risk that rooting may void your warranty.) I didn't need to install an older file Flash apk then update it to a newer one as mentioned here, it just worked with one file, the latest one.

You'll also then need to install and use a compatible browser, as the Google Chrome browser that's provided as standard with the Nexus 7 won't play Flash movies or music etc, even after you've installed Flash. I also explain how to install and use some alternative browsers, below. The problem and background are at the very end, I imagine readers will want the howto first!

How to install Flash on the Nexus 7 - the best way!

So here's the best workaround to solve the problem of Flash not working on the Nexus 7. (It's not really troubleshooting or fixing a bug, it's a workaround - for a situation that was deliberately intended by product suppliers.)

The Nexus 7 is set up as standard to let users install apps only via the Google Play Store. If you want to install an app like the Flash Player using an app installation file that you've dwnloaded, it won't let you do that - unless you change a default setting.

So we'll change that setting first, then download the Flash installation file, then install it on the device direct from the file- aka "sideloading". (In Windows, files to install programs / applications usually end with .exe or .msi - in Android, the operating system used by the Nexus 7, they end with .apk).

  1. (Optional, but may make life easier)  On your Nexus s7, tap the Google Play store icon (the shopping bag icon in your Favorites tray):

    playIconSearch (magnifying glass icon) to find and install a file manager app like ES File Explorer File Manager, Astro File Manager or File Manager HD.

    (For beginners - if you view this blog post in the standard Chrome browser on your Nexus 7, tapping the links above will take you straight there, and you can then tap the Install button to install the app.)
  2. Go to the Settings on your Nexus 7 - ie swipe down the notification shade from the top of the screen, and tap the Settings icon, outlined in red blow.

    notificationShadeSettingsIcon
  3. In the PERSONAL section, tap the word "Security":

    settingsSecurityOutlined
  4. In the Security settings screen, under the DEVICE ADMINISTRATION SECTION tick "Unknown Sources" (this is to let you install an app from a file on your Nexus 7 - otherwise, it just won't let you). Tap OK to confirm you really want to change this setting:

    securityUnknownSources
  5. Now tap open a browser on your Nexus 7, it's easiest to use the Chrome browser that's provided as standard:

    chrome
  6. In your Nexus 7 browser, download the Adobe Flash Player app installation file by tapping this link (the link just given is the direct link to the file that's attached to the bottom of this helpful forum post - if tapping the direct installation file link in your browser doesn't work, you could try going to that forum post and then tapping on the com.adobe.flashplayer-2.apk link from there). A message should flash up very briefly on screen about the download.

    Note: here are some other links from which you may be able to download that apk file, though I've not tried them myself.
  7. Now, find the downloaded apk file on your Nexus 7 and tap it to install Flash. There are two ways:
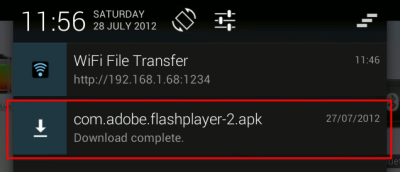
    1. Swipe down from the top of the screen to open your notification shade, then tap on the com.adobe.flashplayer-2.apk  "Download complete" notification, and tap to confirm the installation:
      notificationDownloaded
      OR
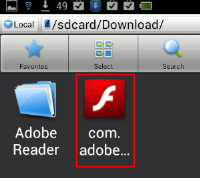
    2. Open the file manager you installed in step 1, browse to the Download folder (a sub-folder of the "sdcard" folder), then tap on the com.adobe.flashplayer-2.apk file and confirm the installation. Here's some screenshots using ES File Explorer:
      downloadFolder
      apkInFolder
  8. Now go back to the Security settings to UNtick the "Unknown sources" setting again, see steps 2 to 2, for security. Whenever you want to install an app from an apk file in future, you can just enable that setting again, install the app, then disable it after installation.)
  9. Note: if tapping the downloaded apk file in step 7 didn't work, try installing an app installer like Fast Installer, then tapping the apk file again. But it should work.

How to play media from Flash sites on the Nexus 7 - use browsers that support Flash!

To actually view Flash sites after you've installed Flash on your Nexus 7, the supplied Chrome browser won't work. That's the way it is, and Google won't be supporting Flash in its Android Chrome browser.

So you have to install a third party browser, and use that in order to view iPlayer or other sites that require Flash.

2 browsers I've tried so far work: Firefox Alpha (Mozilla Aurora) and xScope (free and paid) - hat tip. (Again, those links should take you direct to the installation pages where you can tap to install them.)

But be warned - these are all workarounds, Flash is not officially supported on Android Jelly Bean (the Nexus 7's operating system), so you need to be prepared for random crashes when browsing Flash sites, having to close and restart your browser etc - especially if you try to go to full screen mode (just resizing the page is safest), or leave the page after you've started playing the media, or even just try to pause a video.

Also, different browsers seem to play differently on different sites. So if your favourite Flash site doesn't work well with eg Firefox Beta, try Aurora or XScope etc instead. So far, iPlayer generally works well on Aurora. But different sites eg Demand Five  or 4od may be better in another browser - you just need to try them out (bearing in mind that going full screen may crash the browser, although again iPlayer in Aurora seems relatively OK).

How to use Mozilla Firefox Beta to view Flash sites

Firefox "proper" won't install from the Play Store on the Nexus 7 just yet.

But Firefox Beta, which you can install from the Play Store using that link, does work. Don't worry if you installed Firefox Beta before trying to install Flash Player - all this should still work.

I should note first though that Firefox Alpha, Aurora, seems more stable with Flash, so it may be best to use that for viewing Flash sites - I cover Aurora later, it's very similar.

To use Firefox with Flash sites, first you have to check its Settings to make sure Flash is always enabled, then you need to ensure that iPlayer and other sites won't divert you to the mobile "no Flash" version when you try to browse there.

Here are step by step instructions on how to do that:

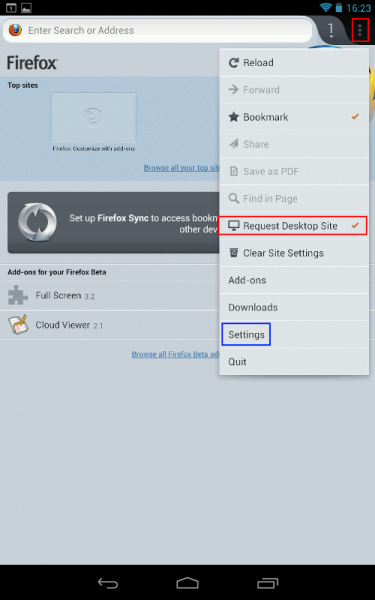
  1. Open Firefox, go to the Menu (3 vertical squares, top right) and choose Settings - outlined in blue below:

    firefoxDesktopTicked
     
  2. In the Settings, under the CONTENT section, tap Plugins:

    firefoxPlugins
     
  3. Then make sure Enabled OR "Tap to play" is selected (ie NOT "Disabled"), and you can use the Back navigation button to return to the browser.

    What's the difference? "Tap to play" is more secure; if you pick "Enabled" and visit a malicious website it could automatically run Flash and install malware on your device. This may be more likely with desktop computers than portable devices and apparently it has never happened with Android, although malware has been disguised as an Android Flash Player. But still, if you want to play it safe, use "Tap to play" - then, you need to positively tap on the video or audio to play it, but you'd only do that on sites you trust, right..? Personally I went for "Enabled", but it's at your own risk and all that.

    firefoxPlugins2
  4. Highly recommended: in Firefox, browse to the Phony extension's webpage by tapping that link I gave, then tap "Add to Firefox" to install that add-on.
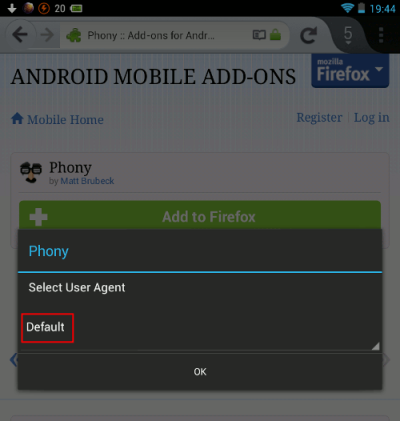
    1. Now, open the Firefox Menu (the 3 vertical squares), and there will be a new Phony item in the list. Tap on the Phony menu item, then under "Select User Agent" tap the word "Default":
      phony1
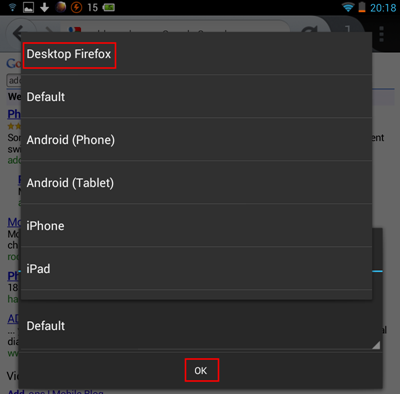
    2. A list will open up - find "Desktop Firefox", tap on that, then tap "OK".
      phony2
    3. Now go back to the Menu and choose Quit at the end to close Firefox. (That's because I found I had to restart Firefox before Phony would work.) Then re-open Firefox, and browse away on Flash sites!
  5. Alternative: if you use Flash sites only occasionally and don't want to install Phony, before visiting the site you must first go to the Menu and make sure "Request Desktop Site" is ticked (outlined in red below). Then in the same tab of the browser (do NOT open a new tab), browse to BBC iPlayer or another Flash site, and Flash movies or audio should then hopefully play.
    The downside of this is that, without Phony, you must remember to tick "Request Desktop Site") every single time in a tab, before you visit a Flash site in that tab, as it won't automatically "save" that preference.
    Also, on Firefox Beta, before installing Phony and setting it to "Desktop Firefox" I couldn't get BBC iPlayer radio shows (listen again) to play at all, although it would play iPlayer television programmes.
    Finally, with BBC iPlayer at least, even after ticking "Request Desktop Site" you may have to keep trying to reload the page or going to it again via a link on a search engine results page, as sometimes it still diverts you to the annoying "not supported" page shown towards the end of this post. This doesn't happen with Phony. Which is why I highly recommend using it!
    firefoxDesktopTicked 
  6. Note: sometimes, on some sites, you will still have to tap on the video or audio in order to kickstart Flash, even if you've selected "Enabled" instead of "Tap to play".
  7. With iPlayer TV: don't use the "popup" icon (the two overlapping rectangles) as that won't work - instead, use the Full screen icon, outlined in red below:

    iPlayericons
  8. Feature request: if only Mozilla would provide a setting for Firefox mobile to permanently request desktop sites so a third party add-on wasn't needed! (and in portrait view moved the Menu button to the navigation bar at the bottom - I keep hitting tabs inadvertently when trying to get to the Menu in portrait orientation!)
  9. Full screen, and avoiding crashes:  updated: be patient and don't tap on the video before it has finished loading and shows the play arrow on the video itself, otherwise it may crash. Also remember, it's best generally to avoid full screen mode. Full screen may work sometimes with iPlayer, but with other UK TV sites like 4od etc, it may crash the browser, and you'll have to close it and restart it again! Workaround - the best fix to get close to full screen, from combining tips and tricks from a couple of forum postings, is this:
    1. on your Nexus 7, download and install the free Full Screen add-on
    2. when you need full screen, activate the add-on through the Firefox menu (you may need to scroll down the menu items list to find "Full screen")
    3. start playing the video, and then double tap on the video to enlarge it almost to full screen
    4. to come out of full screen, press and hold (aka "long press") on the webpage and choose "Exit" out of full screen.

How to use xScope for Flash sites

xScope (free and paid versions) is another browser option which needs fewer steps than Firefox to set up and use.

Once you've installed and opened xScope, you just need to check its Settings to make sure Flash is enabled. Here's how:

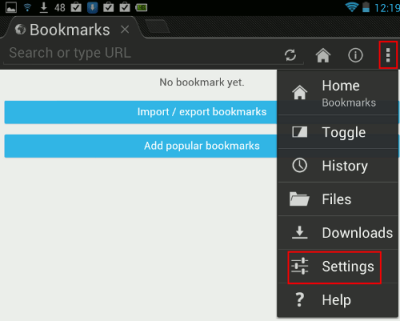
  1. Go to xScope's Settings by tapping the menu icon (3 vertical squares, top right) then tap Settings:
    xscopeMenu
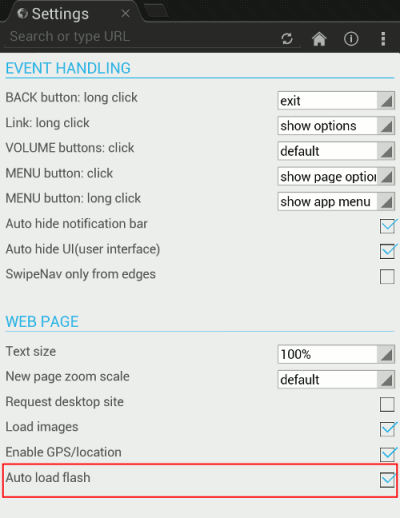
  2. On the xScope Settings page, in the "WEB PAGE" section, I chose to tick "Auto load flash" (but bear in mind the note under the Firefox Beta section above about the risks of auto-loading flash if you visit a malicious website - you have been warned!):
    xscopeFlashSetting
  3. You  can now visit BBC iPlayer and other Flash-using sites via xScope, and Flash should just work. But note that, sometimes, as with Firefox, you do still have to tap on the video or audio in order to kickstart Flash. Or, of course, if you haven't set Flash to auto-load. And remember to avoid full screen mode
  4. One more precaution: it might be best to stop auto-update for xScope, in case a future version of the browser comes out that disables Flash. (This is a real risk - the Dolphin browser for example no longer supports Flash, whereas an earlier version of it does, though on some pages it may crash on switching to full screen). So here's how to disable the auto-update:
    1. Open the Google Play store on your Nexus 7 (shopping bag icon, see step 1), then get to your lists of installed apps by tapping the down arrow icon at the top:

      playApps
    2. Now in the apps list, tap on the name of the app you need to change auto-update for, in this case xScope:

      playXscope
    3. Finally, on the xScope screen in the Play store, UNtick "Allow Automatic Updating". (You can retick it again if you're absolutely sure the developer won't disable Flash support in a future release!):

      xScopeAutoUpdating


What about other browsers, do they support Flash?

You can also use Firefox Alpha (Aurora) - just download its apk file from this page (the one that worked for me was called fennec-16.0a2.en-US.android-arm.apk - version 14 didn't work, for instance). Then install it in the same way as you installed Adobe Flash Player above, making sure you tick the "Unknown sources" security setting first, check the Flash setting, and install and set the Phony add-on as with Firefox Beta (or check "Request Desktop Site" is ticked every time before you visit a Flash site).

Here are screenshots for Firefox Aurora, it's much the same as with Beta, but it's your choice as to "Tap to play" or "Enabled", and don't forget you need to tick Request Desktop Site every single time:

auroraMenu

auroraPlugins1

auroraPlugins2

An earlier version of the Dolphin browser has been mentioned above as working, and I've checked it works with iPlayer radio  - but it crashes if you try to go to full screen with iPlayer video or YouTube, and presumably other sites too. (If you already have Dolphin you should uninstall it first before installing that earlier version - go to the same screen for Dolphin as for automatic updating, above, and tap Uninstall.)

Maxthon was reported to work but for me unfortunately the HD tablet version kept crashing on trying to pause a video, or just trying to access the menu or settings. The mobile (non-HD) version of Maxthon did work, and you can also in Maxthon enable Flash automatically (via its menu - bottom right navigation bar, choose Options, Browser settings, change "Flash on demand" to "Always on") - similar to what I've shown for the browsers above. Otherwise, you'd have to tap on a Flash video or audio in order to play it.

Tip: with Maxthon mobile in landscape view, you can't see the address bar in which to type a URL - you have to swipe down the grey horizontal lines in the curve, kinda like a tab, outlined in red below:maxthonHoriz1Then voila you can see the address bar!:

maxthonHoriz2

Unfortunately I couldn't get Flash to work in either Opera Mini or Opera Mobile.

While Puffin has been said to work, I personally wouldn't use it as (1) they've enabled Flash on the free version only for the London Olympics period, so Flash may stop working in it after that, and (2) BBC iPlayer radio works in Puffin, but if I try iPlayer TV, it won't work as the site then seems to think I'm not in the UK (whereas I am):

puffinNoGo

The Boat browser also reportedly works (in the Settings check under Page content settings, Enable flash/plug-ins first) - but for me it always crashed after starting to play iPlayer video.

Sleipnir wouldn't work for me at all, even with all plug-ins enabled.

If anyone knows of other browsers that reliably support Flash on the Nexus 7, please let me know.

The problem - BBC iPlayer and other Flash sites don't work on Nexus 7 out of the box!

Your shiny new Google / Asus Nexus 7 unfortunately won't play BBC iPlayer video or audio, or indeed media on other websites that use Adobe Flash. You may get screens like these:

"Your phone does not support BBC iPlayer":

iPlayerNo

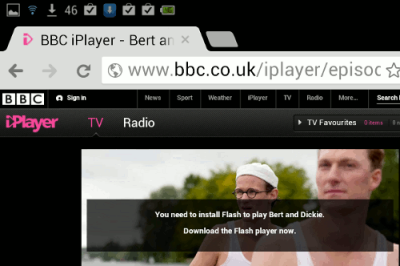
Or you may get, "You need to install Flash":
chromeNeedsFlash

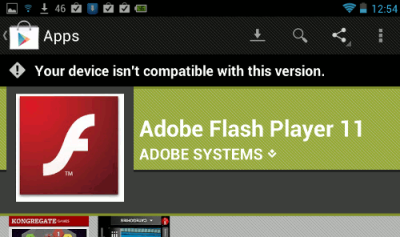
But… if you then try to install Flash Player from the Play Store, you may get… "Your device isn't compatible with this version"!:
playFlashNotCompatible

Background to the Nexus 7 Flash issue

A big disappointment with Google's Nexus 7 Android tablet is this lack of support for Flash, which is used by BBC iPlayer and many other websites for displaying videos or playing music or other audio.

Adobe recently withdrew support for Flash on Android devices and other mobile browsers, although this move was presaged in late 2011. If you try to install Adobe's Flash Player browser plugin from the Google Play Store to your Nexus 7, it won't let you.

While that's really down to Adobe, not Google, it's still a pity that Google didn't provide at least some support for Flash in its Chrome browser in the Nexus 7, given that the tablet is being heavily publicised as a media player - that omission is in my view a Google Gaffe. Indeed, a friend told me that being able to watch or listen to BBC iPlayer TV or radio ("listen again") in bed was a major reason why he'd ordered a Nexus 7, and I suspect the same goes for many other Nexus 7 buyers.

Adobe envisaged that the ultimate solution to this issue would be for websites to eventually move to providing their media using the open HTML5 standard, instead of using Flash.

Unfortunately, that's going to take some time - there are real problems today because many, if not most, websites on which people generally want to view videos or audio don't use HTML 5, but still rely on Flash. So users have been left in the lurch, until sites update their content to migrate to using HTML 5.

Thursday, 26 July 2012

Google Nexus 7 - how to use with Bluetooth keyboard (iGo Stowaway Ultra Slim Think Outside)


The Google / Asus Nexus 7 tablet is far more than just an Amazon Kindle Fire competitor. It works well with a Bluetooth keyboard too, making it an ideal computing device for working on the move if you're a business user who finds a laptop or even iPad too heavy to be truly portable (eg if you have a bad back). See the end of this post for the weight comparisons.

How to pair the Nexus 7 with a Bluetooth keyboard

First here's a video demo of using Bluetooth keyboard with Google Drive on Nexus 7; instructions on pairing are below:

Below are step by step instructions on how to pair the Nexus 7 with a Bluetooth keyboard  - in my case, an ancient iGo Stowaway Ultra Slim Think Outside keyboard, sadly now discontinued - originally bought for use with the Nokia N95 smartphone, it's that old!

  1. Make the keyboard discoverable - with the Stowaway, you hold down at the same time the Ctrl, left Fn (blue) and right Fn (green) keys. A green light will flash slowly above the T button to confirm it's working.
  2. On the Nexus 7 go into the Settings (swipe down from the top and tap the Settings icon):

    settingsIcon
  3. In the Settings screen, in the "Wireless and Networks" section, slide the Bluetooth switch from "OFF" to "ON".

    settings
  4. You'll see a blue On button against "Bluetooth", as well as the Bluetooth icon showing at the top right of the screen. Now, tap on the word "Bluetooth" (in the list on the left under "Wireless and Networks"), and you'll get the following screen. Tap "Search for Devices" at the top right.

    searchForDevices
  5. Under "Available devices", your keyboard's name should appear. Tap its name.
  6. The Nexus 7 should pop up a message with a 4-digit numeric code to enter on your keyboard.
  7. On your keyboard, enter the 4-digit code given, and hit the Enter key.
  8. They should now be paired, and you should be able to use the keyboard with Nexus 7 apps. Type away!

    keyboardBluetooth
  9. Tip: get a Bluetooth widget like the free Bluetooth OnOff so you can turn Bluetooth on and off quickly from your Home screen with one tap. (Obviously turning it off will save power when you're not using Bluetooth).

Why buy a Nexus 7 for portable working?

Just compare these weights:

  1. Nexus 7 (just 340 g) + iGo Stowaway Ultra Slim full-sized folding Bluetooth keyboard (160 g)
    = only 500 g.
  2. iPad 2 = 590 g - ie heavier than the above two items combined. Unfortunately the new iPad is even heavier, at 652 g.
  3. Microsoft's planned Surface tablet with built-in keyboard = 676 g for the lighter version (from the specifications).

So, it's the Nexus 7 for me, until someone produces a modern clamshell Psion 5mx with wi-fi and colour screen - my #1 wishlist item, it's still the best portable computer of all time, only 354 g including full touch-typable keyboard and batteries, and decent sized screen with zoom!

I strongly feel there's still a massive gap in the market for light, small form factor, full computers (my biggest gadget beef).

Weight, the first thing I check in specs, rarely gets mentioned in reviews, but it's an issue for some women, youngsters, and people with back problems who just can't physically carry around laptops, notebooks or even netbooks.

So it's heartening that it's not just me - the techie likes of certain Slashdot readers also consider size/weight first when buying a portable computer.

Friday, 20 July 2012

Chrome tabs - how to export session using Session Buddy extension


In my view it's not at all obvious how you export sessions (ie sets of tabs) from Google's Chrome browser that you've previously saved using the excellent Session Buddy add-on.

How to export a session from Session Buddy? It's the rather unobtrusive down arrow on the right, underneath the cog icon - I've outlined it in red below. Apparently it's known as the "Action" button, but it certainly isn't labelled as such!

chromeSessionBuddy

So, first click on the session you want to export (on the left), then click that arrow I've outlined above, and you'll see Export at the bottom of the menu.

Click Export. Then you can choose whether to export URLs only or titles too, and whether to group by window (if you had more than one window saved to that session), as well as whether to export to CSV or a text file (or just copy the chosen content to your clipboard, then paste it elsewhere).

sessionBuddy2

Took me too long to figure out that it was the little arrow, so I hope this saves someone else some frustration!