Pages

Showing posts with label fix. Show all posts

Monday, 8 September 2014

New window has both Pale Moon button and menu - solution


On opening a new window in Pale Moon, you may find a "double layer" taking up extra screen space unnecessarily, with the blue Pale Moon button top left (with text not icon) - even if you've chosen to view the menu bar and the original window displays properly. Here's what my new windows look like:

pm-nw1Something odd's going on because it should display the button or the menu bar, not both! Possibly a bug, only started happening recently for me.

Here's my workaround or fix. To get rid of the top "bar", just hide the menu bar by UNticking it - menu View > Toolbars > Menu Bar, so that there's no tick against "Menu Bar":

pm-nw2

Then, show it again by using the arrow against the Pale Moon blue button - choose Options, Menu bar:

pm-nw3

Now the new window should be normal again:

pm-nw4But be warned, it's more of a workaround than permanent solution because it doesn't solve the problem going forward, and you may have to go through this process all over again for every new window you open in Pale Moon!

Tuesday, 19 August 2014

Zotero & Pale Moon - "An error has occurred…"


This post is on how to solve the problem when you get this message in Zotero using Pale Moon:

"An error has occurred. Please restart Pale Moon.
You can report this error by selecting "Report
Errors..." from the Actions (gear) menu."

zotero-palemoon-error

This forces you to restart Pale Moon, and unfortunately the error will keep recurring randomly as you keep using Pale Moon, which can be very annoying and time-wasting. It must be to do with Zotero's integration with Pale Moon.

Further issues (if you don't restart Pale Moon immediately) - clicking on folders on the left won't display their items list. However, you can save items to the currently-selected Zotero folder - you just can't see the items list or view existing items, and you can't view your webpages tabs properly as the Zotero pane is in the way, blocking your view!

Also, if you get this error message, and you try to use your keyboard shortcut (usually Ctrl-shift-z) or the X icon to the right of the Zotero toolbar to close the Zotero pane, or you open a new Pale Moon window and try to start Zotero there, you'll just get yet another error message:

"There was an error starting Zotero".

zotero-palemoon-error2

zotero-palemoon-error3

Workaround to keep working in Pale Moon (if not Zotero)

First, here's a temporary workaround, just to let you see and save your current webpages or tabs to Zotero.

Hover the mouse over the top of the Zotero pane so it becomes a double headed arrow:

zotero-palemoon-drag

Then click and drag it down to hide the Zotero pane, so that only the Zotero toolbar is showing:

zotero-toolbar

Obviously this gets most of Zotero out of the way of your webpages and tabs, so you can keep saving your then-open webpages to the currently selected folder.

If you need to change folders just drag Zotero back up, click on the name of the correct folder on the left and save the next webpage item, etc.

What's the longer-term solution?

Full solution to "An error has occurred. Please restart Pale Moon…"

The permanent fix I found after some troubleshooting is to disable automatic syncing in the Zotero settings.

  1. In the Zotero toolbar, click the Zotero Settings icon (the cog), then Preferences:

    zotero-preferences
  2. Click the Sync tab, then click by "Sync automatically" to UNtick it, and click OK:

    palemoon-zotero-sync
  3. Finally, restart Pale Moon.

Since then, I've had no recurrence of the error message. I tested this solution by re-enabling automatic sync in Zotero and, sure enough, the problem came back.

The only downside is that in some ways this is just a workaround because you then have to remember to sync Zotero manually - click the Sync icon  at the right of the Zotero toolbar:

zotero-sync

I now tend to do that every day just before I go and have lunch or dinner!

Monday, 16 June 2014

Zotero & Pale Moon - solve Word communication error


If you get "Word could not communicate with Zotero. Please ensure Firefox or Zotero Standalone is running and try again", when trying to use the Pale Moon browser (see Pale Moon review) with Zotero and Word in Windows, here's how to solve the problem.

Don't waste your time trying the usual fixes for that communication error, something more specific is needed for Pale Moon. The following worked for me in Windows 7 Pro and Word 2010.

1. Use the 32-bit version of Pale Moon

The 64-bit version has compatibility issues with Zotero, so even if you have a 64-bit computer, it's best to download install the 32-bit version of Pale Moon.

If you've already installed the 64-bit version of Pale Moon, just uninstall it in the usual way (eg for Windows 7) and then install the 32-bit version.

2. Install the Zotero add-on

Install the Zotero for Firefox add-on in Pale Moon in the usual way.

3. Do NOT try to install the Zotero plugin for Word from within Pale Moon

Where you previously had Firefox and Zotero working with Word integration, you should not try to install the Zotero Word plugin again from within Pale Moon. That will just make even more stuff stop working. Tried that, just made things worse for me, Word integration stopped working altogether even with just Firefox open!

(But if you did that already, you can fix it this way: close Word, close Pale Moon for luck, open Firefox and then reinstall the Word plugin for Firefox direct from the Zotero webpage, open Word, and check that you can add citations normally in Word again.)

4. Edit the Zotero Word plugin

After some searching and tinkering (here's where I got the clue about the Startup folder!), I worked out how to implement the required edits.

Do not try to edit Word's normal.dotm file in the Word templates - you can't edit the Zotero macros from there. Instead:

  1. Open Word
  2. Menu File > Open
  3. In the File Open dialog box, click in the top address bar (or press Alt-d), then type or paste in the following:
    %appdata%\Microsoft\Word\STARTUP

    pmz1
  4. Then hit the Enter or Return key, or click the right arrow button outlined in red in the pic above. The correct sub-folder will open.
  5. Open the Zotero.dot file in that sub-folder. You'll just get a blank Word document.
  6. Now in that Word document, press Alt-F11 (ie hold down the left Alt key and tap the F11 key). A new window will open, with the title "Microsoft Visual Basic for Applications - Zotero". Click on "Project (Zotero) on the left to highlight it:
    pmz-project
  7. Next go to menu Tools, choose Macros, and you'll see this pop up:

    pmz2
  8. Click on "ZoteroInsertCitation" to highlight it, as shown above, then click the Edit button, and a sub-window should open up.
  9. Now find the section that reads:
    ' Try various names for Firefox
        Dim appNames(5)
        appNames(1) = "Zotero"
        appNames(2) = "Firefox"
        appNames(3) = "Browser"
        appNames(4) = "Minefield"
        For i = 1 To 4
    (you can search for 'various names' to get there - menu Edit Find or Ctrl-f)
  10. You need to make two changes
    1. insert the line:
          appNames(5) = "Pale Moon"
      after the appNames(4) line.
    2. change the 4 to read 5 in the "For" line
    so  it now looks like this:
    pmz3
  11. Now go to the menu, File Save Zotero, and close that window, then close Zotero.dot.

5. Further tips on using Zotero with Pale Moon

Don't have both Firefox and Pale Moon open! Just have Pale Moon open to insert citations etc from your Pale Moon Zotero library.

Syncing. You can transfer your Zotero library to Pale Moon by syncing it from Firefox to the Zotero Sync Server, then (using the same username and password) syncing it again in Pale Moon - it may take some time each way. If you don't already have a free Zotero account to enable syncing, it's worth creating an account, if only for the peace of mind with backups!

PDFs. Yes you can view PDFs in Pale Moon and add PDFs to Zotero using Pale Moon. You just need PDF plug-ins for Pale Moon. (Added 17 June)

Credits: this forum and patch. I just added some shortcuts and screenshots!

Fix Pale Moon migration tool problem


There's a migration tool to move all your Firefox settings, bookmarks, add-ons etc to the Pale Moon browser (see Pale Moon review and tips). This post is on how to sort out one problem you may get with the too.

Before you start

Before you consider using the migration tool, you need to note a couple of things (and see the limitations listed on the migration tool page):

  1. It may be best to set up everything clean, from scratch, in Pale Moon - download your fave extensions, tweak their settings as you like them, etc. This would avoid carrying over any possible problems with corrupt or odd settings etc from Firefox. It's more time-consuming to do, but I think it's well worth it (as do others), and this is what I did personally.
  2. If you have multiple Firefox profiles, the tool only moves the default profile - if you don't know what multiple profiles are, you're probably not using them! (I only have multiple profiles myself because problems with previous Firefox profiles caused me to create new ones and I haven't deleted the old profiles yet just in case).

Using the migration tool

If you've opened Pale Moon at least once before trying the migration tool, you should do this first before launching the tool (you'll see why later):

  1. Go to your existing Pale Moon profile folder (how to find your Pale Moon profile)
  2. Make a note of the full name of the profile folder, eg 12a34b78.username. Better still, copy/paste the name somewhere.

Make sure you close both Firefox and Pale Moon before running the tool, and say Yes to overwrite the current minimal profile data, if you're trying this tool this right after installation.

pm-overwrite

How to fix the Pale Moon migration problem - possible solution

This suggestion seemed to involve a lot of steps so I tried something else, and it worked! Below is solution I came up with (which hopefully will help some people, but if it doesn't you could try the more drastic one - at your own risk!).

If you've had problems with the migration tool, where it looks like no settings have transferred over from Firefox (see next section):

  1. Make sure you've closed Pale Moon and it's not running.
  2. Go to your Pale Moon profiles folder (here's how).
  3. If you see not one, but two, sub-folders inside the profiles folder (each named with a mix of characters and numbers), you're in luck!

    pm-profiles
  4. One of those profile folders will be the same as the original profile folder whose name you noted in the previous section (before you ran the migration tool). The other profile folder will be completely new.
  5. Note down the full filename of the new profile folder (you'd have noted the name of the other profile folder earlier, but if not, note it now, so that you know which name is for the original folder and which is for the new one).
  6. Now, rename the original profile folder - anything different, eg old.blah.
  7. Next, rename the new profile folder so that its name is exactly the same as that of the original folder (whose name you noted at the start before you ran the migration tool).
  8. (If you've already run the migration tool without noting down the name of the original profile folder, don't despair - look at the modified dates of the two folders. The older one is likely to be the original folder. Also, look inside the profile folder, at the "extension" sub-folder. The profile folder that contains your Firefox extensions, that you tried to migrate over, will be the new profile folder.)
  9. When you start Pale Moon again, the settings etc should have transferred over this time.
  10. If you made a mistake and renamed the wrong folders, and Pale Moon won't work or still doesn't show the transferred settings, just close it, get the filenames from your notes and try the above again the other way round!

Further action. When you start Pale Moon after all that:

  1. it may say that the Classic Theme Restorer isn't compatible etc. That's fine, you don't need it with Pale Moon
  2. the Status Bar may not be visible - you may have to rightclick the empty space to the right of the tabs and:
    1. tick the Status Bar (and also Menu, etc as you wish) to display it, then
    2. rightclick the same place again, choose Customize, then drag the Status text, Progress etc, and other icons down to the status bar as you wish.

Explanation? What seems to have happened in this particular case (though there might well be other problems with the migration tool) is that, although I'd asked for the old basic profile to be overwritten, the tool had failed to do that, but had created a brand new profile instead, in a separate profile folder, containing all the transferred settings. However, Pale Moon wouldn't recognise the new profile folder (even using Profile Manager, it claimed there was only one profile there - the original one that should have been overwritten). By renaming the original folder to something else, and giving the new profile folder the same name as the original profile folder, Pale Moon was made to recognise the new profile. Sorted!

(To save you trying this: what didn't work was deleting the original profile folder. Pale Moon wouldn't start at all when I tried that. Hence the rename trick.)

Background - problems with the migration tool

In case you got similar error messages, here are the background details.

I tested the tool on a friend's Windows Vista PC who had only one Firefox profile. It started out fine, it seemed to find the right folders so I clicked "Copy profile":

pm-migration5[3]

It seemed to progress OK, eg saying that Status-4-Evar wasn't needed in Pale Moon (which it isn't):

pm-migration6

But the migration tool didn't seem to work! A message kept popping up, where I had to keep clicking "Continue" multiple times:
Script Control
The script you are executing is taking longer than expected to run. Click End to abort the script or Continue to continue script execution.

pm-migrate3

And then I got a message:
Copyfolder - Error Number: 76
Error Source: Microsoft VBScript runtime error
Desc: Path not found

pm-migrate5

It listed the paths just to the Firefox and Pale Moon folders in AppData (but not the specific profile sub-folders).

And inexplicably it ended with "Status: Completed", suggesting the transfer had worked, and that you could just click "Exit":

pm-migration7

However, when I reopened Pale Moon it seemed that nothing had been migrated! No extra add-ons were visible, no bookmarks were moved, etc.

The rename trick explained in the previous section solved the problem.

Problems with Firefox 29 (& 30)? - possible fixes


Fed up with Firefox 29 or 30? You're not the only one. Here are some solutions, fixes or workaround to try - I hope they help some other people.

1. Get the old user interface back

You can install the Classic Theme Restorer add-on, as covered previously. NB: after that you may need to rightclick in an empty area next to a tab, choose Customise, and then drag your status bar text (if you have Status-4-Evar) back down to the bottom left, and also draft your NoScript and other icons from the top right down to the status bar location, then Exit from the Customise view.

Mozilla have since given more guidance on how to restore the old look.

2. More drastic - restore an older version of Firefox

Eg you could download Firefox 28. If you want to make absolutely sure that you don't lose your existing settings, it's safest not to uninstall the existing Firefox 29 first (contrary to Mozilla's instructions) - instead, install the older version of Firefox over it, which has worked for some people.

There's a quick way to downgrade Firefox, instead of running the downloaded setup file for the older version to reinstall it (which worked for me when I tried it):

  1. open the setup file using the free 7-Zip, and open the folder named "core"
  2. copy its contents (ie all folders etc inside the "core" folder, called "browser", "defaults" etc)
  3. paste the copied folders/files to overwrite the existing folders/files that are inside your Mozilla Firefox program folder - ie open your Firefox program folder, then paste the copied folders/files and overwrite existing files, but NB:
    1. you may want to backup the contents of the Firefox program folder first, ie copy and paste them elsewhere, before you try this, so you can copy/paste them back if anything goes wrong
    2. my Firefox program folder is at C:\Program Files (x86)\Mozilla Firefox, yours may be in different location eg C:\Program Files\Mozilla Firefox - here's how to find your Firefox program installation folder

Important: ideally you should disable your network connection before downgrading Firefox, and turn off automatic updates (ie switch to "Never check for updates") on Firefox immediately after the downgrade when you re-open Firefox. Otherwise, it will just update itself back to a newer version of Firefox as soon as you launch your downgraded version!

Big red warning: downgrade and disable updates only at your own risk, because you'll lose the security updates rolled out in the later versions! Older versions are less secure. The next option, below, may therefore be a better bet.

Tip: if you don't manage to stop Firefox downloading an update at least partly, you can try this:

  1. close Firefox ASAP after you've turned off the automatic updates (disable that quickly!)
  2. delete the downloaded update files (here's where they are located). This worked for me and I was able to re-open Firefox without it trying to update itself.

I tried downgrading to 29 (from 29.0.1), but it still kept crashing or freezing and Session Manager wouldn't work properly again even after that, so I downgraded to 28. So far, that's still working, fingers crossed…

3. Download and use Firefox ESR (extended support release)

The ESR is intended for enterprises (there's even a portable version), but be warned that Mozilla try to discourage it for personal use!

The big advantage of ESR is that it gets all of Mozilla's security updates for Firefox: download ESR here. But it's effectively an older version of Firefox.

Now, I didn't test this to see if ESR keeps the existing Firefox settings, so you should take backup copy again just in case, but the trick above about copying over the contents of the "core" folder should work, if you don't want to do the full install procedure.

4. Give up on Firefox and switch to the Pale Moon browser!

I'm now exploring this option as I've had enough of Mozilla messing up the interface and functionality for people like me who have been loyal users of Firefox for years.

Pale Moon is an open source browser based on the same code as Firefox, which provides a tool for moving your settings etc over from Firefox, and so far all all my Firefox add-ons / extensions work! Please see my separate Pale Moon review and tips for more details. You can use both Pale Moon and Firefox at the same time, generally, so you don't lose anything if you try it.

Background

With version 29, Mozilla changed the user interface of Firefox so as to make it near unusable. Also, I found that version 29.0.1 kept crashing and freezing (and not just because of Flash or Realplayer plugins!). Crash recovery (and indeed automatic periodic session saves) stopped working with Session Manager - which is extra bad when it's always crashing! That's why I had to spend hours getting my main browser to work again. And am now testing Pale Moon, which so far has been excellent.

Monday, 3 February 2014

Open Word or Excel document read-only - add context menu item


If you'd like to right-click on a Word or Excel document in Windows Explorer to open it as read-only, supposedly you should be able to hold down the Shift key, rightclick on the filename, and there should be an option to "Open as Read-Only".

image

However, choosing this Shift-rightclick option doesn't actually open the document as read-only. This seems to be a known bug in Office 2003 and Office 2007, and also in Office 2010 and Excel 2010.

There's one workaround and one fix.

Open in protected view

The workaround is that, if you Shift-rightclick on a Word or Excel .xls file in Windows Explorer, there's also an option to "Open in Protected View".

Choose that, and it works pretty much as read-only: you can't change anything, you can't save, but you can copy/paste from that document. This works for Excel as well as Word.

Rightclick context menu item

What solves the problem completely in Word, which I used myself, is to edit things to add a new rightclick Open Read-only context menu option that actually works to open Word documents as read-only. I based this solution on a combo of this post (which wasn't actually on opening read only) and this page (about opening read-only, but for XP only, not later versions of Windows).

Here's how to add a right-click context menu item to open Word files as read only, properly - works for me using Windows 7 and Word 2010:

First, download FileTypesMan (free, but donate if you can, the man certainly deserves it!) - you have to scroll quite a way down for the "Download FileTypesMan" link (I used "Download FileTypesMan for x64" as my computer is Windows 7 Pro 64-bit).

Next, unzip/extract the files (rightclick on the zip fiule downloaded and Extract all to create a new unzipped folder) and open the new folder, then run FileTypesMan.exe.

On the left, scroll down till you find and highlight .docx (or use menu Edit > Find and and type docx to find it, make sure you then highlight that line):

image

Now in the menu choose Actions > New Action (or press Ctrl-n).

In the box that pops up, fill it in like this (and see diagram just above the list):

image

  • Action name - I used  "Open read-only" without the quotes, you could just use "Read only" etc as you prefer
  • Menu Caption - I used "Open read-only" again
  • Command-Line - you can click Browse to find your Winword.exe under Program Files or Program Files (x86) (you will have to drill down to find Microsoft Office, Office14 or Office11 etc depending on your version), or Select from Running Programs if Word is already running, which is the easiest. You could alternatively enter the full path to Winword.exe, with quotes around it, as shown below, but it's easiest to Select from Running Programs (you can launch Word just before you click Select and it should work, just scroll down to find it in the "Select Process" list, possibly to the end):image

After you've used Browse or Select, it will fill in the Command-Line box for you with something like this:
"C:\Program Files (x86)\Microsoft Office\Office14\WINWORD.EXE" "%1"

Now, you have to edit what's in the Command-Line box, by inserting after the "%1" the following (which you can copy/paste from the next line) - just after the 1 but before the close double quotes, and make sure there's a space between the 1 and the first /:
/h /n /dde

In my case, the Command-Line box ended up reading like this:
"C:\Program Files (x86)\Microsoft Office\Office14\WINWORD.EXE" "%1 /h /n /dde"

Next, in the DDE section in the Message box, you should enter  the following, which again you can copy/paste:
[AppShow][REM _DDE_ReadWriteOnSave][FileOpen .Name="%1",.Revert=0,.ReadOnly=1]

(In the Application box you can enter Word if you like, but it will still work even if you don't.)

Finally, click OK. This adds a new Action to the bottom half of the FileTypesMan window, which you can doubleclick to edit in future.

Now, when you rightclick (no need to hold down the Shift key) a docx document in Windows Explorer, you will have a working "Open read-only" menu option (or whatever title you gave it in the "Menu caption" box above).

Furthermore, in FileTypesMan you can select (in the lefthand column) the type .doc for old-style Word documents, and rinse and repeat the steps above, if you wish.

Excel protected view - rightclick only

For Excel spreadsheets, unfortunately the above fix doesn't work, so you have to open them in protected view.

But to make life easier for yourself, you can use FileTypesMan to change things so that you don't have to Shift-rightclick to get the "Open in Protected View" menu option. Here's how to get that option to display just on a simple rightclick:

In FileTypesMan, find and highlight.xls on the left (scroll or search, as with docx above).

image

Now in the bottom half of the window, find and doubleclick "ViewProtected" (outlined in red above).

In the box that pops up, UNtick "Extended", and OK:

image

Now a simple rightclick, as opposed to Shift-rightclick, will call up the "Open in Protected View" option.

Sunday, 16 June 2013

Stop Word from reducing all windows!


Too many times, when I want to close the current window in Word, I accidentally hit Alt-F5 (instead of Alt-F4) which means it then 'restores', ie reduces the size of all my open Word documents. Every single one of them. I then have to maximise them one by one, individually going to each window first. This is a big annoyance as there is no single command to 'Maximize all windows' in Word, as far as I can find. What a pain.

My solution or workaround, short of finding a way to maximise all Word document windows together at once in one go, is this fix: simply disable the Alt F5 hotkey! Then it does nothing if you hit that combo inadvertently, instead of reducing all your Word windows to tiny unusable ones.

Here's how to disable that hotkey.

  1. In Word, rightclick an empty spot in the toolbar and choose "Customize the Ribbon".
  2. Towards the bottom against "Keyboard shortcuts", click the "Customize" button (outlined in red below):image
  3. Now on the left under Categories, scroll down to highlight "All commands":image
  4. Then click in "Commands" at the top right, and scroll down to find and highlight "App Restore".
  5. Under "Current keys" (outlined in red above) it should now show "Alt+F5".
  6. Click on the line that says "Alt+F5", then click the button (also outlined in red, above) saying "Remove".
  7. Then click the "Close" button.
  8. Then "OK".
  9. That should be it, you should be rid of this nuisance!

Monday, 24 September 2012

Canon MF4100 series - scanner problem? Solved!


If your Canon multi-function scanner has suddenly stopped working and won't scan, and you're troubleshooting error messages like "Unable to open TWAIN source", "Cannot open TWAIN source", "Source initialization failed" on trying to scan, here's an easy solution to the problem that's worth trying.

I've not tried it on other i-Sensys MF4100 imageClass series devices, like MF4120 or MF4140, but it worked like a charm on my MF4150. In my case the scanner function on my Canon i-Sensys MF4150 LaserBase laser multifunction printer, copier, scanner and fax suddenly started playing up and it wouldn't scan anything, whatever application I tried to use, even though the printer and copier worked fine.

The MF Toolbox app appeared but, although previously it would automatically scan to PDF, nothing happened after that, no matter what buttons I clicked. Similarly with other scanning apps I tried, like Abbyy Finereader - I just got error messages.

I thought I'd have to reinstall the drivers, but on searching I found a great solution from Jeff Widmer which worked instantly - no rebooting, no unplugging etc! I'm posting it here, with slightly quicker steps.

So here's the step by step on how to get the scanner on your Canon MF4100 series multi-function device working again, for Windows 7 but you could try it for Vista and see (for techies: you just need to add a TWAIN folder's path to PATH):

  1. Open Windows Explorer or Computer, and navigate to
    C:\Windows\twain_32.
  2. Inside the twain_32 there should be another folder, open that folder too (in my case it's named "MF4100", yours may have a different name eg MF4120).
  3. Now hold down the Alt key and tap d. This changes and highlights what's in the Windows Explorer address bar.

    image
  4. Just press Ctrl-c (hold down Ctrl, tap c) to copy that highlighted address line to your clipboard (or if you prefer the mouse, rightclick on that address and copy it in the usual way).
  5. Now go to your System Properties:
    1. The fastest way is to click the Windows Start icon bottom left, type in the search box (without the quotes) "sysdm.cpl" and hit Enter or click the Search icon.
    2. The slower way is to rightclick the Computer icon on your desktop, choose Properties, then on the left click Advanced System Settings.
  6. Make sure you're in the Advanced tab by clicking on "Advanced" at the top if necessary.
  7. At the bottom of the Advanced tab, click the "Environment Variables" button.

    image
  8. In the box that pops up, in the top half (under "User variables"), check under the first column, Variable, and find the variable named "PATH".

    image
  9. Either doubleclick on the PATH line, or single click on it then click Edit. You should get something like this:

    image
  10. You'll see the "Variable value" box usually has a long line of text already in there, highlighted. Be careful NOT to delete anything in that line (click Cancel and try again, if you delete anything by accident). Instead, go to the very end of that line (you can click into the box, then use the arrow keys to go right to the end, or just hit the right arrow key once without clicking anything and you'll be there).
  11. Now at the end of that box, type in a semicolon ie ;
    Then paste in (Ctrl v) what you copied in step 4 above. No need to add any spaces anywhere, just the semicolon and the copied stuff. Here's what mine looked like after that:

    image
  12. Then OK everything. In my case, my scanner immediately started working again, even without a reboot!

If that didn't work, you may need to try reinstalling the drivers. In the case of my MF4150 you have to install the drivers while the device is NOT plugged in to the computer via USB (or dire things may happen and the whole device may not work), but in other cases you can just plug it in, so you have been warned! For the MF4150 you'd unplug the USB cable from the printer/scanner, uninstall the device in Device Manager, reinstall the drivers from the CD (trying to download the latest ones from Canon's site first) and then plug in the USB cable again. Here are Microsoft's instructions on installing/uninstalling drivers for scanners.

I also found a very long thread on (different) fixes for the Canon MP Navigator, which you could try if you've no luck with any of the above - but with Jeff Widmer's fix I didn't need to!

Thursday, 20 September 2012

Firefox loads blank pages in tabs on startup? Solution


This post is on how to make Firefox load and display all webpages in all tabs automatically when you first open Firefox. Lately it just loads pages in a few tabs (3 max), but pages in all other tabs are blank with no content visible, and the status bar (visible if you use the indispensable Status4Evar add-on) shows "Stopped" at the bottom left.

image

Other tabs won't display anything but blank until you actually click on the tab for the page. It's very tedious to have to click for each page individually. I save webpages in tabs because I want to use them, and I can't use them if they're invisible!

The quick answer: try Firefox options, then Tab Mix Plus Options, then Session Manager options (if you use either of those extensions), and if all else fails, install the Load Tabs Progressively add-on and change its options, which is what finally worked for me.

Scroll down for full explanations and screenshots.

Background

Many people only want saved startup tabs in Firefox to load when you click on tab, so that Firefox starts up faster. But, like this blogger and others, I want the opposite.

I have a reasonably fast computer with decent amounts of memory. As I use zillions of tabs, it's too time-consuming to have to click on one tab, wait, click on the next tab, etc. I always set my Windows computer to start all my main applications and documents automatically, so I can switch on my computer, go have breakfast or at least coffee, and when I get back to my computer it's all up and ready for me. I want browsers to do this too: I want all tabs to load and display on launching Firefox while I go do something else, and I agree that not allowing this is plain bad usability (though taking away individual users' choice of which option they want is worse).

I wasted too much time trying to troubleshoot and fiddling round with about:config till I found this page explaining that this annoyance is in fact a 'feature' which was introduced in recent versions of Firefox (13 onwards I think).

The current default setting is a pain when you have lots of tabs and have to click each one separately. The point of setting Firefox to launch with a set of tabs is because you want to use them all.

As a workaround, I'd been using 'Reload all tabs' to make all the webpages visible (rightclick on a tab heading for the menu that allows that, if you have TabMixPlus).

General setting

The suggested solution, to force all pages in all tabs load and display when Firefox opens, was to UNtick the 'Don't load tabs until selected' box and OK.

In my version of Firefox (Firefox 15) it's in the Tabs tab of Options (menu Tools, then Options, then Tabs), in others it might be in the General tab.

image

Like so:

image

However, that didn't work for me even after restarting Firefox. There are other options which may need to be set, so try those too.

If you use TabMixPlus

The same link suggested that if you use Tab Mix Plus (TMP) (also an essential extension, in my view), you need to go to TMP Options > Session > Restore and check the "Reload all tabs" checkbox.

If you use Session Manager

As I use Session Manager (which manages loads of sessions with finer control than TMP's session manager), I had no such option, so I went to Session Manager options.

Under General > Saving & Restoring, I UNticked "Restore tabs on demand" (and OK or Apply), to try to get tabs to load automatically without having to "demand" each one individually.

image

If all else fails

Unfortunately, none of the above worked for me - UNticking "Don't load tabs until selected" and the like did not change anything. Only 3 tabs ever loaded automatically when I started Firefox.

Therefore, I had to install an extra extension - Load Tabs Progressively. This works, but I'd recommend some tweaks.

Once you've installed it and restarted Firefox, go to Tools > Add-ons and find Load Tabs Progressively. Click its Options. Change "Maximum number of concurrent loading tabs" to 0 and "Maximum number of loaded tabs" to -1. Then OK.

image

Otherwise, it will load only up to a maximum number of tabs, and only a certain number at a time. If like me you have tons of tabs and just want them all to load while you do something else, you'd want it to load however many tabs you have, ideally all in one go (in my case!).

This excellent extension, as the name suggests, opens each of your saved session tabs progressively, one by one, and the settings I've recommended will get it to open all your saved session tabs no matter how many, and whether using TabMixPlus or SessionManager.

Saturday, 9 June 2012

Internet Explorer 9 - how to open History, Favorites, Feeds on the left


When opening your History (Ctrl-h) in Internet Explorer 9, it opens the pane (or should I say "Explorer bar") on the right hand side. That's the way they made it - and it's a big annoyance.

To open the History bar on the left, you have to use another keyboard shortcut instead - Ctrl-Shift-h (ie hold down both the Ctrl and Shift keys, tap h, release them all).

And it's Ctrl-Shift-i to open Favorites on the left, Ctrl-Shift-g for the Feeds.

If you used the old hotkeys and it opens on the right, you can click the green arrow (top left of the pane) or use the Ctrl-Shift-h combo to move it over to the left. But if you close the Explorer bar, Ctrl-h will open it on the right, all over again. So it's best just to learn the "new" shortcut keys.

Prime example of if it ain't broke why fix it…?!!

Friday, 27 April 2012

Word footnotes - how to update cross-references to footnotes


In Microsoft Word, if you insert cross-references to footnote numbers and later add or delete any footnotes, the footnote numbering as shown in the cross-references can be wrong.

You can click the cross-reference and be taken to the right footnote, but the footnote numbers that display and print will be the 'old' ones.

Here's a tip on how to fix that problem - it took me ages to find the solution.

You need to:

  1. click inside the footnotes area first
  2. press Ctrl a (hold down the Ctrl key then tap the "a" key then release both)
  3. tap the F9 key, and
  4. OK it all.

This was in Word 2010, but I believe it's the same for Word 2007 etc too.

Tuesday, 15 December 2009

Vista: Skype Error #6102 or "Problem with recording device"


If you get Skype's Error #6102 problem, and Skype's FAQ doesn't solve it, here's a troubleshooting tip if you have Windows Vista: you could try restarting Windows Audio (how to restart Windows Audio).

And then after you've done that, make sure you check that your Skype audio settings (menu Tools -> Options -> Audio Settings) show the correct device for both microphone and speakers, e.g. your headset, and if not change it back and Save.

That trick worked for me.

Tuesday, 2 June 2009

Vista: how to record sound from your computer (Audacity, Freecorder etc)


Can't record from your computer because your sound device isn't showing in the dropdown list of recording devices in Windows Vista?

If you've had problems trying to record audio (music, speech / voice, streaming audio etc) that’s playing back on your computer speakers when you're using software like the open source free audio editing / recording tool Audacity or the free dedicated sound recorder Freecorder, it’s not necessarily to do with your soundcard drivers or anything complicated – it could just be a “feature” of Vista where Microsoft seem to have decided to hide away most of your sound devices.

If you can’t record sound from your computer because you can’t see anything relevant in the dropdown list for Recording Devices in Audacity (or Freecorder, etc), and nothing that you try from the list of device options will work, here’s a tip on how to get the list to display properly. I finally found it on the Audacity wiki after many troubleshooting attempts and much time wasted.

  1. Bring up the list of recording devices on your Vista PC. The easiest way is to rightclick the Volume (speaker) icon in your taskbar, bottom right hand side of the screen, then select Recording Devices:


  2. In the Recording Devices tab, rightclick anywhere inside the window and select "Show Disabled Devices". The menu might look a bit longer than what's shown below if you right click on the name of something in the list instead of clicking an empty space below the list, but it doesn't matter, both will have this option. (While you're at it, if you want to you can also select "Show Disconnected Devices" so you have the full picture. Not shown below to avoid clutter.)

  3. You should now see your soundcard properly in the list of recording devices. It's called "Stereo Mix" (or maybe "Mono Mix"), just to confuse us all:


  4. Now, all you have to do is to choose "Stereo Mix" as your recording device in your recording software. There's a howto for both Audacity and Freecorder below.

Audacity - how to select recording device

Go to the menu Edit, choose Preferences and you'll get something like this - in the Recording section on the right under Device, just select your Stereo Mix (or Mono Mix) and OK it.

If that didn't work, try in turn all the devices that magically appeared in Recording Devices when you chose to Show Disabled Devices, and hopefully one of them should do it.


For those new to Audacity, just start it recording by clicking the Record button (with the big red dot), then switch windows and start playing the audio you want to record, and click the Stop button in Audacity to stop recording. You can tidy up the recording by deleting the gap at the start afterwards, but editing is beyond the scope of this post.

Freecorder - how to select recording device

Click the Settings button.
In the Sound & Audio Configuration section on the right, click the Sound Card drop down list and choose Stereo Mix and OK. You get the drift...

Other issues?

If the above solution didn't work for you, there may be other problems such as needing to update your sound card drivers, fiddling around connecting your sockets etc (and see my post about how to troubleshoot and fix general problems with sound on Vista).

This post is just about what might be the quickest general fix for this particular annoyance, but obviously there may be other issues in individual cases. Good luck!

Thursday, 30 April 2009

“Failed to play test tone”, no sound on Vista – troubleshooting


Has your Windows Vista computer suddenly gone silent - no sound comes out of your speakers, “Failed to play test tone” appears when you try to test your speakers? (e.g. after upgrading to Vista). Well, you’re not alone.

If you’ve suddenly lost sound / audio support on your Vista PC, this post contains a step by step pictorial guide for non-techies on some troubleshooting tips to try.

Different issues could give rise to this annoyance, e.g. a new program that was installed. So this post will help you only if your problem was caused by certain specific issues – but I hope the troubleshooting ideas suggested below will help you figure out why your system’s sound has stopped working and, more importantly, help find the solution to fix it!

A. How to restart Windows Audio after “Failed to play test tone”

This is the solution which finally worked for me to restore audio output on my computer, in case this tip helps someone else. I also found that the fix wasn’t just temporary for me – it’s survived several restarts / reboots since.

How to try this fix: go to the start menu and in the “Start Search” box type in the following (then hit Enter): services.msc

sound0

In the Services window that opens up, scroll down till you find “Windows Audio”. Leftclick once on it to highlight it, then rightclick on it and choose Restart:

sound01

Then close the Services window and check to see if your sound is now working again.

B. Still no sound coming out? - other troubleshooting things to try

Some preliminary things to check if no sound is coming out of your computer speakers (yes, some of them are obvious, but often it’s the obvious things that can catch people out, including me!).

1. Volume control – muted?

Did someone mute your speaker volume?

To check this, leftclick the speaker icon in your system tray (bottom right hand of the screen) and check to see if your Speakers have Mute on (red line through it, see below).vol

If so, just click that icon and then the Mute icon (outlined in red below) to turn mute off! And obviously you should also check the volume slider to see that the volume level is high enough.unmute

2. How to get to the Sound window

Most things to check are in the Sound window.

How to open the Sound window? There are several ways to get this up.

Absolute quickest way: click the Start menu (bottom left Windows icon), in the Start Search box type the following then hit Enter: mmsys.cpl

Alternative way to get to the Sound window: Go to the Start menu, type in the Start Search box: sound
Then doubleclick the “Sound” item (with the speaker icon against it).

soundicon

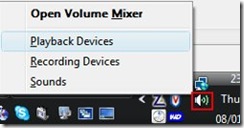
Visual mouse way: rightclick on the volume / speaker icon in your system tray, bottom right (outlined in red below) and pick Playback Devices to bring up the Sound window:
sound1

3. Are your speakers the selected sound output device?

Maybe the sound somehow got set to come out of your headphones instead of your speakers.

To check this, in the Sound window go to the Playback tab.

In the Playback tab, is there a tick (white on green circle) against your speakers? If not, click to select Speakers and then click Set Default and OK.

image

4. Try to play the test tone; changing default format

To try playing the test tone, in the Sound window’s Playback tab highlight Speakers by leftclicking once on it, then click Properties:

sound3

In the Properties window, go to the Advanced tab and then click on the Test button outlined in red below, to see if you can hear the test tone (if you don’t hear it try my solution at A above!):
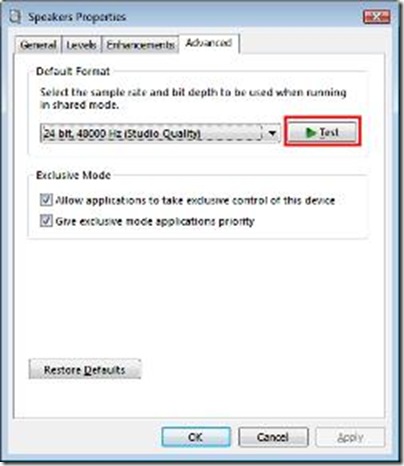
sound4Some people got the “no more sound” problem after changing the Default format in the dropdown list to the left of the Test button in the pic above.

If you did that, try checking that dropdown list. Are there duplicate entries? If so, try the Microsoft hotfix. Or just try changing the format back to what it was, and that may be enough to fix it (possibly after a reboot).

5. Sound effects?

Another fix which seems to have worked for some people (it didn’t for me) is to do with sound effects.

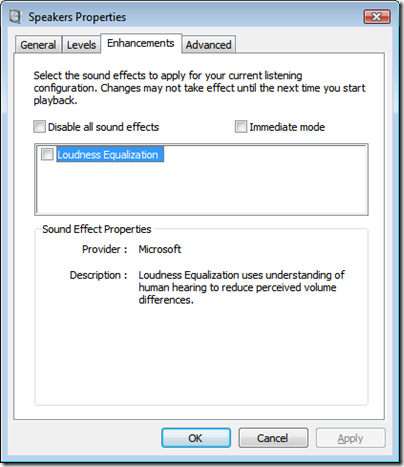
While you’re in the Speaker prosperties (see 4 above as to how to get there), go to the Enhancements tab.

Clicking to check (i.e. put a tick in) the “Disable all sound effects” box (and then clicking OK) seems to have sorted out the problem for some people:
image

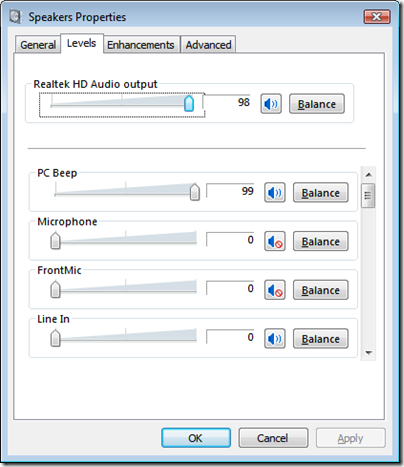
Sound levels. Should be the same as B.1, but while in Speaker Properties you could also go to the Levels tab and double check that the sliders are at the right levels to be heard, i.e. it’s not just that the sound output for your speakers is too quiet or has been set to 0. If so, just move the slider to a better position (like 98) and OK it:
image

6. Try the Windows sounds too

Back in the Sound window, you should also check to see if the system sounds are audible even if e.g. MP3s or streaming audio from webpages etc can’t be heard.

If so, that’s a clue that maybe it’s a particular program like Windows Media Player that’s up the spout, rather than Windows generally, and you’ll have to find a solution for that particular program.

To check this, go to the Sounds tab and click on one of the items that has a speaker icon against it (e.g. Asterisk) then click the Test button

image

7. Try several other applications and devices

Is sound missing only in one application (e.g. Windows Media Player), or everything? Try several programs e.g. if you can’t hear an MP3, trying playing it using different applications.

If it’s only inaudible in one program, that suggests it’s a problem with that one bit of software and you may need to reinstall it or try other fixes specific to that program.

For instance, egg on face time here but after a YouTube change a few months ago I lost all sound. Then found that it was only because the YouTube volume level slider (see below) had somehow defaulted to zero on my system! When I moved the slider up, that fixed it.

youtube

Also, try selecting other audio devices (e.g. headset), see 3 above, and if there’s sound from those but not your speakers, then that points to an issue with your speakers, whether hardware (they’re bust!) or software (drivers etc). To check the hardware issue, obviously you can try connecting the speakers e.g. to the headphones or line out of your MP3 player / iPod, and see if any sound comes out of the speakers then.

8. Update your sound card drivers

Worse comes to comes, try updating your sound card drivers (how is beyond the scope of this blog post as it depends on your sound card).

Most people seem to suggest this as the first thing to try, but for me it would be the last as the others are easier to do and less drastic, and may well work.

9. Desperation time?

While searching for a solution to my own issue I found some suggestions that deleting a particular registry entry and then rebooting might work (HKEY_LOCAL_MACHINE\SOFTWARE\Microsoft\Ole\DefaultAccessPermission). But I’ve not tried it so if you’re desperate enough to have a go, it’s entirely at your own risk and you should make sure you backup your registry first just in case it makes things worse!