Pages

Sunday, 4 September 2011

How to batch crop JPEG photos, scans, images


Here's how to crop a bunch of JPEGs with the free JPEGCrops (Windows), which I used where I needed to chop half an inch (of printer-ink-wasting-black) off the top edge of one set of scanned music score pages, and half an inch off the bottom edge of another set (where I'd turned the book upside down to scan those pages). I couldn't find a proper howto, so here's my step by step.

Cropping multiple files in a batch saves having to open, crop and save each JPEG individually. You just set the edges of the first image (where you want it to be cropped to), and the rest of the photos or pics can automatically be set to the same dimensions.

If all the unwanted bits are on the same part of every image, eg always the left margin or always the bottom margin, you can use the excellent free PDFill PDFTools. My problem was that for some images I needed to crop one edge, and for others another edge, so I couldn't do that - hence JPEGCrops.

I couldn't get JPEGCrops to work fully at first, so here's my step by step tutorial, including all the basic stuff most people skate over:

  1. Download, install and open JPEGCrops. It's a bit blank looking, but that'll change.


  2. See the folder name in the bottom right? That's the folder into which the software will automatically save the cropped images, in my case "C:\Users\myloginname\Cropped". You can change the location of that folder via the menu File > Select Output Dir to choose another folder, but obviously you need to do that before you crop the images in question.

  3. Go to menu File > Preferences and choose your Default Aspect and OK. In my case, as I'm in the UK, it's A4 - your mileage may vary. Feel free to experiment and change it for each set of images and see how it looks.


    (The Preferences box is weird on my system, many buttons aren't visible, probably something to do with my system.)

  4. Now in JPEGCrops open up the pics that you need to crop. There are 2 possible ways -
    1. use the menu File > Open Images (or click the "Open Images" button at the bottom left), then navigate to the folder containing your JPEGs, then select the files you want; you can select several files by holding down the Ctrl key as you click on the ones you want, and click Open, or
    2. in Windows Explorer or Computer, navigate to the right folder, select the images you want (again Ctrl and clicking, or the Spacebar key for hotkey fans, does the trick), and drag the selected images into the JPEGCrops window.

  5. Your selected images should now all be in JPEGCrops. Look at the first pic. You'll see parts of it are greyed out, and parts of it are more clearly visible with a white background. The cropping will get rid of the greyed out bits.


  6. Depending on your situation, you may want to UNtick the "Flip aspect" button, as I did, to get a proper Portrait view:
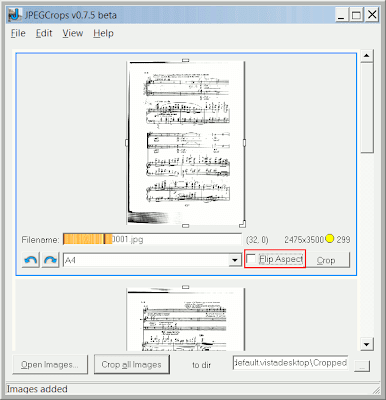

  7. There are white horizontal and vertical bars around the clearly visible bit. You'd drag these with your mouse to outline the area of the JPEG that you want to keep. But don't do that just yet!

  8. This is the step I missed: first, go to the Edit menu, make sure "Synchronize Crops" is ticked (it isn't in the pic below), by selecting it if necessary.


    This is to make sure that the crops etc you make to one image will automatically be done to all the others you opened in JPEGCrops. Otherwise you have to tediously do them one by one, which kinda defeats the purpose of using "batch" image editing software!

  9. Now that sync is on, you can drag the white bars to outline the part of the image that you want to keep. There are right and left curly arrows at the bottom left which you can use if you also want to rotate all images at once.


  10. Once you've done the edits, it's a good idea to scroll down through all the images in JPEGCrops to check that the correct parts are outlined in all the images. This is to avoid cutting important bits off the occasional image, especially if you haven't scanned them all in exactly the same way and sometimes had the book (or whatever) a few millimetres off.

    You may find you have to tweak some of the edges one way or the other, so that you have the sections you need outlined in all the pages. Worse comes to worse, you could untick the synchronisation, then tweak it just for a particular problem image or two.

  11. When all set, click the "Crop all images" button (NOT the "Crop" button):


  12. It automatically crops them and saves the cropped images in a new folder, the folder mentioned in step 2. (You can open that folder quickly by clicking in the box, selecting the folder path info and copying it into clipboard, then pasting it into your Windows Explorer address bar.)

  13. In my case, I then repeated this with a different set of JPGs where I needed to crop a different edge off. Then I stitched the cropped images together into a single PDF file for ease of printing, rather than having to print each cropped image one by one - PDFill Tools works great for that too (it's the "Convert Images to PDF" button, then drag and drop the image files, and reorder images in the list if necessary).

Sunday, 14 August 2011

LinkedIn privacy - change your settings with fewer clicks


If you're a member of business networking site LinkedIn and don't want your name or profile photo used for "social advertising" to endorse products or services on LinkedIn, you have to opt out. Here's a "howto".

How to opt out of social advertising on LinkedIn

The quickest way to opt out is:

  1. click this link
  2. login to LinkedIn with your username/password (if you aren't already logged in)
  3. in the "Manage Social Advertising" box that pops up, UNtick the box against "LinkedIn may use my name, photo in social advertising"

  4. click "Save".

Below are some further privacy-preserving steps you can take on LinkedIn.

How to protect your privacy on LinkedIn - shortcuts to other options

Other steps you may wish to take, while you're signed in to LinkedIn, are as follows:

  1. data sharing with third party applications - click this link to opt out; UNtick the box, then click "Save changes":

  2. "enhanced advertising" - click this link to opt out, again UNtick the box, save changes
  3. who can see your profile pic - click this link to control the options
  4. what info is shown on your public profile - click this link to control display of info from your profile in search engine results
  5. how your name is displayed - click this link to change this; under "Basic Information", "Name", there's a "Display Name" option - select the last one to hide your surname (just the initial is shown), remembering to save the changes:

  6. can others find out that you've viewed their profile? - click this link to control this; the first option allows people (if they've also enabled this) to see that you have checked them out! Some might want to show just their organisation, or prefer to be "totally anonymous":

  7. email preferences - click this link to check and change eg who can send you LinkedIn invites
  8. correcting or deleting info about you - click this link to contact LinkedIn

I've just linked to some of the key settings which may be relevant to those concerned about their privacy, because while the direct links are given in LinkedIn's privacy policy they're difficult to track down amongst the thickets of LinkedIn's long and winding privacy policy.

There are more options that you may want to check out, eg invitations to participate in research - see below on LinkedIn settings.

LinkedIn settings - the longwinded way

It's via your Settings page that you can opt out of social advertising on LinkedIn, and also other settings which may intrude on your privacy,

To access Settings, the quickest way is to click this link, then login if necessary.

Alternatively:

  1. Login to LinkedIn.
  2. At the top right, hover over your name or the down arrow by it, and click "Settings":

  3. Enter your password again if required.

The different types of Settings are listed at the bottom left, grouped into 4 sections:

  • Profile;
  • Email Preferences;
  • Groups, Companies and Applications; and
  • Account.

The "social advertising" opt-out is accessible by clicking the Account link, then "Manage Social Advertising" -


You might want to look at the other links too.

For example under the "Profile" section is "Select what others see when you've viewed their profile".

And the "Groups, Companies & Applications" section is where you can turn off data sharing with apps (although the link I gave above is the quickest way to get there).


Similarly, controlling the display of your name is under the Profile section (Edit your name etc):

More info

LinkedIn's changed privacy policy, which was announced in June 2011, says that (I added the bold):

"In order to deliver relevant and valuable ads to you and your network, LinkedIn may use your name and profile photo in connection with social advertising based on content shared on LinkedIn. This advertising may include the fact that you have recommended or endorsed a product or service on LinkedIn, followed a company, joined Groups or conversations, established or added content to your profile, etc., and will only be displayed to your LinkedIn network."

After criticism of its social advertising changes by security firm Sophos and others, LinkedIn said that they now won't initially show photos against ads, and will just show the number of people in your network who like that product etc.

Here's LinkedIn's "before outcry" and "after outcry" mockups, from their blog post:

However one important issue is still not very clear, as one commenter pointed out. When you click on the "X people in your network" link, what happens? Does it at that stage then show the names or photo of the exact people concerned? Who knows, so some people may well want to opt out anyway, just in case.

Friday, 12 August 2011

Freedom of information requests by Twitter!


You can tweet a freedom of information request to public authorities, the Information Commissioner has said. Even referring to the authority's name in an @mention may be effective.

However, for a FOIA request to be valid, you have to:

  1. give your real name, or at least link to it (eg in your Twitter profile) - a pseudonym isn't considered good enough, and
  2. provide an "address for correspondence".

The Information Commissioner asked, but didn't directly answer, the question: does "address for correspondence" include Twitter names?

I'd argue that in the internet age it does, because people can reach you and correspond with you via your Twitter name. (Or indeed via email addresses.)

Furthermore, the Information Commissioner has said, "The authority could ask the requester for an email address in order to provide a full response. Alternatively, it could publish the requested information, or a refusal notice, on its website and tweet a link to that".

All this is good news for transparency, freedom of information and open government generally, and may perhaps be a lesson to those public authorities who are only willing to provide a postal address or a long online web form for accepting freedom of information requests. If they won't provide an email address for FOI requests, then tweet requests to them, some may say…!

If all public authorities were to make available on their websites an easy to find email address for accepting freedom of information requests from the public, it would be so much better for everyone concerned.

All this may perhaps be less good news for staff at public authorities who may now have to monitor tweets. Or maybe they'll just decide to terminate their Twitter accounts…

Note - this is only for England/Wales/Northern Ireland. Scotland has its own Scottish Information Commissioner, who may (or may not) share the Information Commissioner's view.

Via Computers & Law.